4.2. Sink node
4.2.1. Description
Icon: 
Number of inputs: 1.
Number of outputs: 0.
- Definition
Sink nodes let you send rows to a storage system.
- Configuration
You must specify the data sink
 . If necessary, you can create a new data sink (remote file repository, database,, etc.)
  .
.Specific settings are suggested for some types of sink (files in particular)
 .
.Il est possible d’utiliser un noeud cible déjà dans un flow, pour en créer un autre dans un autre flow
 .
.
Note
When a data sink is altered, the changes are applied automatically as soon as the sink configuration has been validated.
- Example
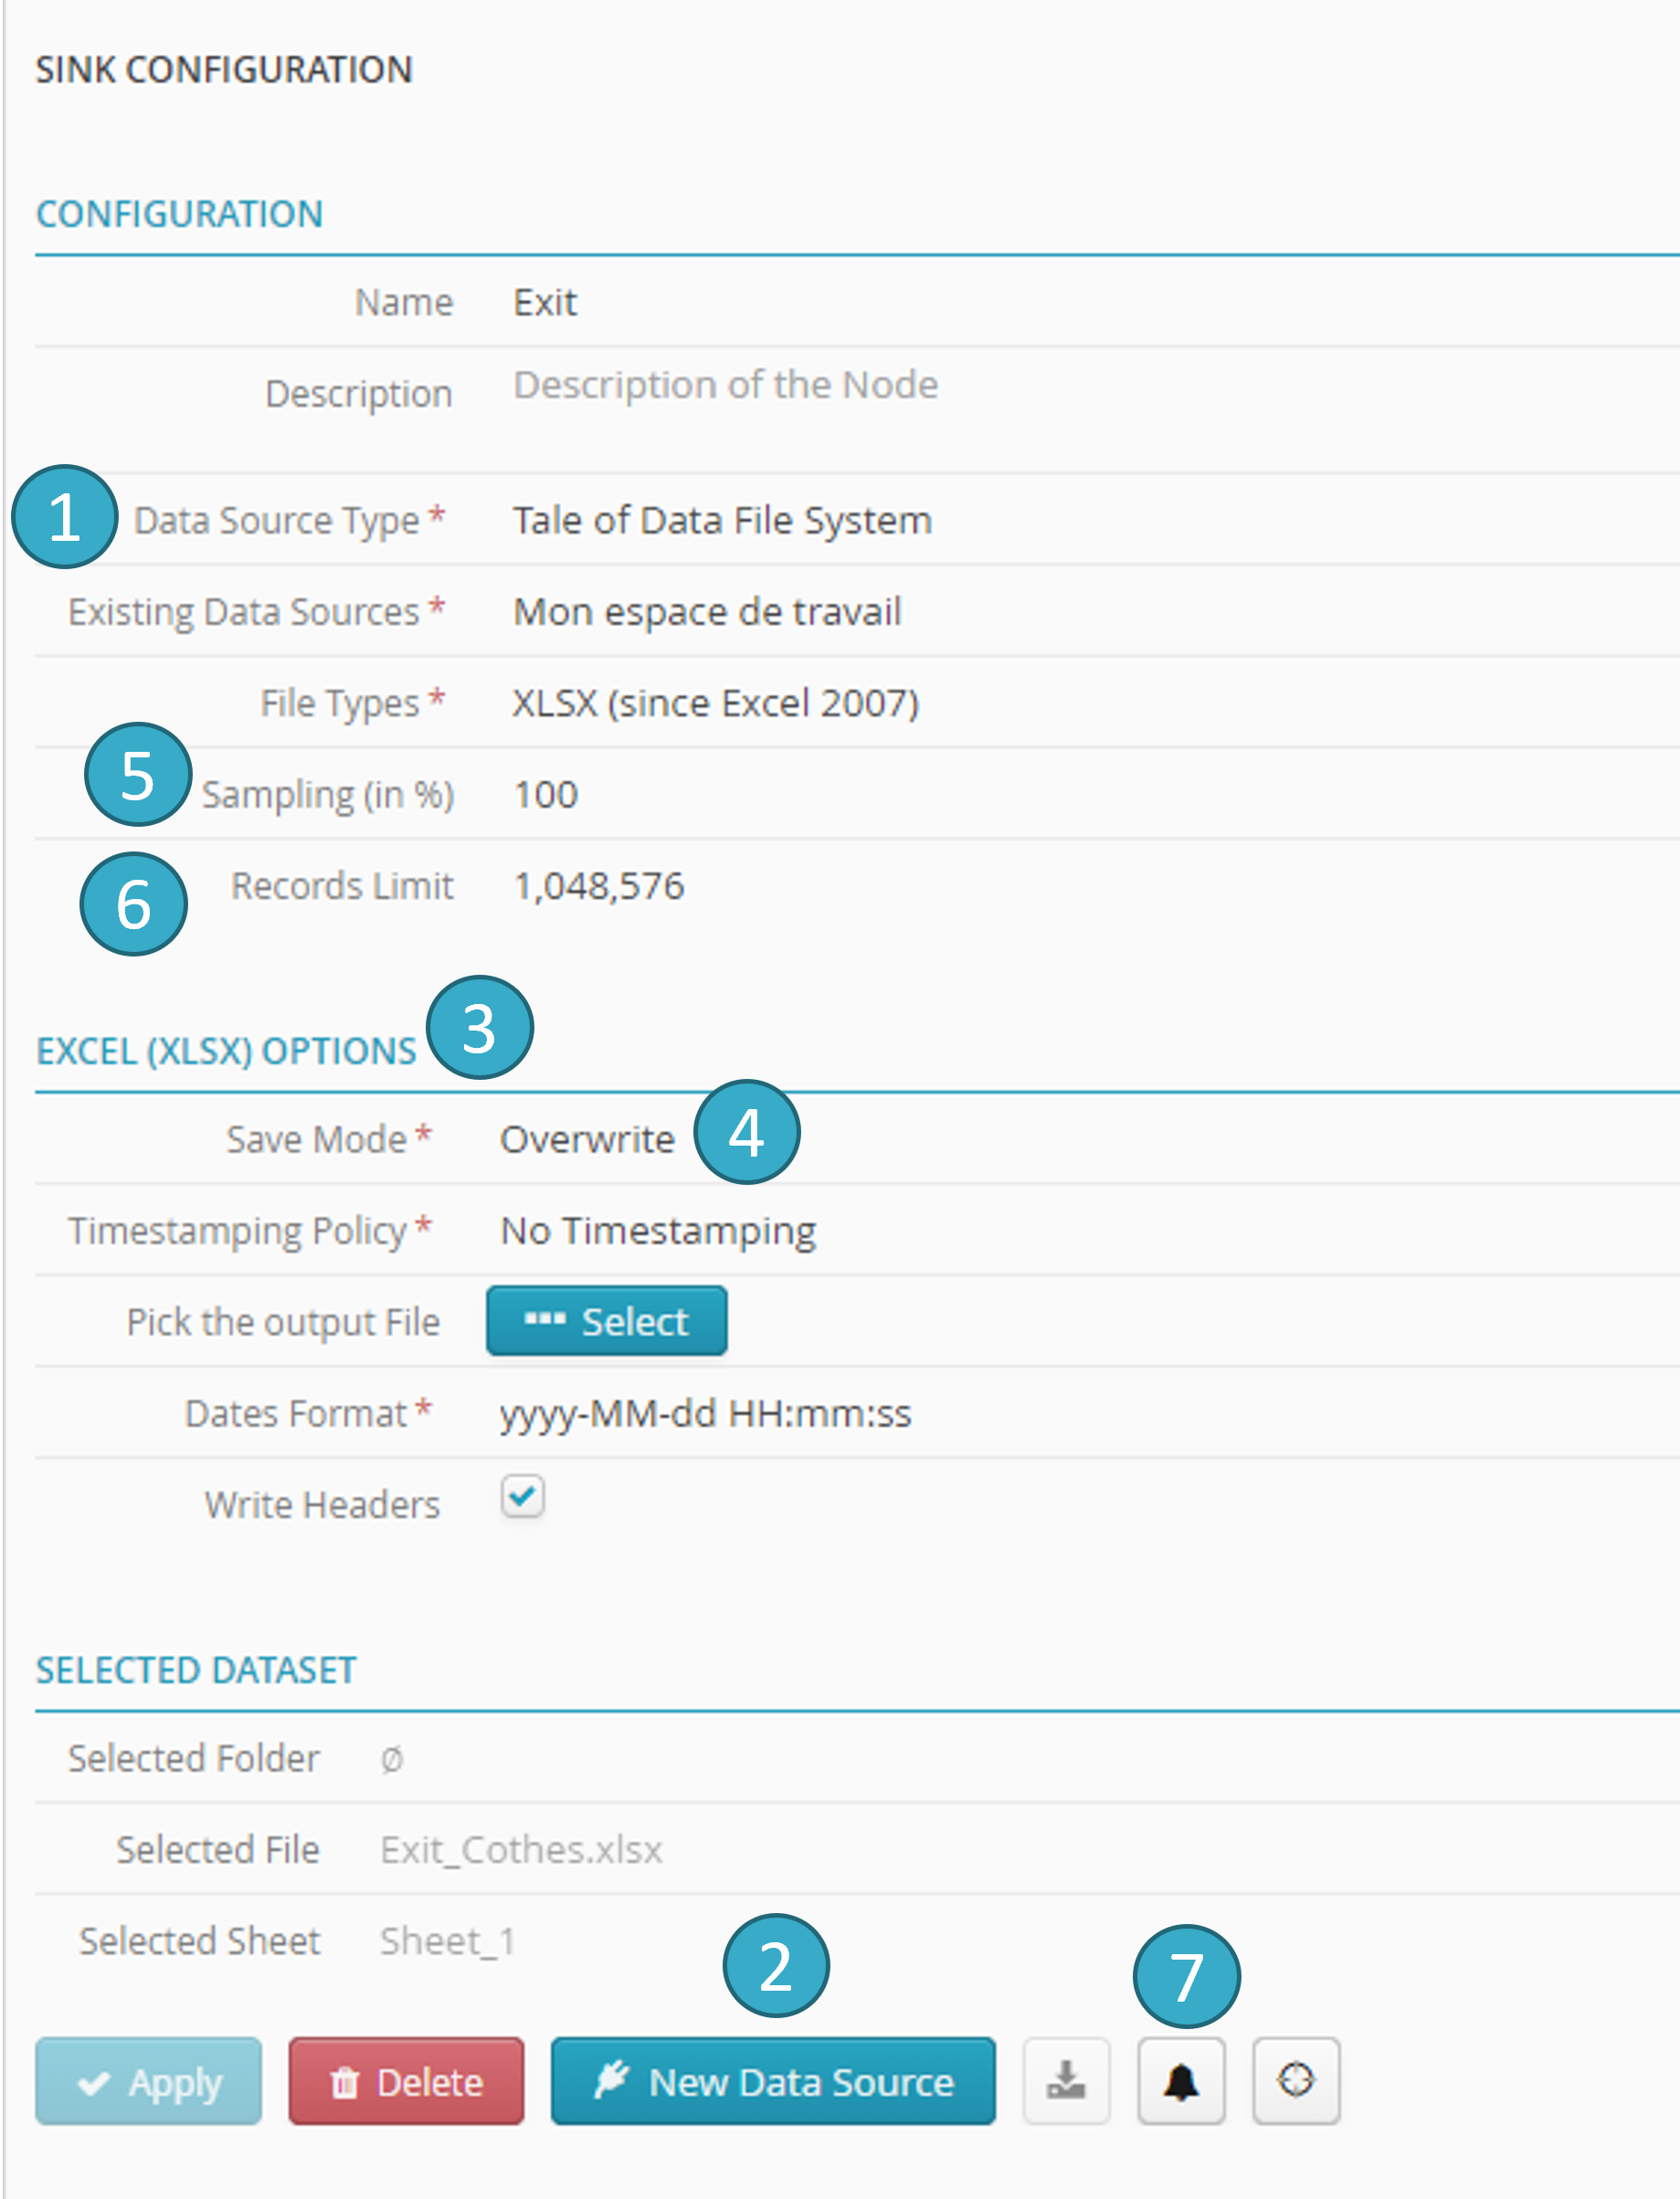
This example shows the configuration for a sink node.
The node lets you retrieve data processed in the flow in a csv file.
Hint
For CSV-type outputs, all input file extensions are valid when choosing the output file name (e.g. .txt, .log, etc.).
4.2.2. Save mode
Save mode  lets you decide how a flow is to behave if a sink already exists:
Overwrite :
overwrite an existing table or file.
Append :
add records to the end of an existing table or file.
Create :
create a new table or file. An error will be flagged if the table (or file) already exists.
Insert or replace a tab :
This mode exists for Excel sheets. This option allows you to insert an additional tab into an existing Excel file to add the rows sent to these types of targets. If the Excel file does not exist, it will be created. If a tab with the same name already exists in the Excel file, it will be overwritten.
Overwrite (keep the target table if it exists)
Available for databases, with the following option (Truncate). The table will be deleted, recreated, and then filled with the data.
Overwrite (keep the target table if it exists)
Available for databases, with the following option (Truncate). The table will be deleted, recreated, and then filled with the data.
Update :
Available for the Salesforce connector. Allows updating data in the CRM. For more information, see the relevant section.
Hint
You can therefore create flows with multiple sinks by writing to different tabs in the same Excel file. To do this, all sinks linked to that Excel file MUST use the Insert a tab backup mode. If this is not the case (i.e. if any sink linked to the Excel file uses the Overwrite or Create backup mode), a configuration error will be triggered, preventing the running of the flow.
4.2.3. Record limit
This is the number of records  that can be sent to the sink. The number MUST be positive.
If no number is specified, this means that all the records are to be sent.
Warning
The limit on the number of records to be written will be taken into account after sampling.
The limit on record numbers will be taken into account during production (this does not apply to sink nodes).
4.2.4. Sampling (%)
Use this option if you do not want to send all, or the first N, records to the sink. Unlike a source node, a sink nœud uses this option during production.
This is a randomized sample of records  expressed as a percentage of the total size of the dataset that is to be sent to the sink.. On performance grounds, the percentage is an estimate.
Value 100 = no sampling. This means you either want to send all the records (no specified limit) or the first N records (max limit N)
4.2.5. Alerts ( Notifications )
You can configure notifications for each sink to tell you when records written to a sink validate an activation setting. To configure a notification, see Setting a notification in a flow.
4.2.6. Operation of the Add (Append) mode based on target types.
The Add mode (see save modes) behaves differently depending on the target type. This is noticeable if the data structure does not match that of the existing target as it appears at the time of the flow execution.
The main cases to report are:
Writing to a database table
If the data to be written has fewer columns than the existing target at the time of execution, these missing columns will be filled with null for the added rows. If there are additional columns compared to the existing target at the time of execution, the flow will encounter an error during execution.
Writing to a Parquet file
If the data to be written has fewer columns than the existing target at the time of execution, those missing columns will be filled with null for the added rows. If there are additional columns compared to the existing target at the time of execution, these columns will be added to the Parquet file and filled with null for the previous rows.
writing to a CSV or Excel file
The data will be appended to the previous ones without verification against the structure of the existing columns. It is essential for the flow creator to maintain the column order to preserve the integrity of the file.
4.2.7. Writing data to Salesforce
Before you can write data to Salesforce, you must first add a source node to your flow.
In the source node configuration panel:
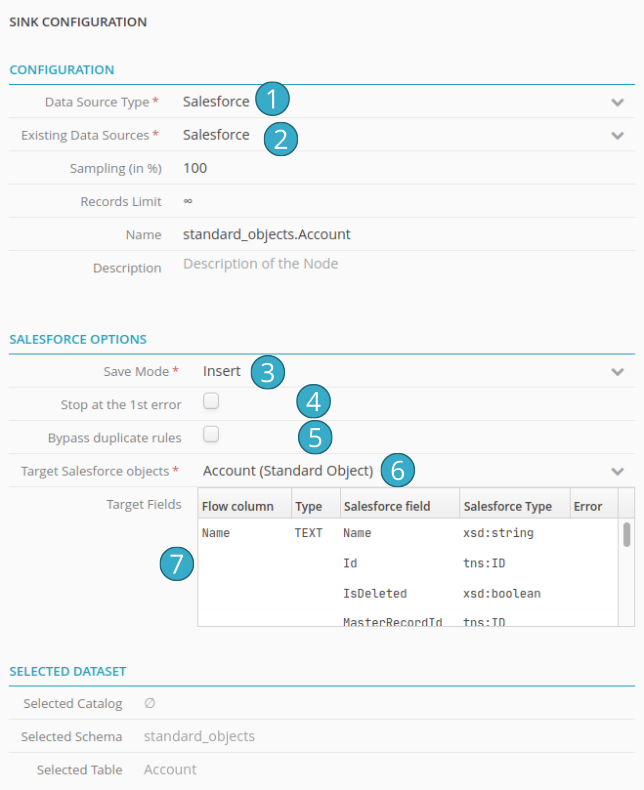
Select Salesforce from the Type of data source dropdown list.
Select your Salesforce application from the Current data sources dropdown list.
Select a write mode:
Insert to add new records
Update to alter existing records
If you tick Stop at the 1st error, writing will stop as quickly as possible at the first error encountered (e.g. missing required field or a duplicate). Records written before the error will remain in Salesforce. If you do not tick this box however, the connector will write to Salesforce every record that does not create an error (best effort) but at the end of the flow will trigger an error to indicate that not all the records could be written. Failure details will be shown in the run window and also emailed to the flow owner.
If you tick Bypass duplication rules the connector will ignore the Salesforce duplication rules. Attention: If you activate this option, you must ensure that your flow does not generate duplicates (to do this, use the advanced duplication functions in the Tale of Data Preparation Editor).
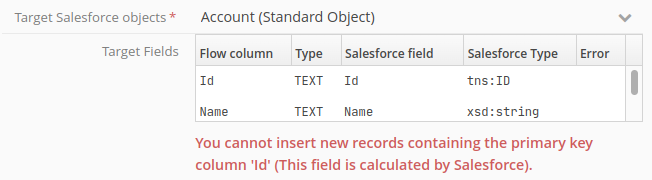
Target Salesforce Object: the collection of Salesforce objects to which you wish to write data. In the screen capture above: Account
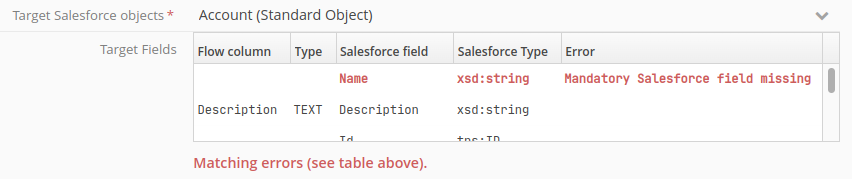
Target Fields: this table displays matches (and match errors) between the columns from your Tale of Data flow and the fields expected by Salesforce. Match rules are as follows:
The Tale of Data column must have exactly the same name (and case) as the matching Salesforce target field.
The Tale of Data column type must be compatible with that of the matching Salesforce target field (e.g. you cannot write a text value to a Salesforce date field)
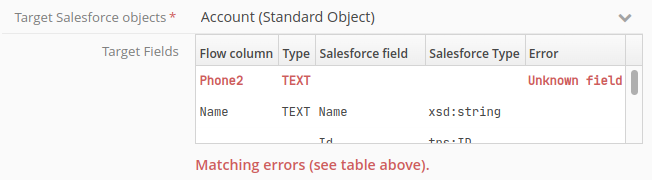
Example of a match error in a field name
Other types of error (shown in red) in the table of target fields:
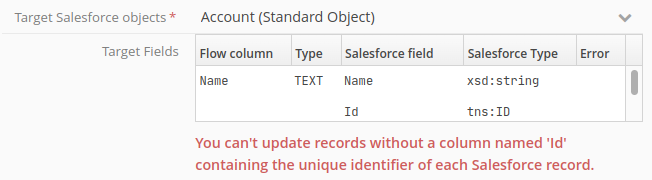
When you are in Update write mode, your flow MUST when output generate a column labelled Id (case-sensitive, text-type) containing the unique Salesforce identifier for the records to be updated. Please note that only the fields produced by this flow will be updated. If you want to e.g. update just column C, the output from your flow must contain only columns Id and C. No other fields will be changed.
When you are in Insert write mode, your flow must not when output generate any columns labelled Id. ‘Id‘ is the name used only for the unique identifier for all Salesforce objects. Salesforce alone can attribute a value to this field:
If a Salesforce field is required but is not provided by your flow, target node configuration will trip into error, preventing the running of the flow:
Note
Important: in Update mode, Tale of Data lets you, within the same flow, read and write in the same Salesforce table