2. Catalog view
2.1. Catalog view
The catalog can be accessed via the main Tale of Data menu.
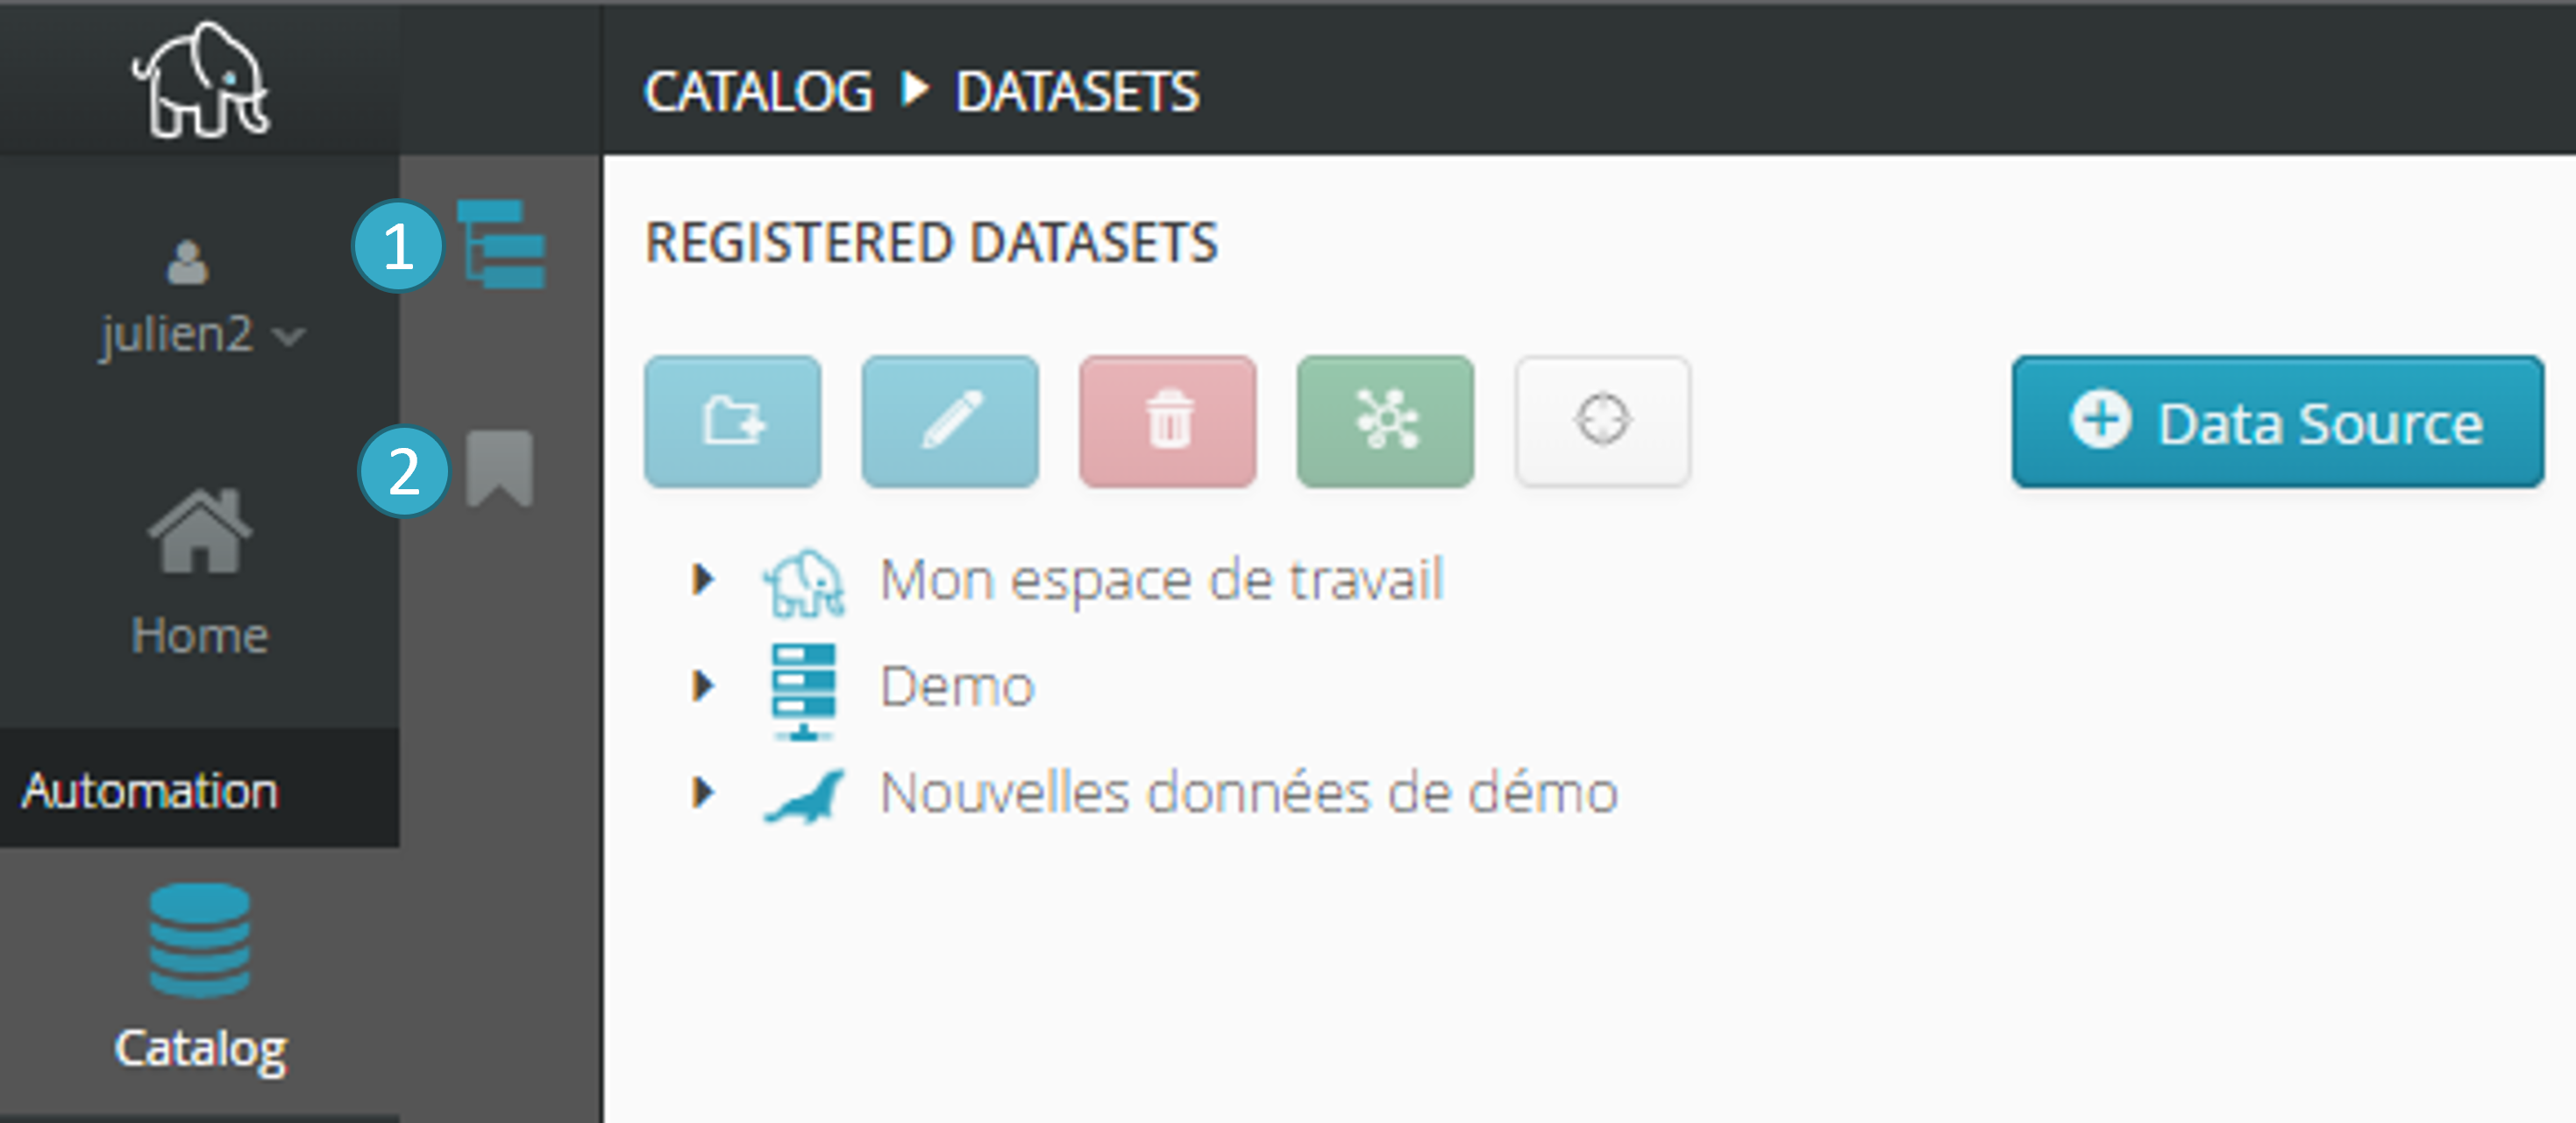
The catalog is divided into two parts:
Access
to datasets
Access
to repositories
2.1.1. Accessing datasets
The Access to datasets view in the catalog lets you:
Add new data sources (files, databases).
Find the datasets you need with an easy to use single graphical interface, which remains the same whatever the underlying storage system (files, databases) may be.
Upload files from your computer.
Import one or more datasets into a flow.
Access the datasets produced by a flow (target).
Preview data
Use the search bar to navigate through the source names, sorted alphabetically.
Run a flash data quality audit in order to generate a report computed on a subset of the rows, along with a data consistency analysis performed by a generative AI.
Warning
For a complete report covering all rows in large datasets, please use the Mass Data Discovery module.
To use a generative AI, please configure your API key (see the Security & Authorizations menu in the main menu at the top left).
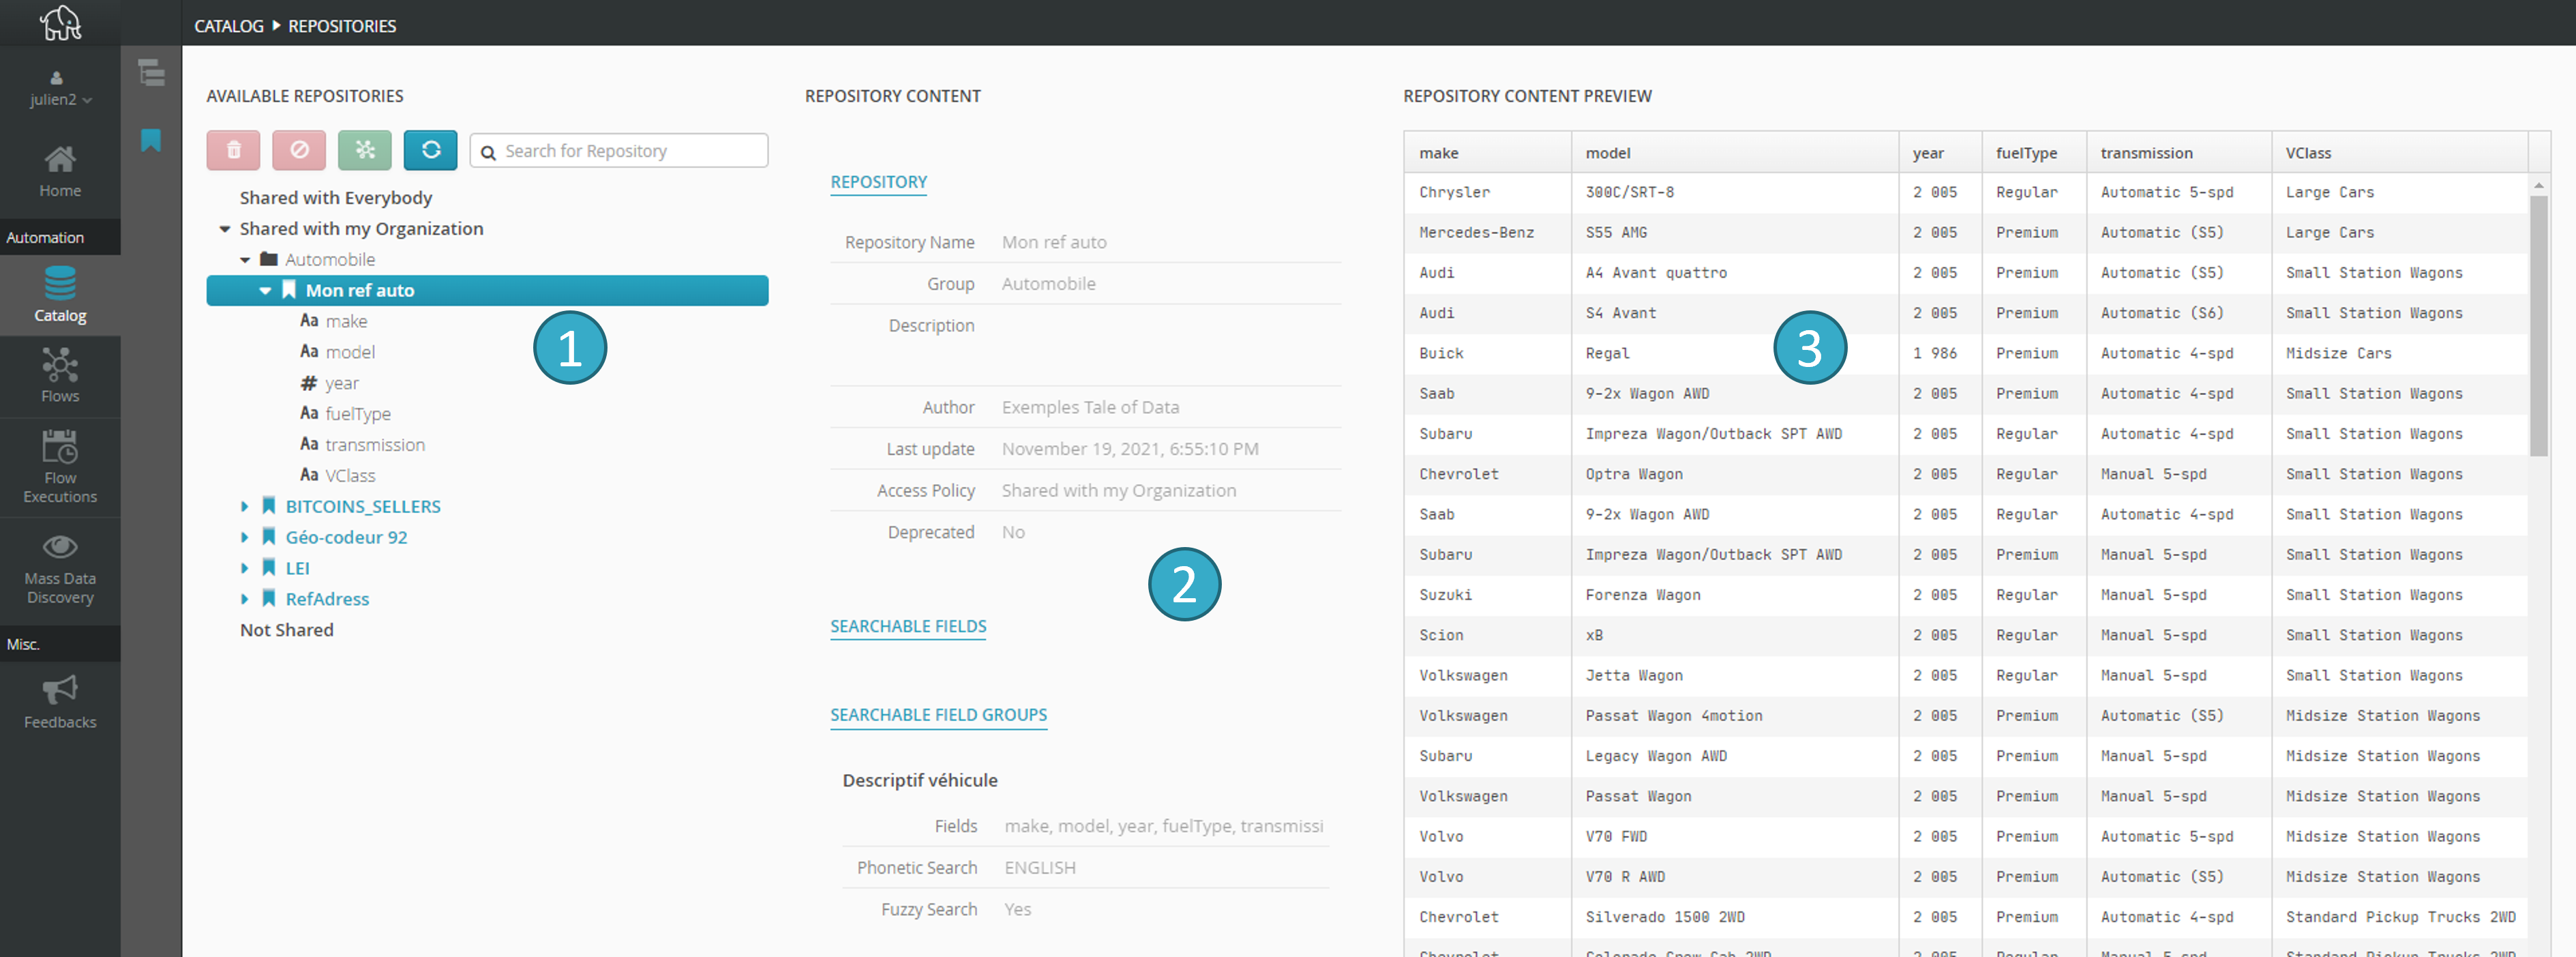
The catalog screen appears as shown below:
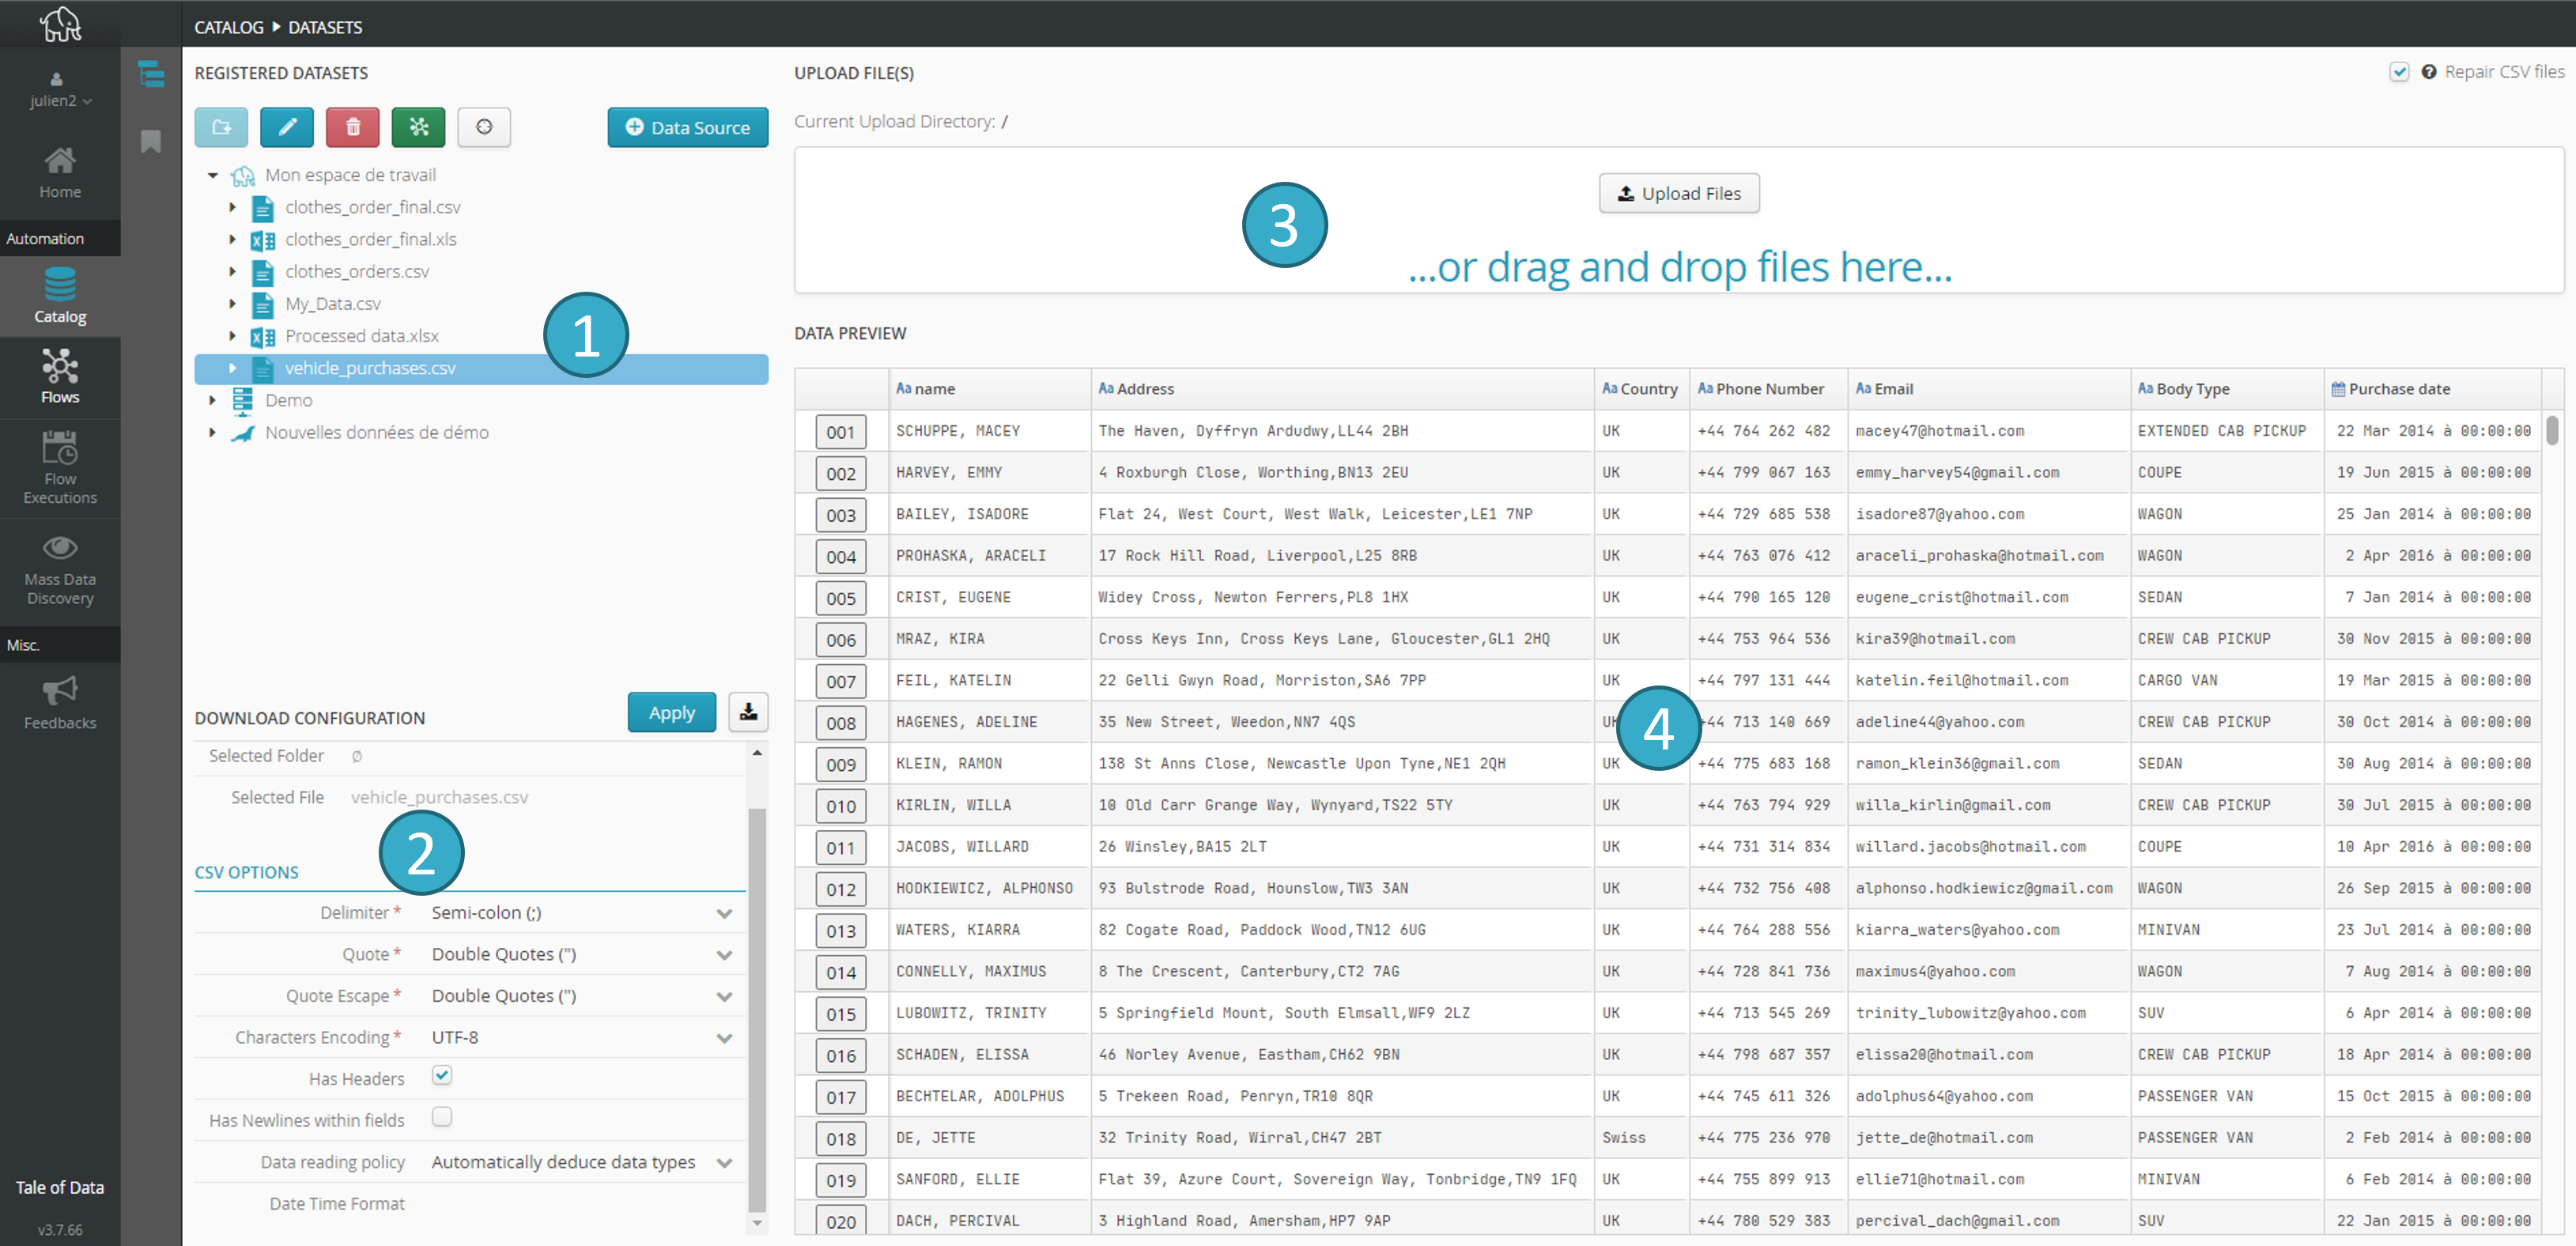
In the following main zones:
Zone for browsing
and selecting datasets.Upload zone
 for the dataset and the flash data quality audit.
Preview zone
 for the selected dataset.
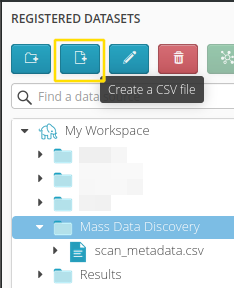
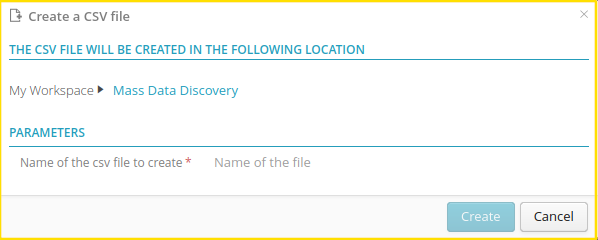
2.1.2. Create or Edit a CSV file
2.1.2.1. Create or Edit a CSV file
Creating an empty CSV file is also possible.
2.1.2.2. Modify a CSV file or an excel tab
It is now possible to edit a table for minor changes by clicking the “Edit” button located above the preview. Once in edit mode, you will be able to save the changes.

Note
This feature works on small tables. If the file contains a large number of rows, editing will not be possible.
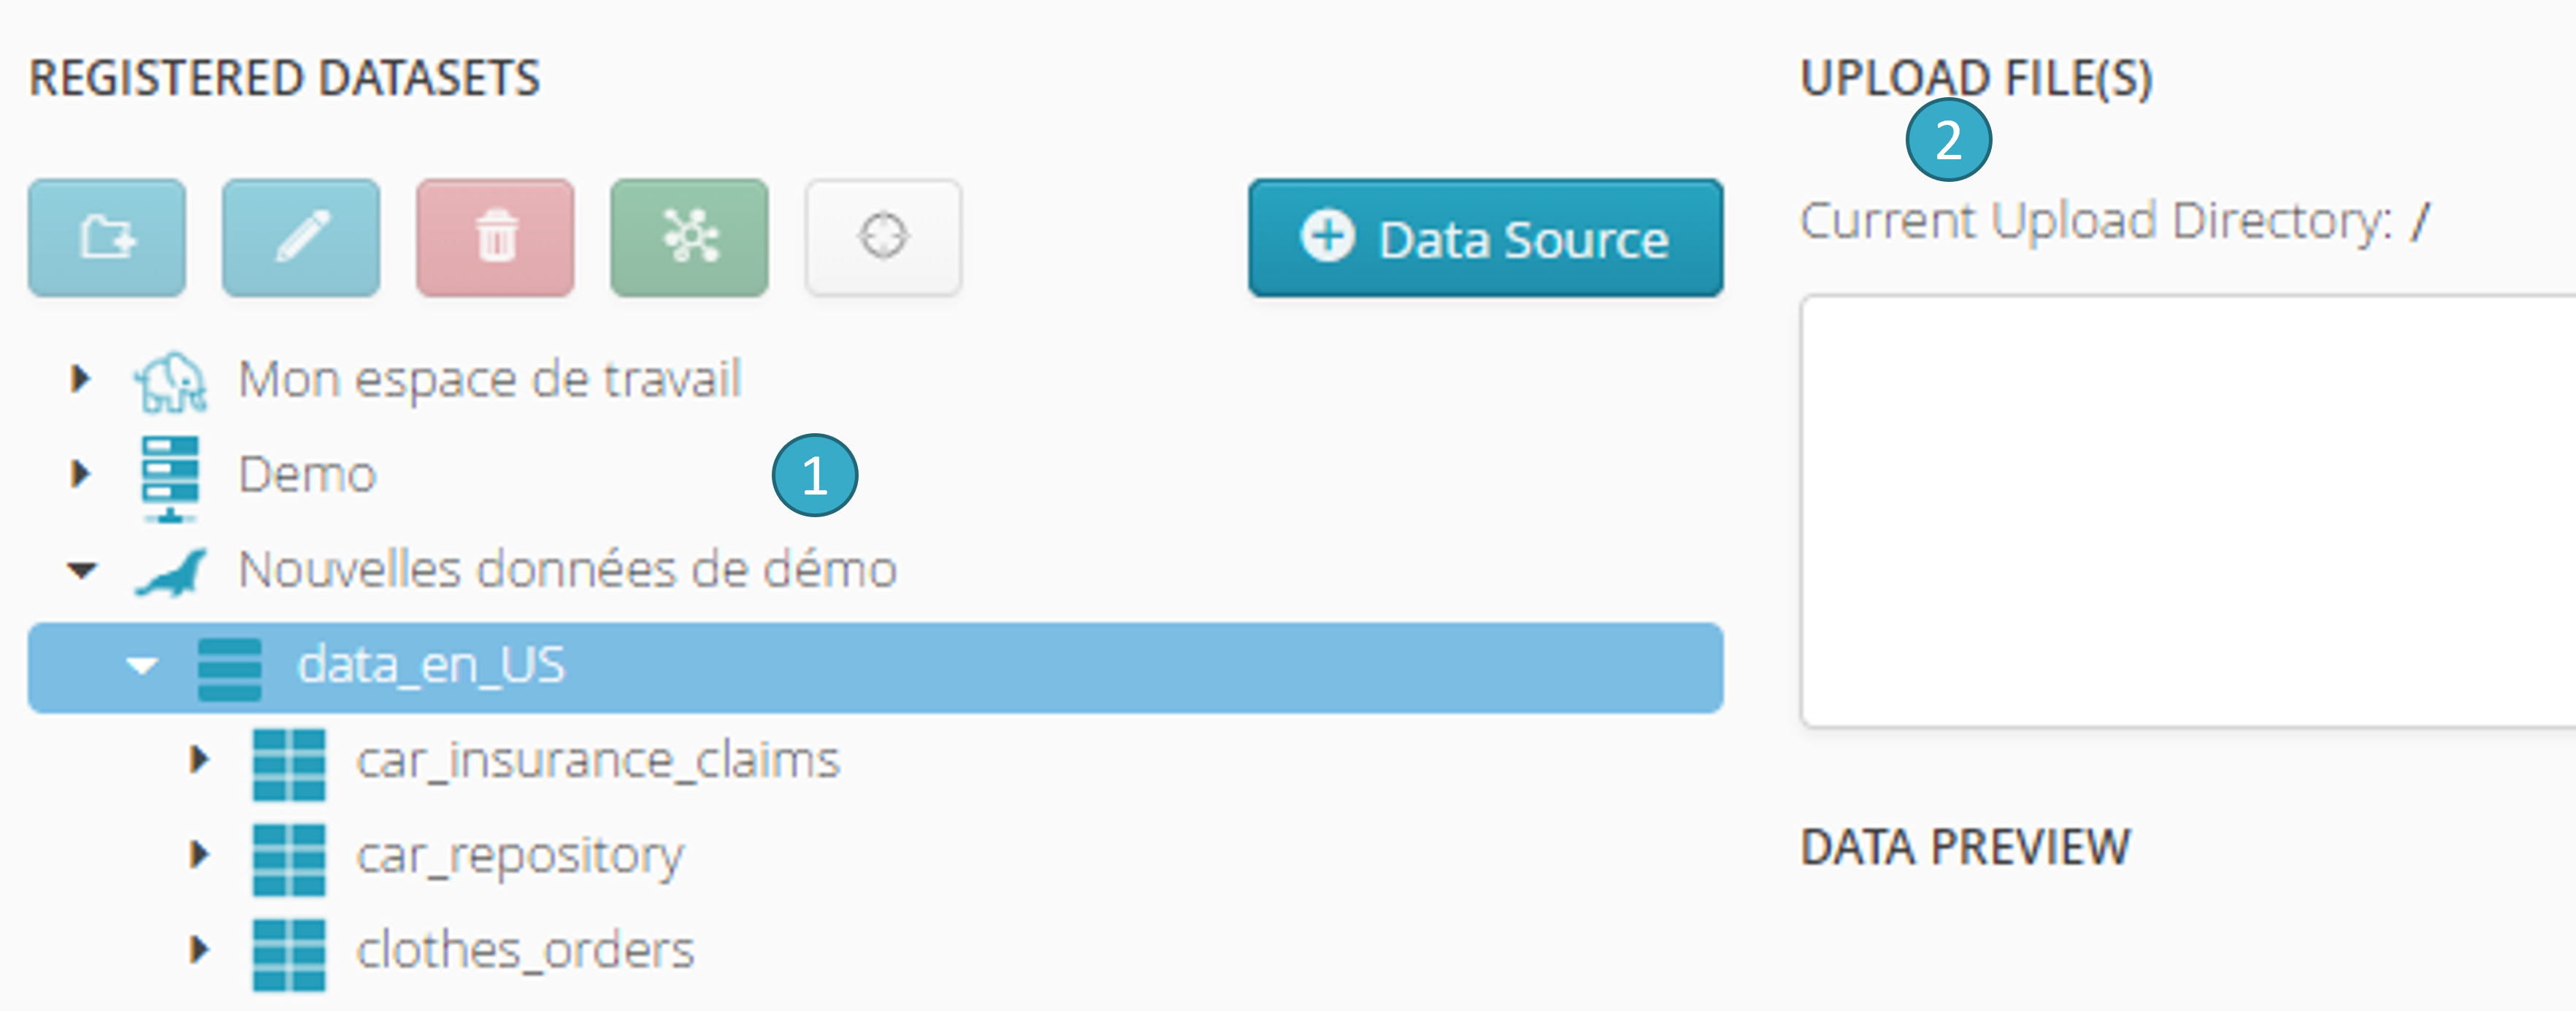
2.1.3. Accessing repositories
This screen gives you access to all the repositories available to the user.
In the following main zones:
Zone for browsing
and selecting repositoriesInformation zone
for the selected repository.Preview zone
for data in the selected repository.
2.2. Upload files into Tale of Data
2.2.1. Uploading a file

Open the file selection dialogue box
.Drag and drop files into this zone to upload them
.My workspace destination repository to which the file will be uploaded
.CSV file repair
: this makes a CSV file compatible with processing in a distribution environment:Delete the rows before the first row of data or the header.
Standardize the number of columns (longest row will act as benchmark and blank cells will be added if necessary).
Delete cells with over 4 096 characters.
Eliminate empty rows.
2.2.2. Alter the destination repository for upload
If a new file being uploaded has the same name as a file already in the My workspace upload repository , the new file will replace the old file. To change the destination repository, simply select it in the tree before making the upload:
Select the “ToD Demo” destination repository in the tree
.Confirm the selected destination repository
. Files will be uploaded to this repository.
2.2.3. Creating, renaming and deleting repositories and files
The following zone is in the top left-hand corner of the catalog screen

Creating a repository
.Renaming the selected repository or file
.Rename the selected repository (and all its content) or file
.Configuring the import of selected datasets to a (new or existing) flow
.
Caution
Note: Deleted repositories and files cannot be recovered.
2.3. Creating flows from the catalog
The start guide gives simple details on how to create a flow from the home screen, and how to add source data that can also be viewed in the catalog.
There are, however, two other ways of creating a flow:
by selecting datasets in catalog view, and by using the add to a flow button (
going via flow view and adding a flow. This must be done before any dataset is added.
We detail below the first of these methods, which is usually the quickest and easiest as it uses datasets to create new flows and also to add them to existing flows.
2.3.1. Add one or more datasets to an (existing or new) flow
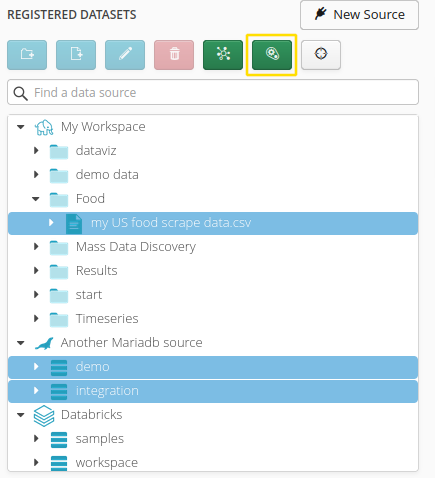
The second method is the quickest of all. The following zone appears in the top left of the catalog screen.
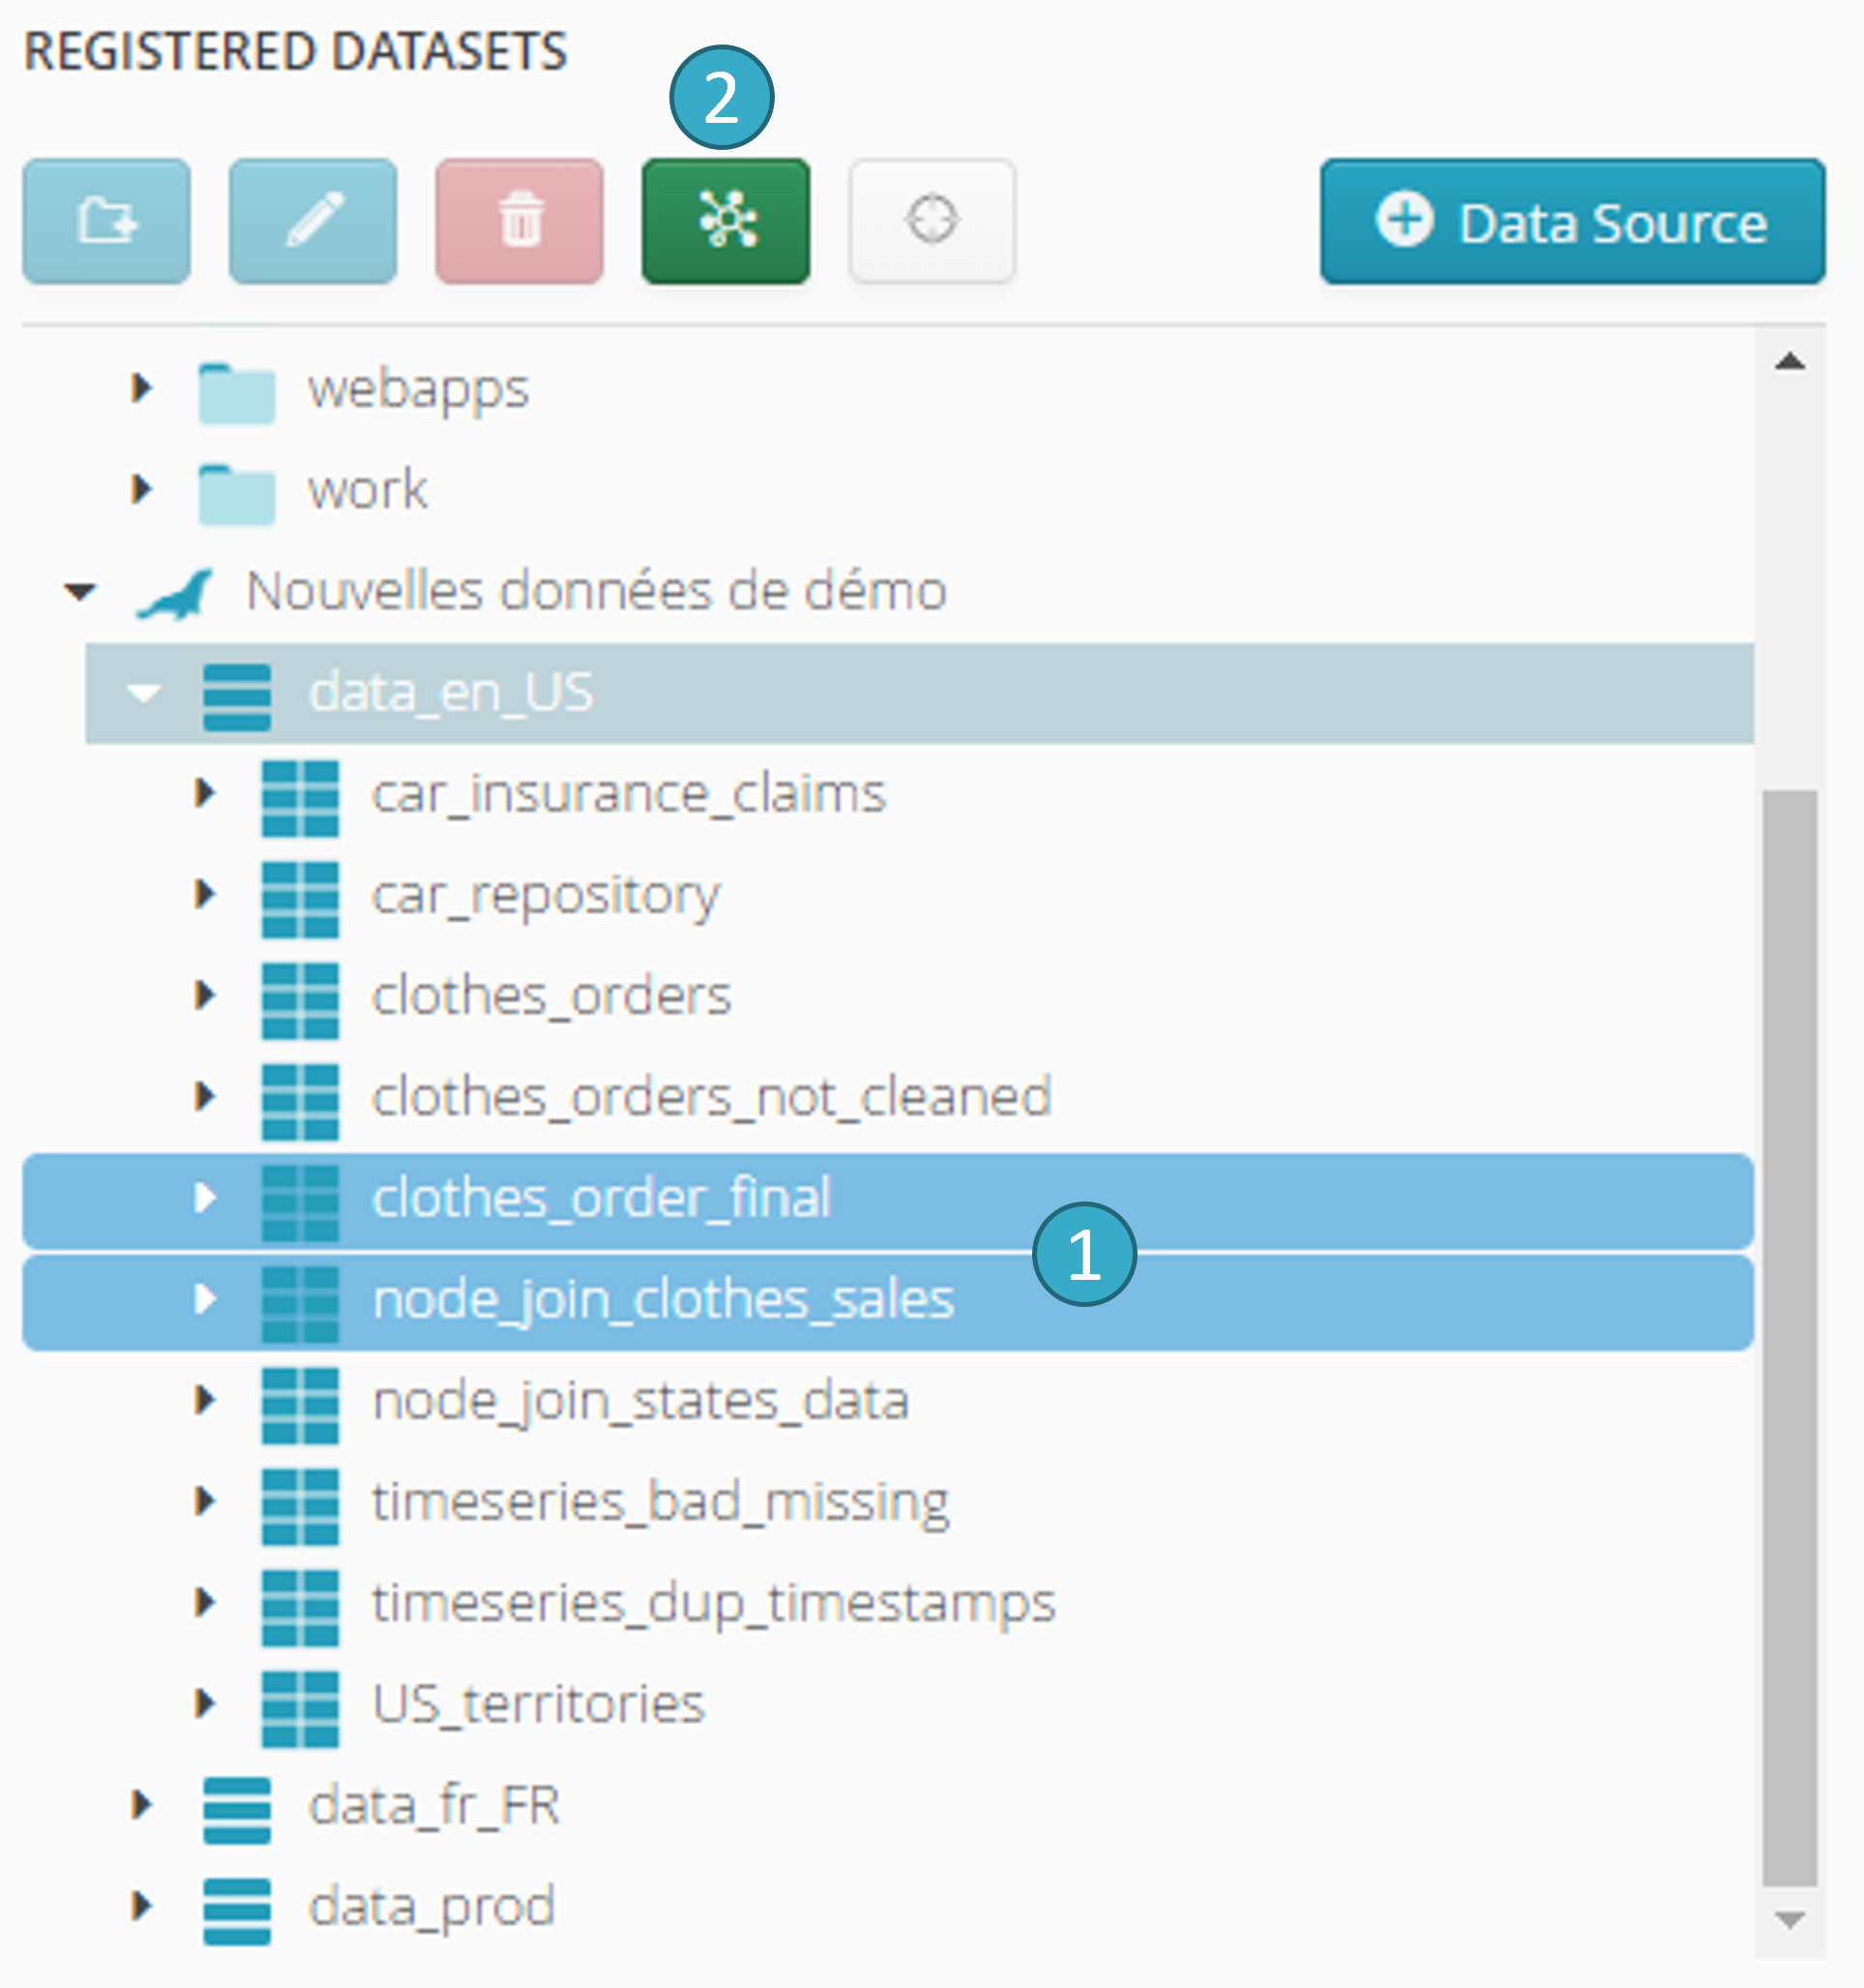
Selection zone for the dataset(s) to be imported into a flow. To select several datasets, keep CTRL depressed while clicking each relevant dataset
.Configuration button for imports into a flow
.
This button is available both on the catalog screen and in the configuration panel of each source and sink within a flow:
The following window will open once you have clicked the configuration button for an import into a flow:

List of previously selected datasets
.Addition operations
.Fast configuration button for Additions. All datasets will have their own Addition operation
.Tab for switching between new and existing flows
.
You can quickly add selected datasets to an existing or new flow, while at the same time configuring how the datasets will interact with each other (Addition):
- Standalone dataset
The dataset will be added without any link in a flow.
- Prepared dataset
The dataset will be added to a flow with a link to a preparation.
- Union dataset
The dataset will be added to a unique join node. Dataset order will be maintained.
- Join dataset
The dataset will be added to a unique join node.
- Dataset for enrichment
The dataset will be added to a unique enrichment node as the dataset receiving* new columns.
- Enrichment dataset
The dataset will be added to a unique enrichment node as the dataset donating* new columns.
Tip
The parameters of each dataset can be altered in the flow if necessary.
You can re-order datasets using drag and drop. Order is important only to union datasets.
Once the operation has been validated, the view will switch to the (new or existing) flow concerned in Flow Designer.
2.3.2. Configuring the import of selected datasets to a (new or existing) flow
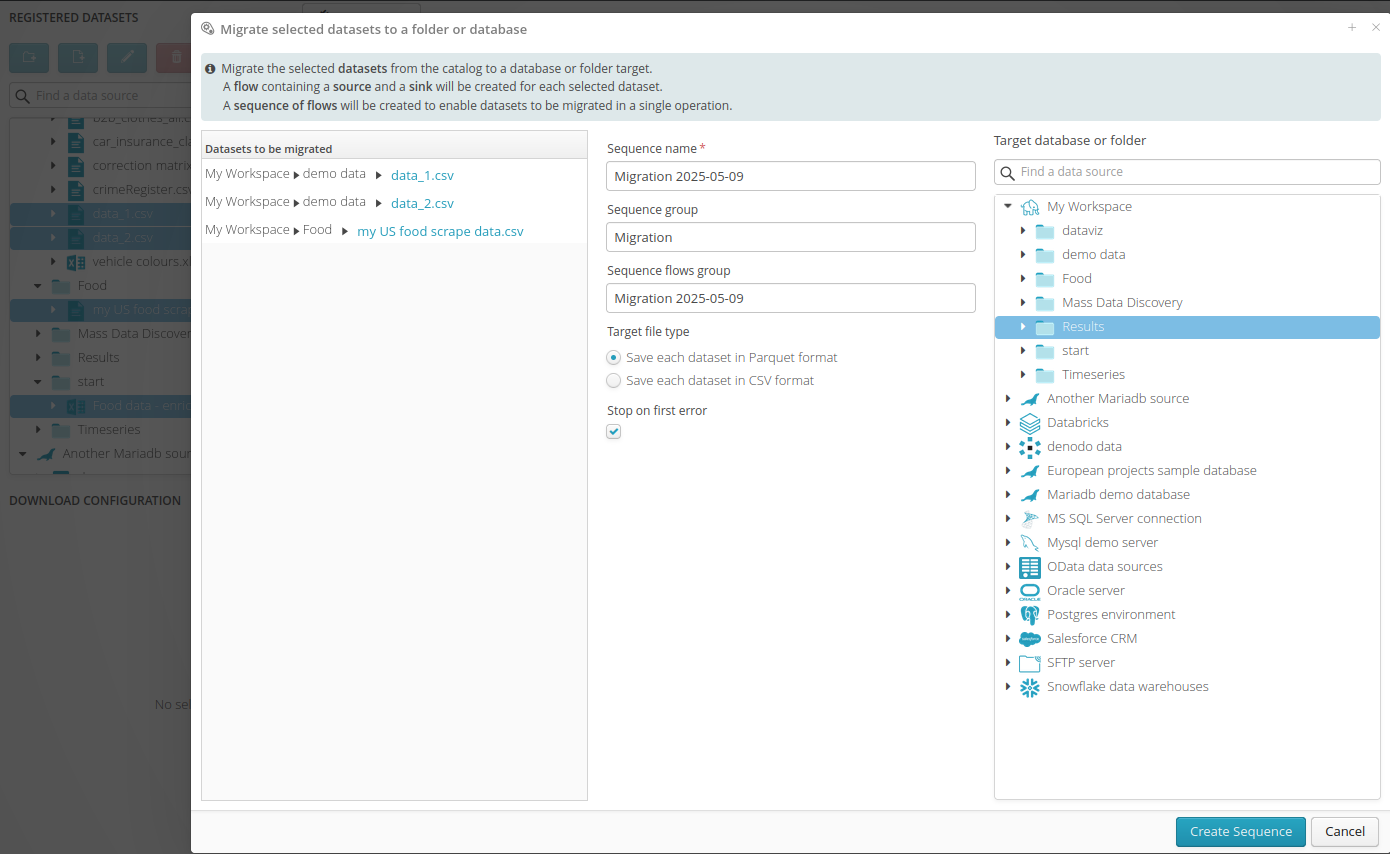
As part of using Tale of Data, there may be times when the user needs to bulk move tables from one system to another, or from one folder or group of tables to another within a given system. This operation can be broken down into a series of flows, each transferring a table from a source to a target. In practice, the work required to create these flows can become repetitive and tedious, which is why the Migrate Datasets function was created.
With just one click, it’s possible to generate the necessary flows to migrate the selected dataset(s) from the catalog to a target in a specific location within a database or a specific folder. A flow containing a source and a target will be automatically created for each selected dataset, along with a dedicated sequence of flows, allowing the complete migration to be carried out in a single operation. It’s also possible to schedule this sequence of flows so it runs regularly in the future. The more tables there are to migrate, the more time this feature can save.
Note
This migration operation can be extremely useful for decoupling the tables containing the original data from those used by generic flows for performing reusable processing operations. To load a different dataset, you simply need to launch a migration sequence, which will load the new data, and then run the generic sequence that handles the actual processing. This way, you can choose to load different versions of datasets (for example, snapshots taken at different times), training datasets, datasets containing only problematic cases (extracted by other flows), or shortened datasets to speed up processing development. The data lineage will allow you to see all the data sources feeding these generic tables and visually understand the processing logic. This approach makes it easier to reuse flows and to create generic, modular, and reusable tools.
2.4. Other catalog view functions
2.4.1. Deletion of relational database tables
To select a relational database table (e.g. MariaDB, SQL Server, PostgreSQL…etc.), click delete :
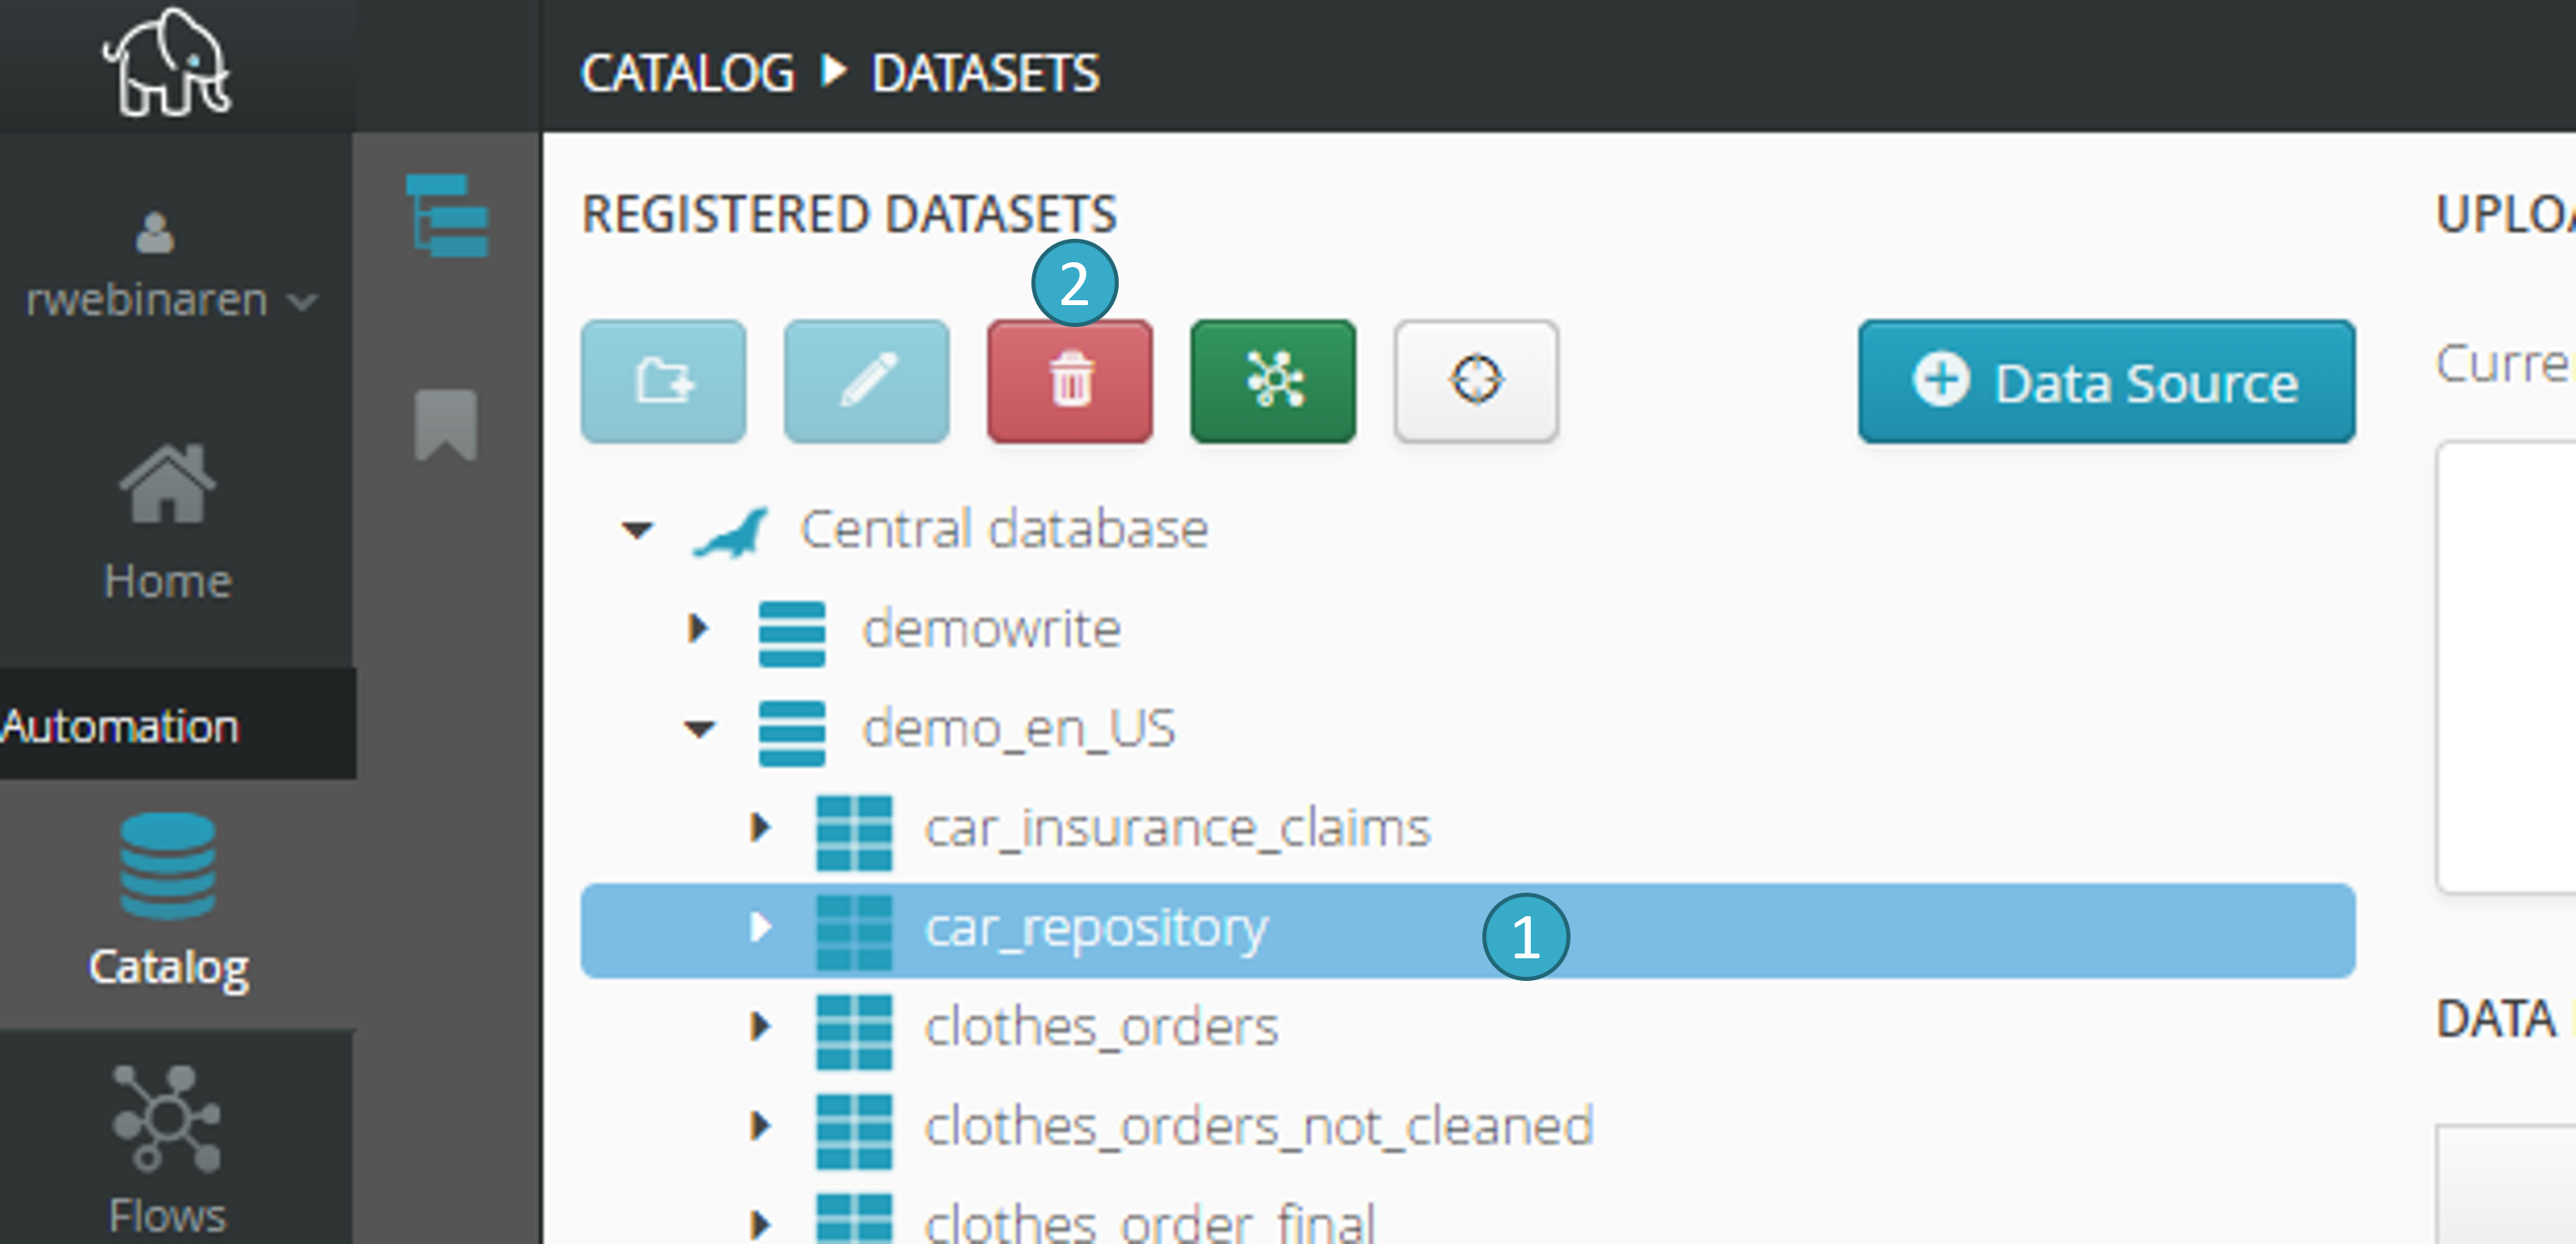
This button will delete the table, so long as the database account associated with the data source has the necessary authorizations.
2.4.2. Display the number of rows in a dataset
Right-click a dataset in the catalog to access information on this dataset:
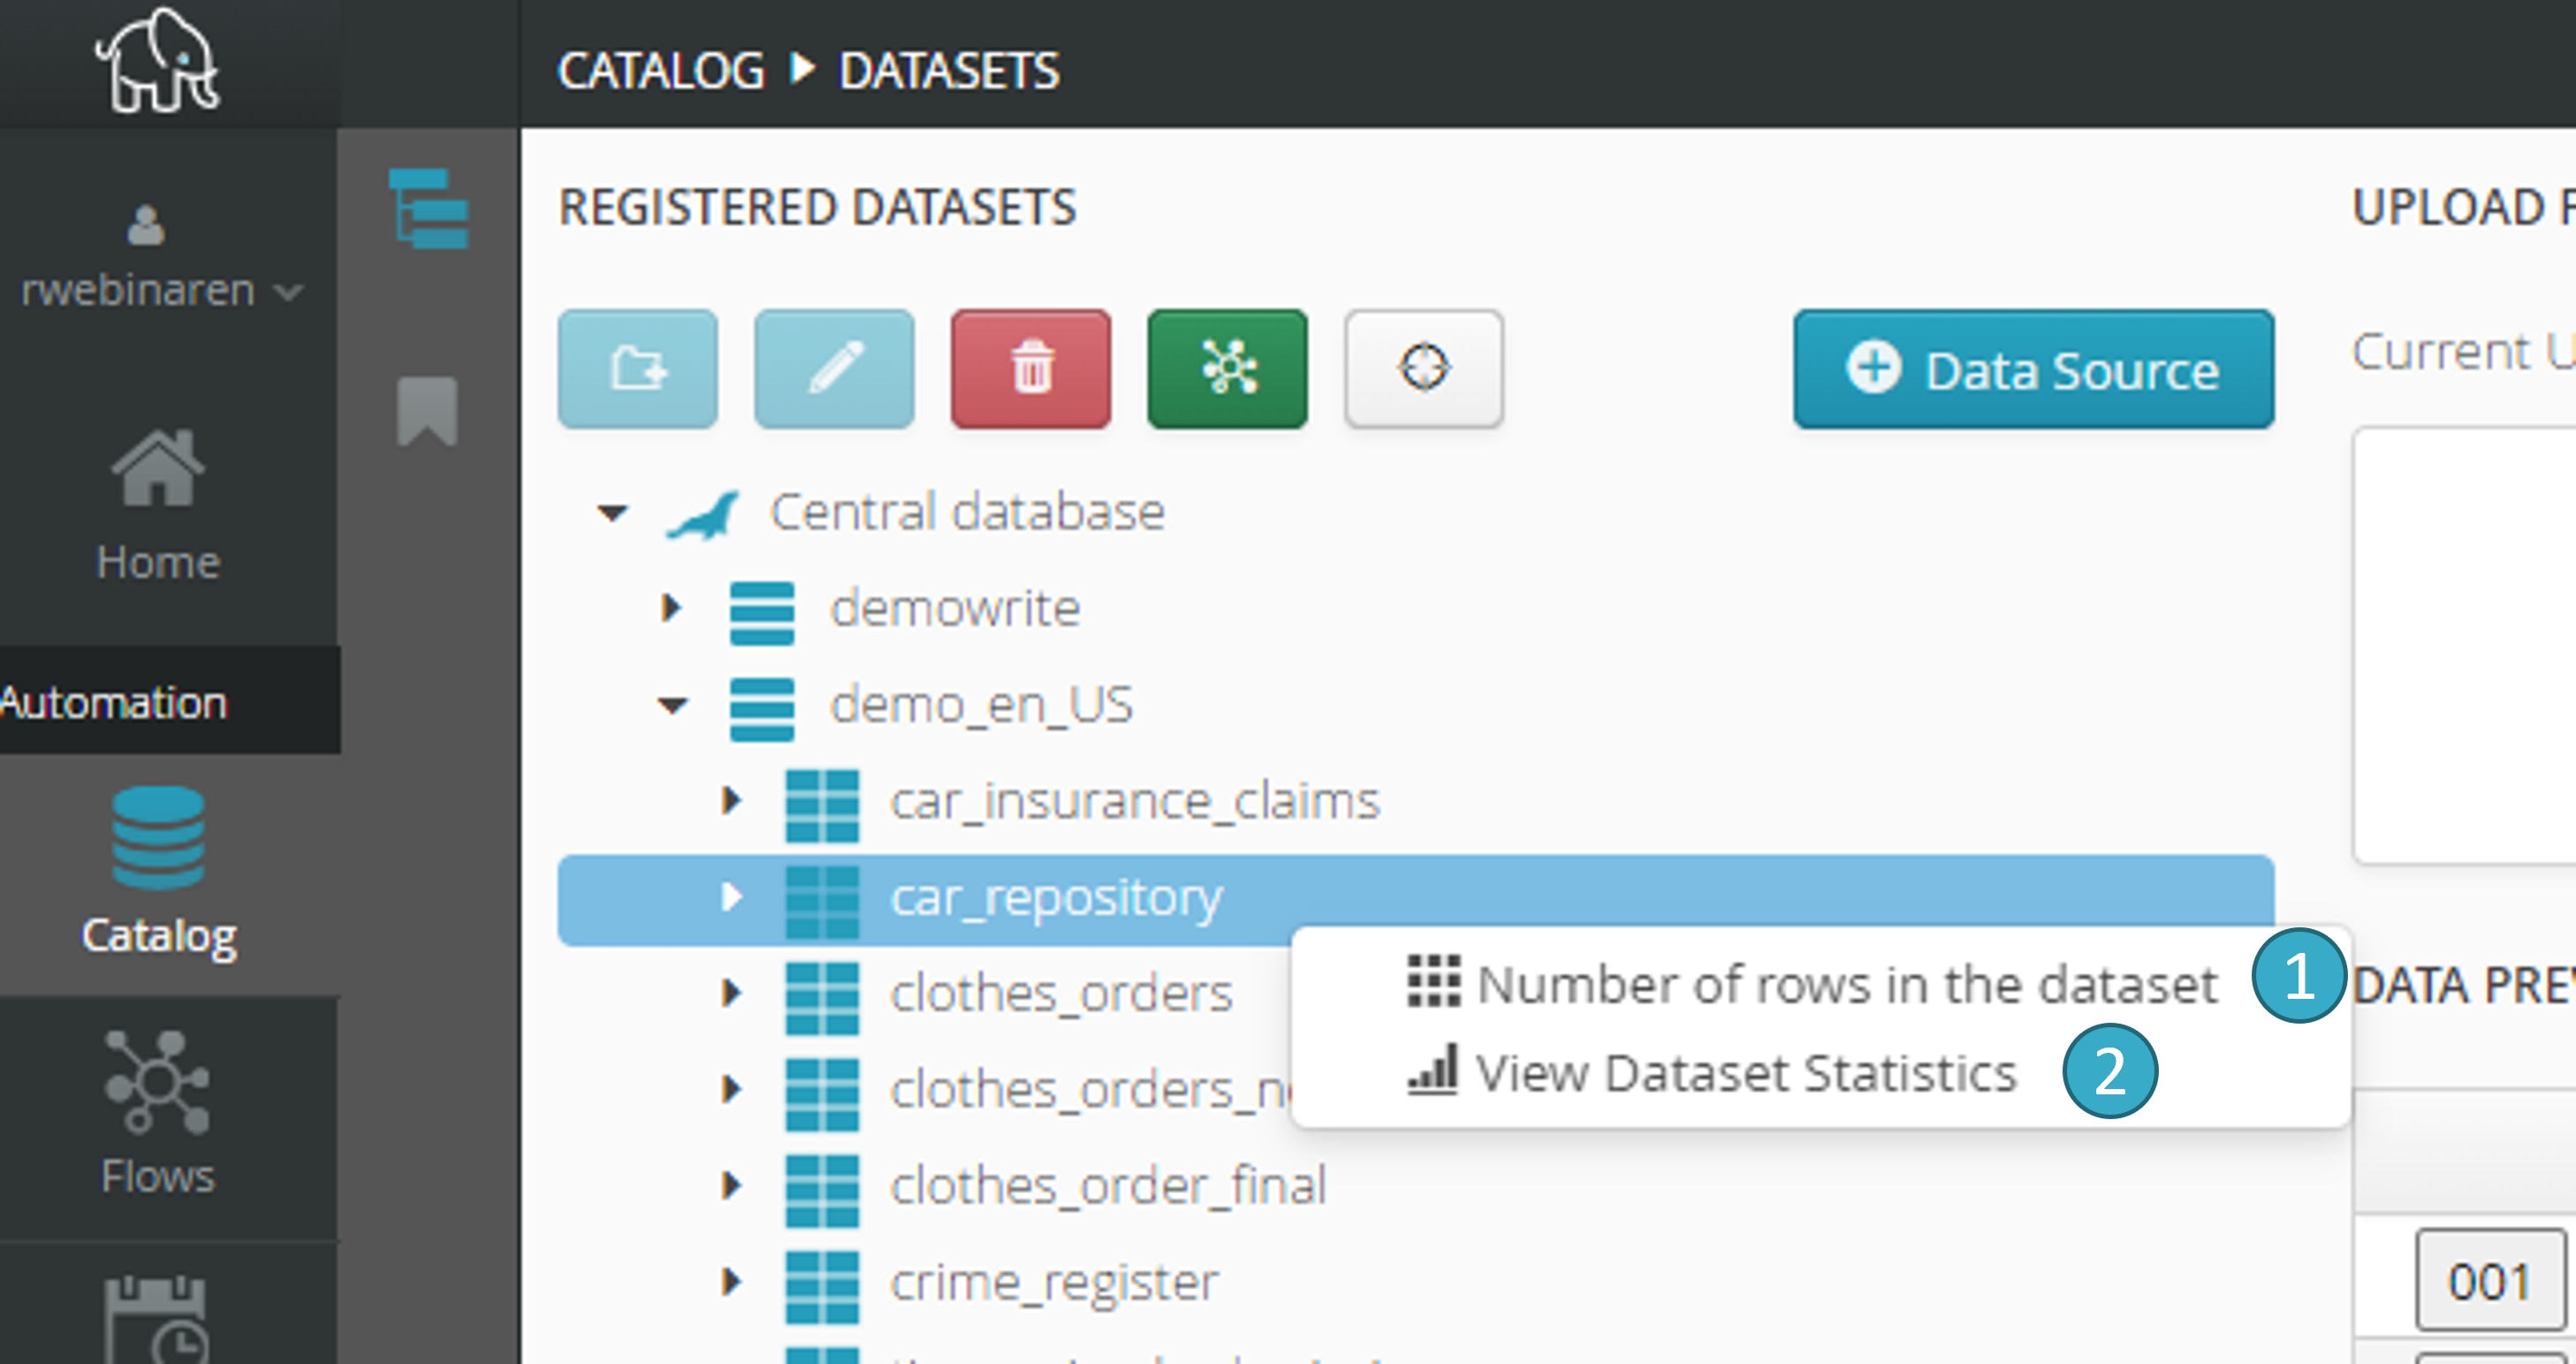
Number of rows in the dataset: The time required to calculate this information will depend on storage type (file, database).
2.4.3. Display dataset statistics
Use to access the statistics for the values in the dataset (calculation time will depend on the type of storage and also on the number of columns and rows):
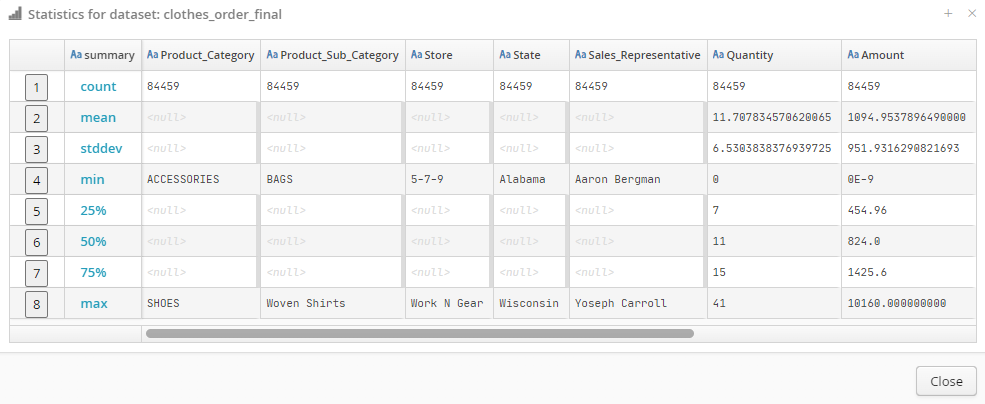
The following will be calculated for each column in a dataset:
- Count
number of non-empty values in the column.
- Mean
average column value (does not apply to text or Boolean data).
- Stddev
standard deviation of column values (does not apply to text or Boolean data).
- Min
lowest column value.
- Percentile 25
column value below which 25% of the dataset rows lie (does not apply to text or Boolean data).
- Percentile 50
column value below which 50% of the dataset rows lie (does not apply to text or Boolean data). This is therefore the median.
- Percentile 75
column value below which 75% of the dataset rows lie (does not apply to text or Boolean data).
- Max
highest column value.
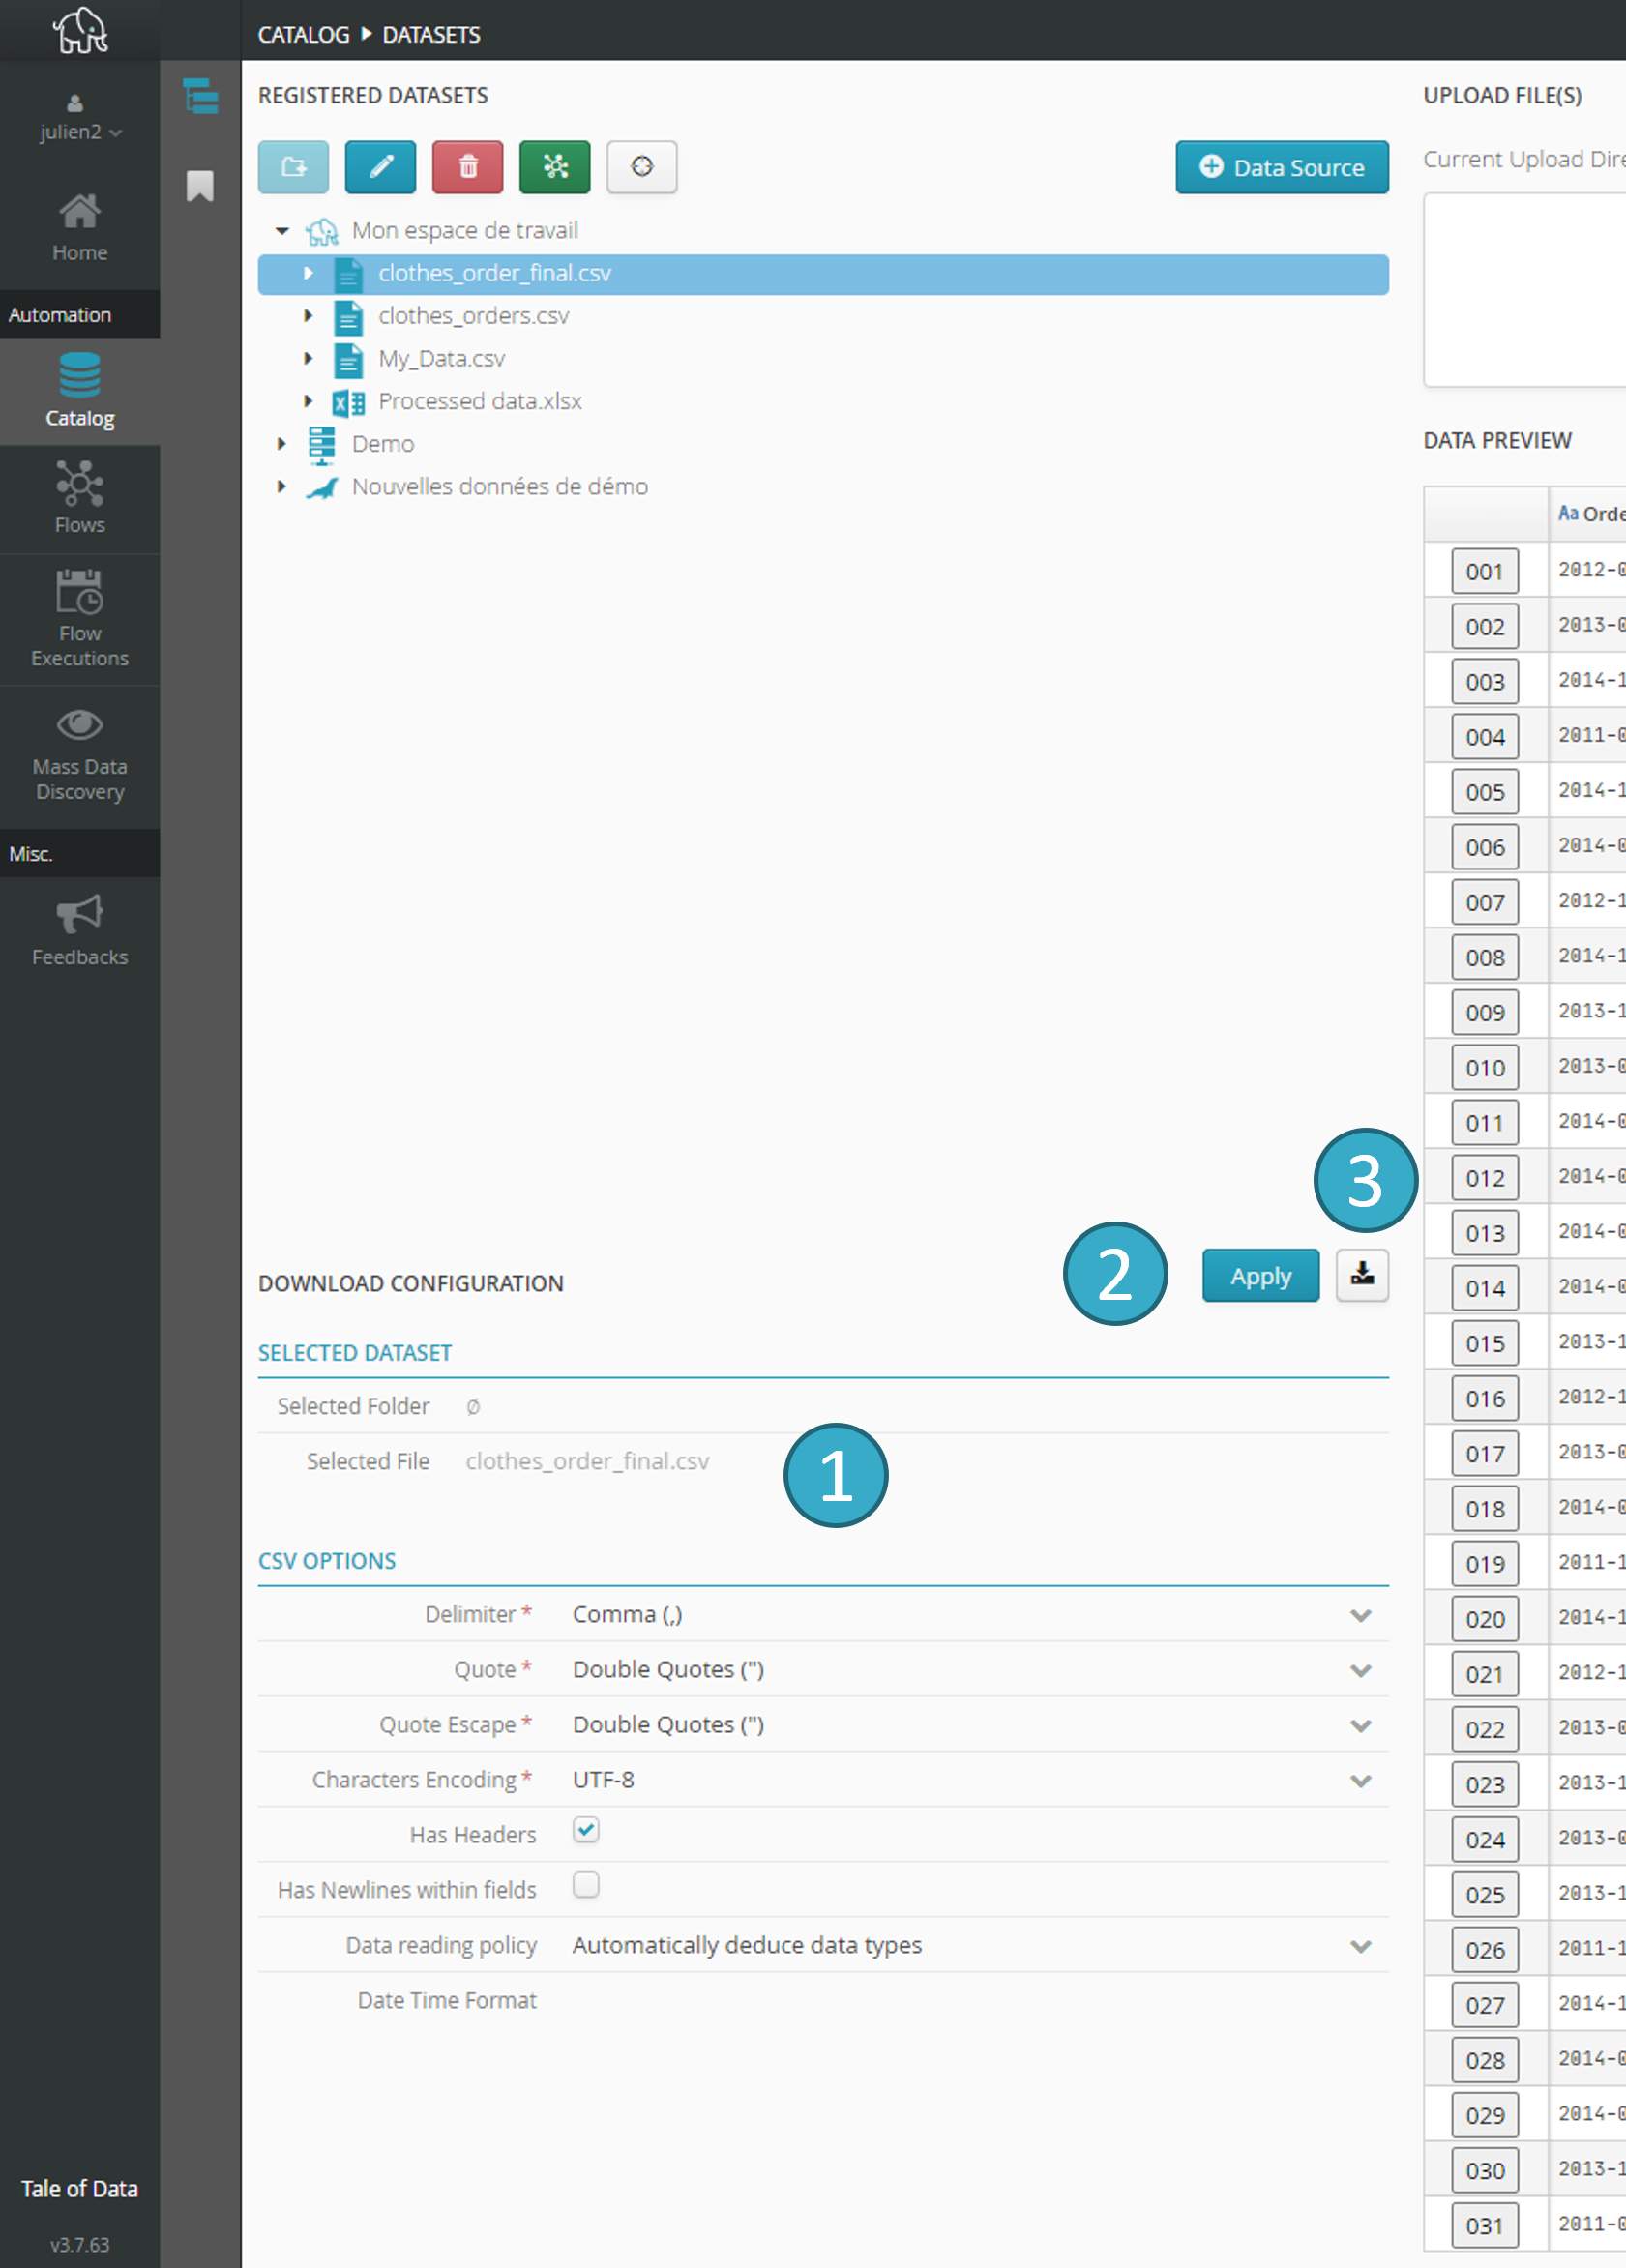
2.4.4. Downloading a dataset from the catalog
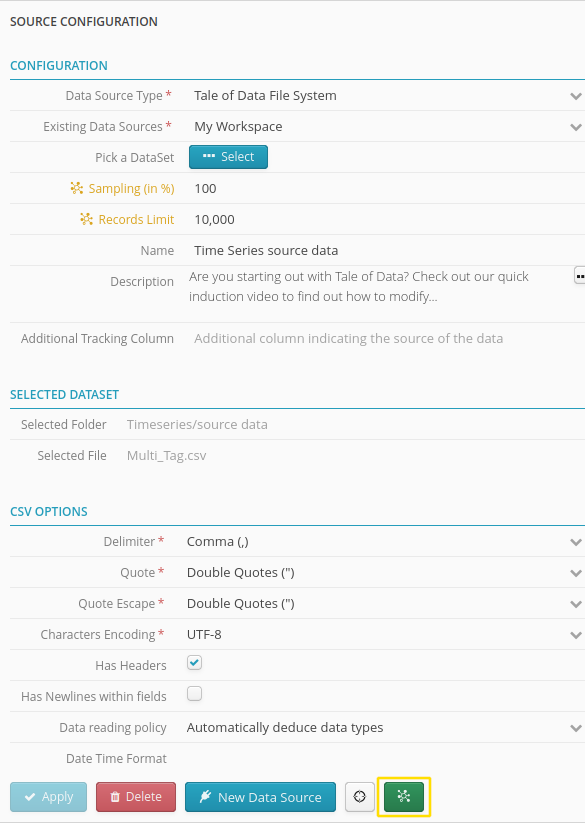
When you select a dataset in the catalog tree, an upload configuration zone will appear.
Configuration options depend on the type of dataset selected. For example, if you select a CSV file but dislike the auto detect results, you can change settings, such as separator, encryption, etc.
If you change the configuration, you must click Apply to confirm the new settings.
Click the button  to the right of Apply to download the dataset.
You will download a zipped csv file (file.gz).
Note
Tale of Data lets you download up to 1 000 000 rows from the catalog (rows that exceed this limit will be ignored).
Depending on the number of rows and columns involved, download can take between a few seconds and a few minutes.
2.5. Flow, dataset and record lineage
Lineage lets you view a full data processing chain involving multiple flows, based on one dataset. The data lineage also details the dependencies on other data sources, such as reference datasets, as well as the tables that feed filters with conditions of the type “ contains at least one element (or does not contain any element) of the column…”. These dependencies are displayed using specific icons.
2.5.1. Access to the data lineage from the catalog
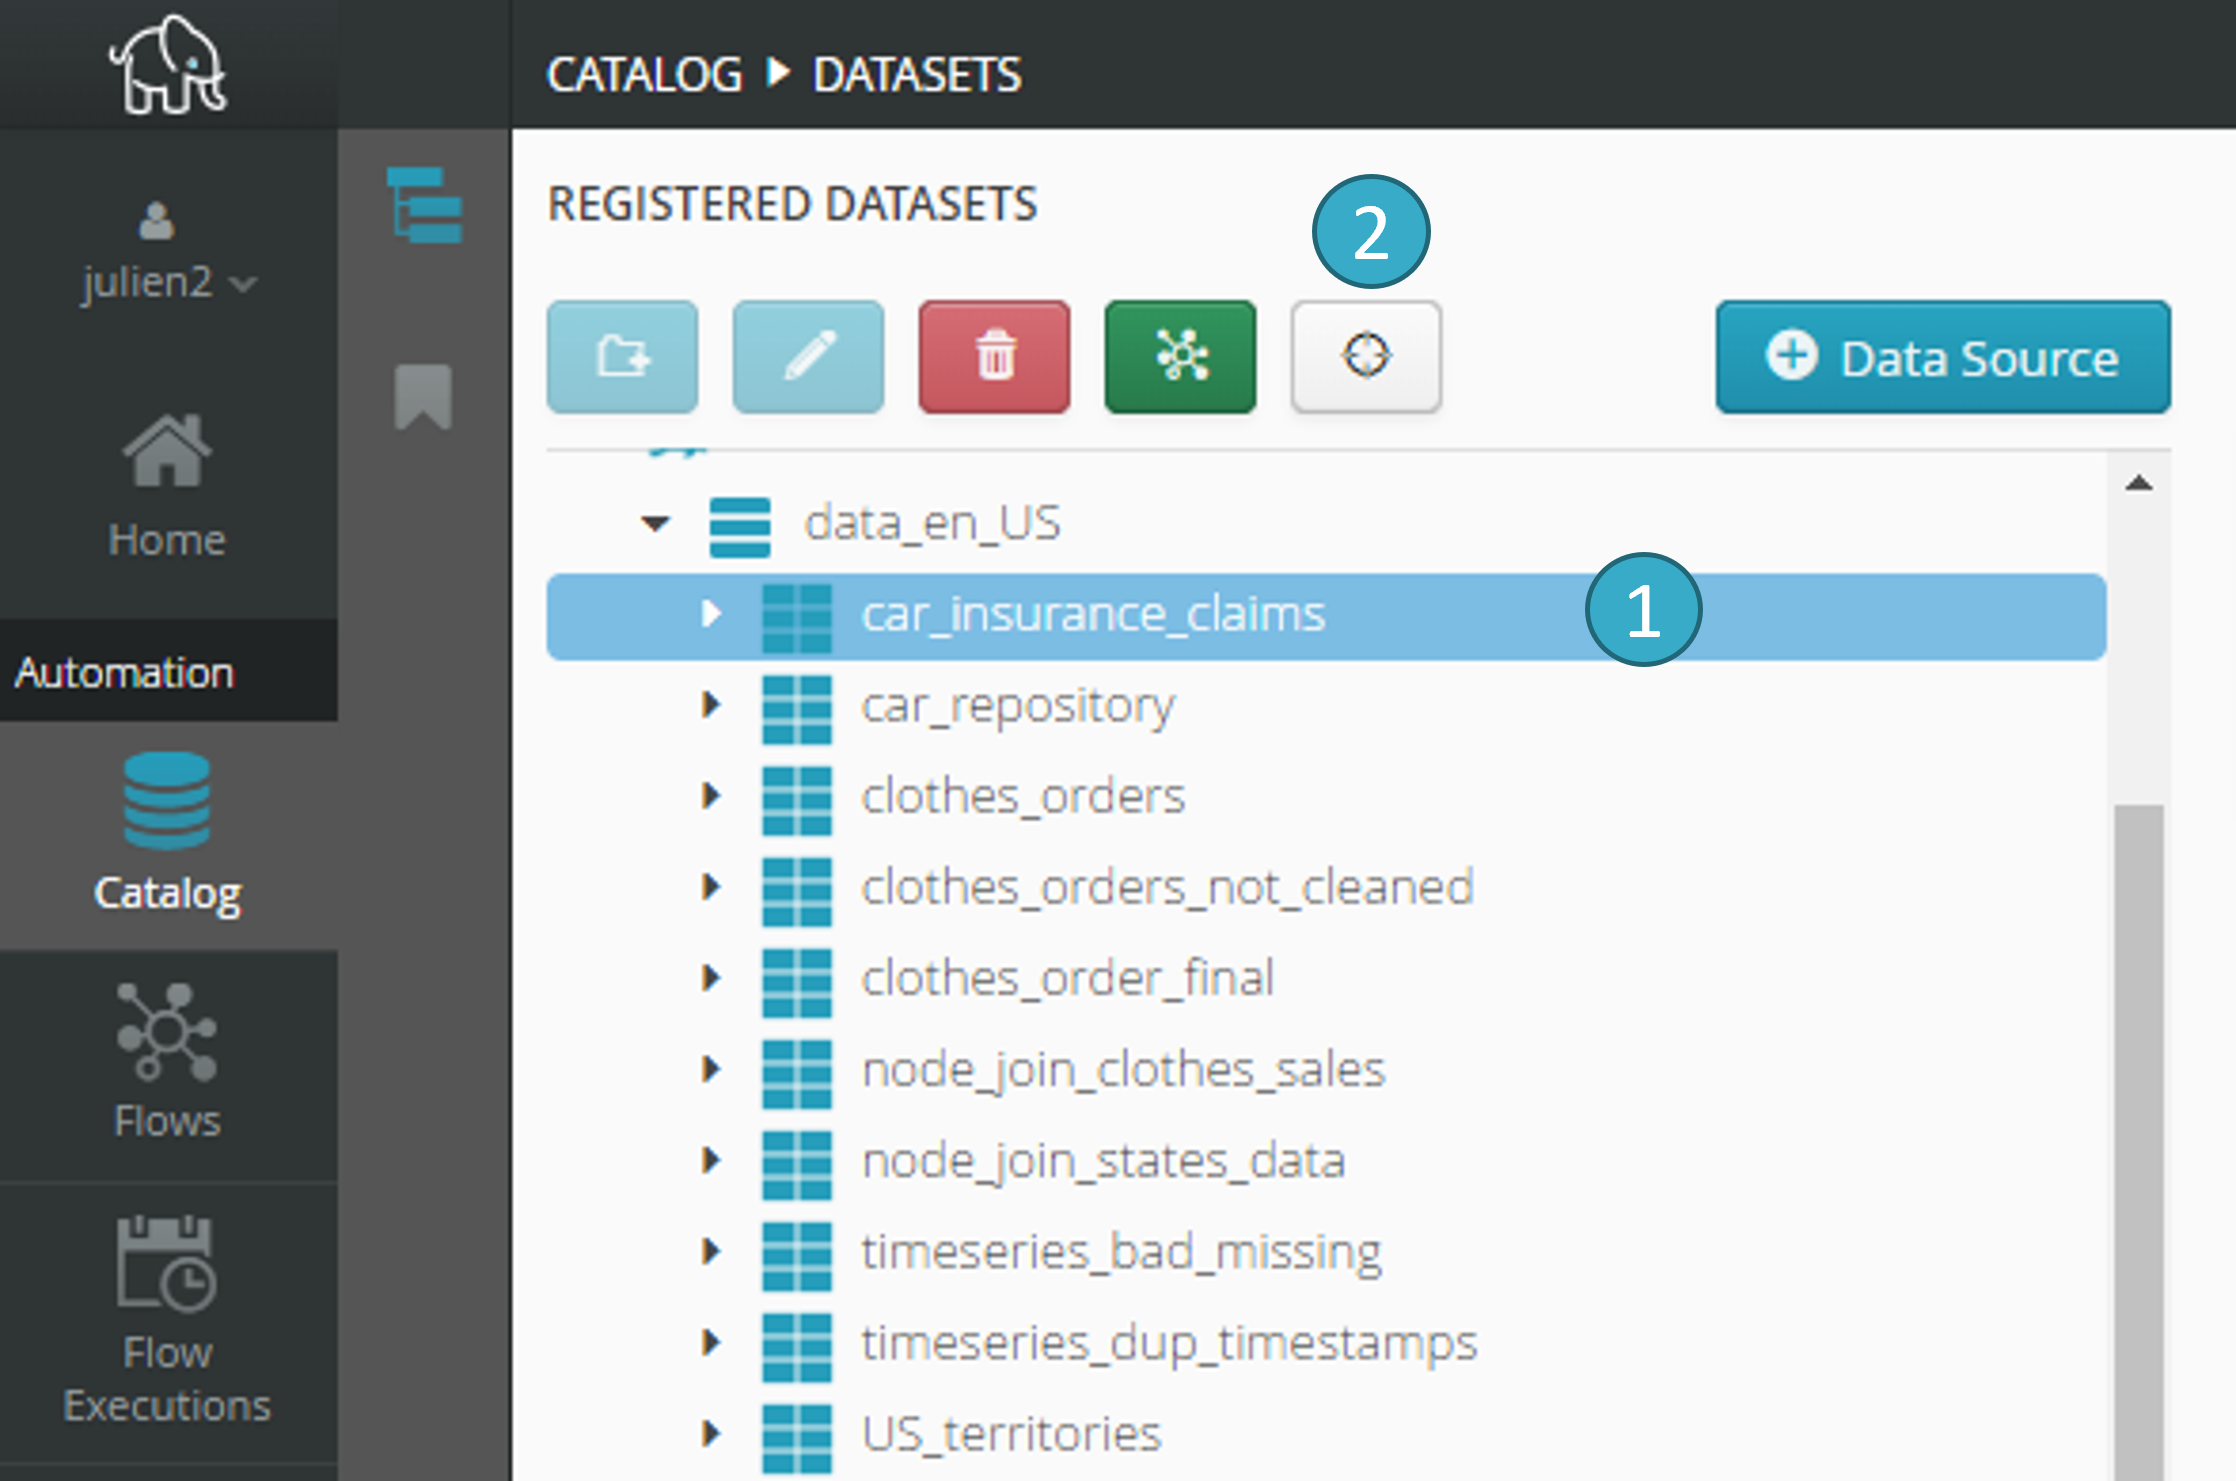
In catalog datasets view:
Select a dataset
(in this example: customers_tod_final_particuliers_deduped.parquet).
Click the target icon
 .
.
The Lineage window will open. Two approaches will be offered:
Upstream Lineage.
Downstream Lineage.
2.5.2. Upstream lineage
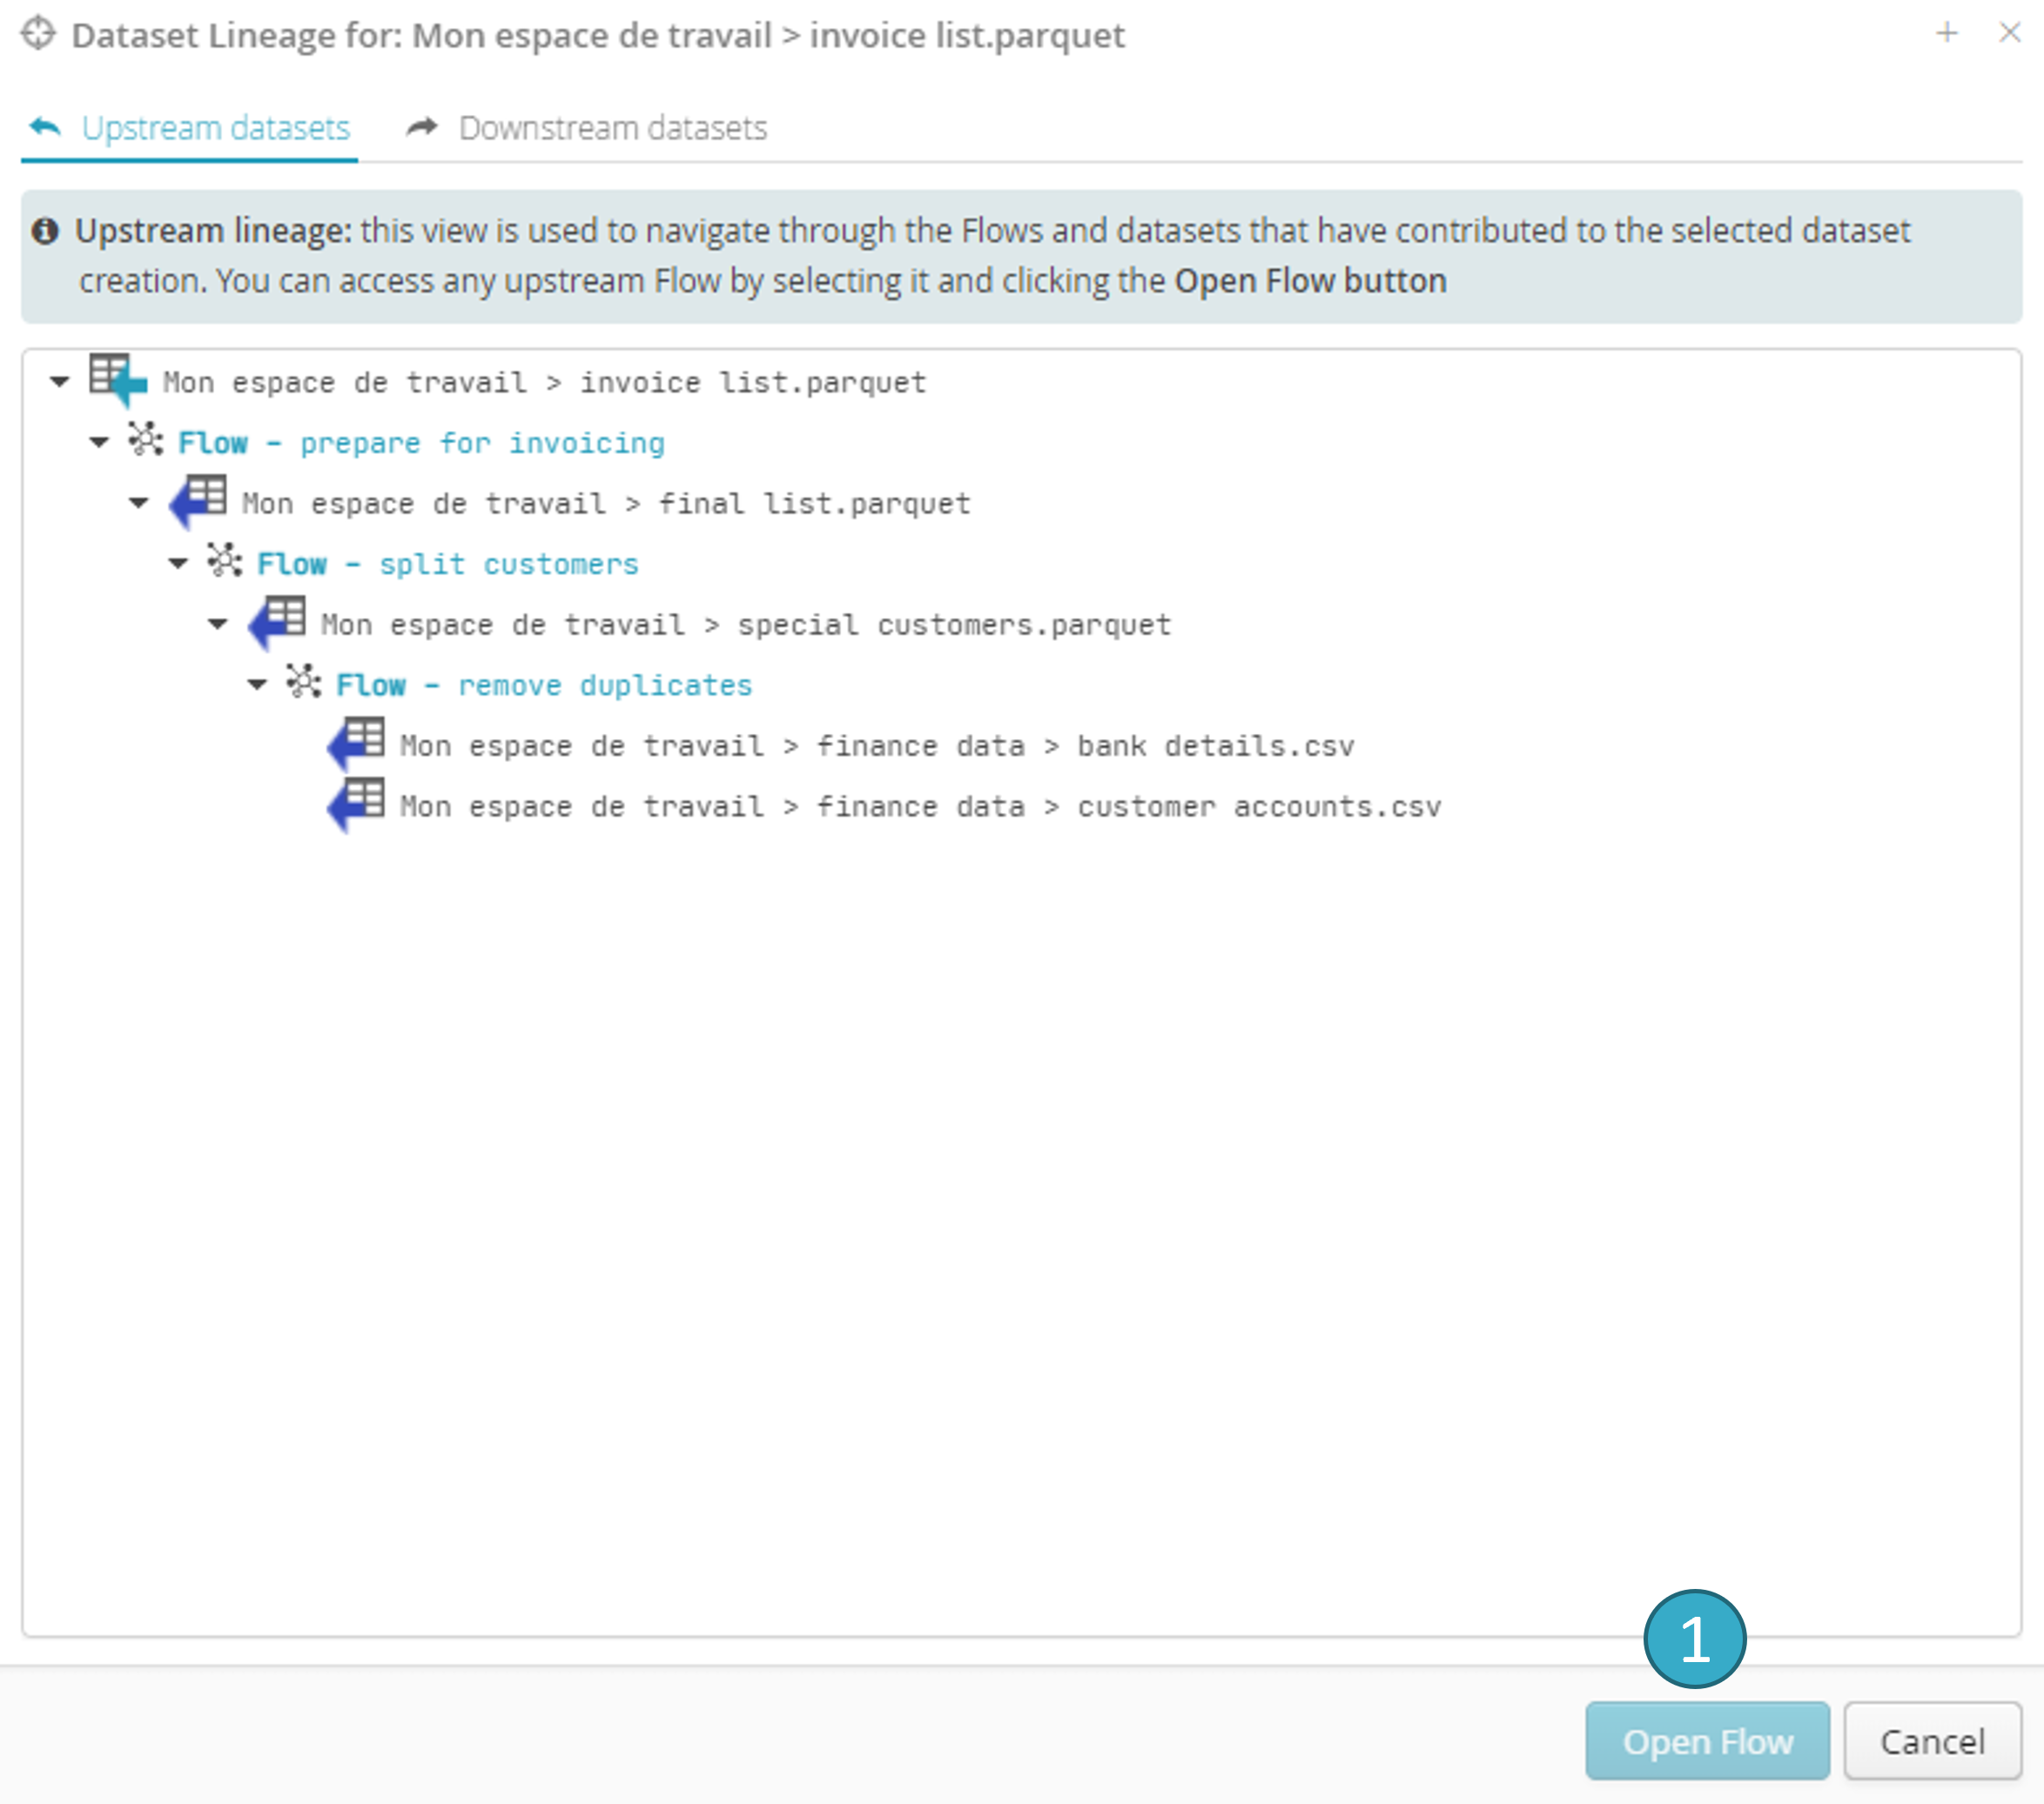
This view lets you browse through the flows and datasets that helped create the selected dataset.
You can access any upstream dataset or flow by selecting them using the Open dataset and Open flow buttons, respectively.
2.5.3. Downstream lineage
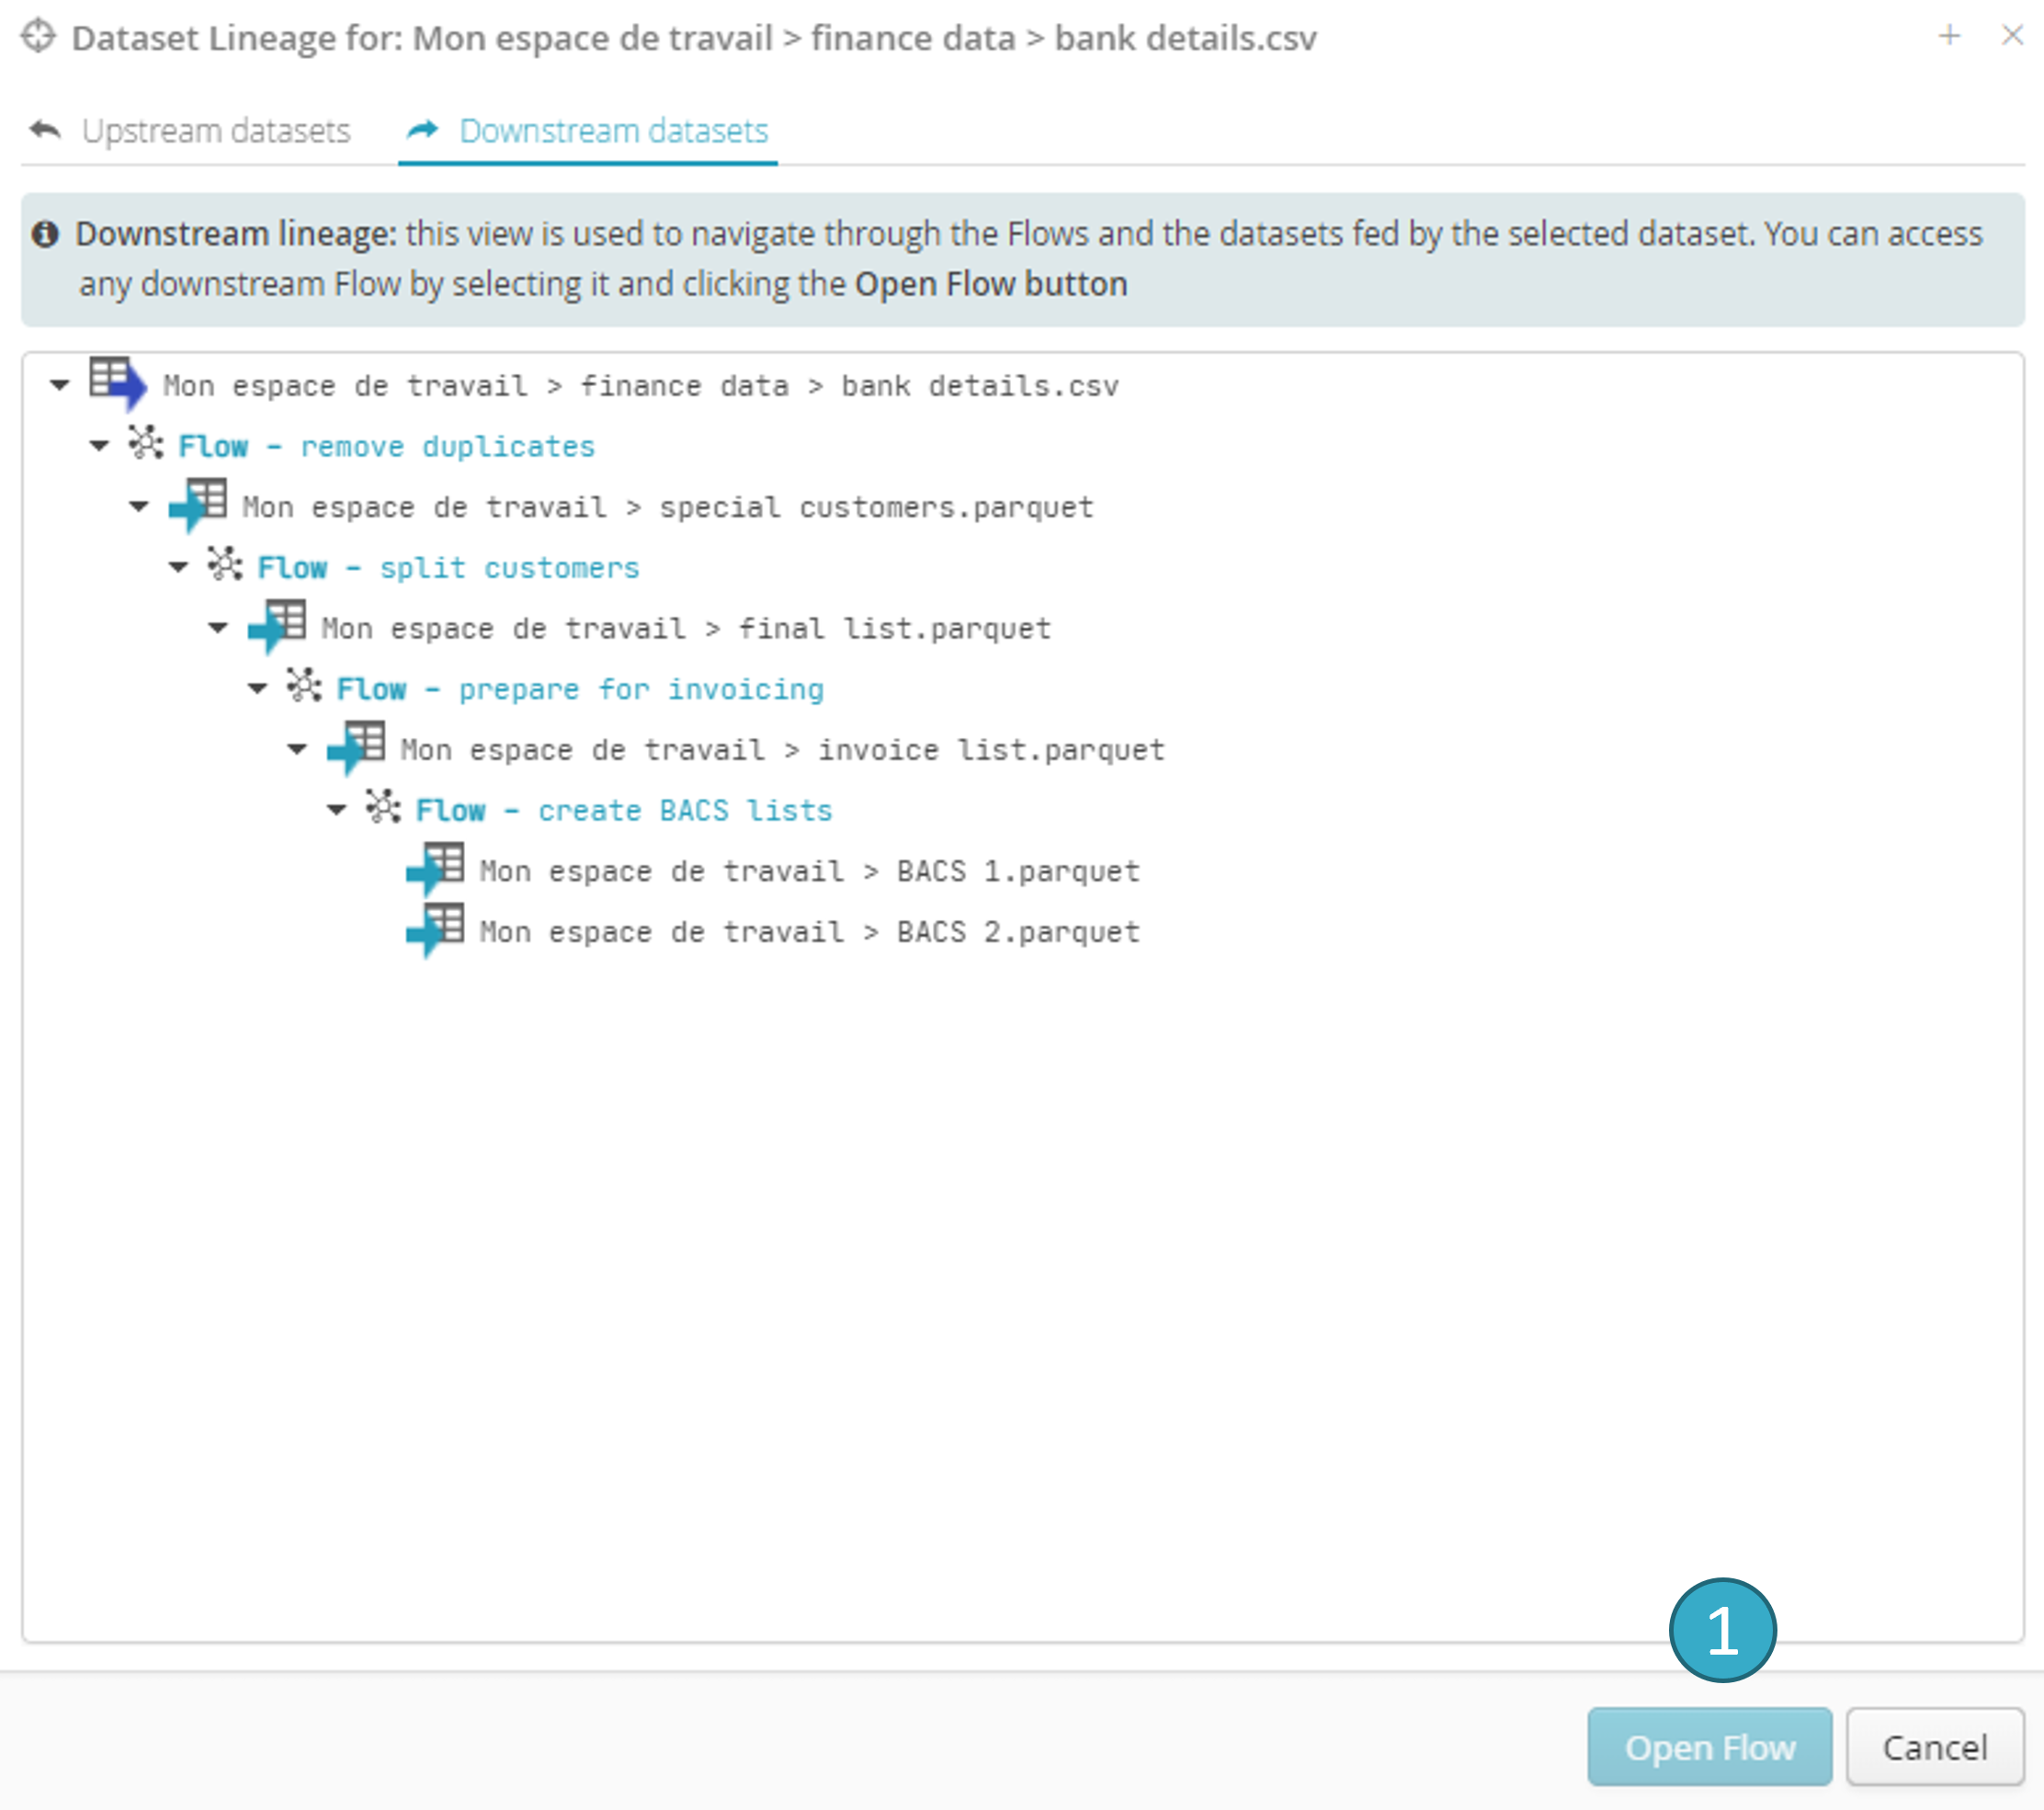
This view allows you to navigate through the flows and datasets that are fed by the selected dataset, as well as through the associated dashboards.
You can access any downstream flow, dataset, or dashboard by selecting them using the Open dataset , Open flow , or Open dashboard buttons, respectively.
2.5.4. Access to the data lineage from the flow editor
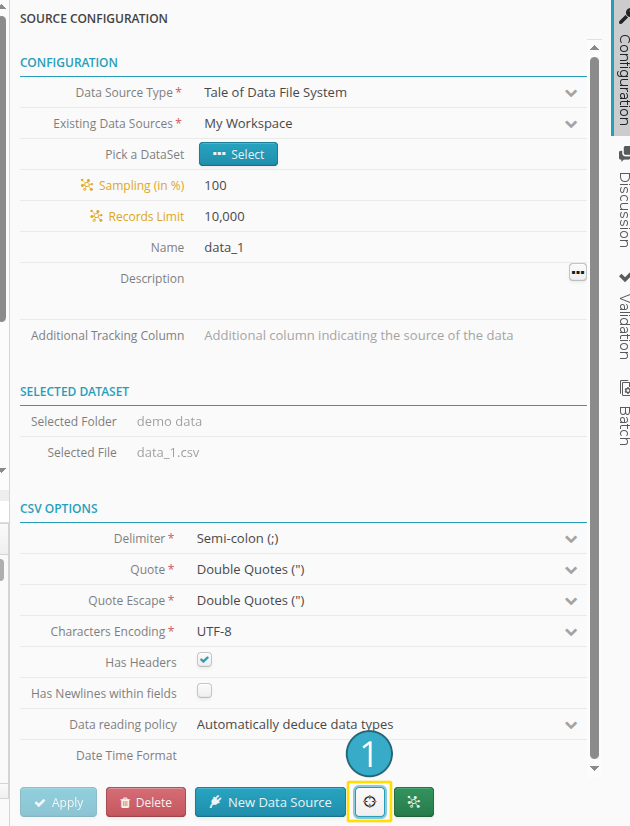
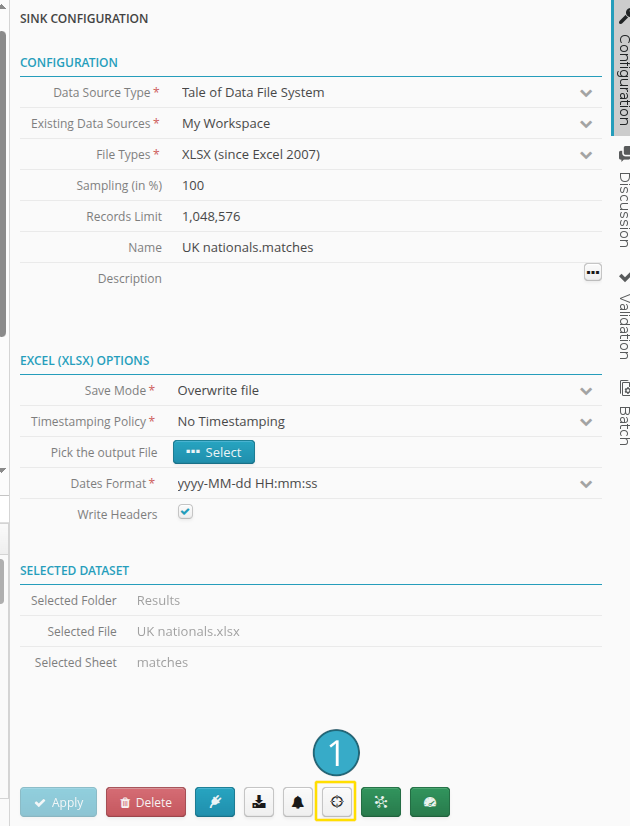
The configuration panel of any source or sink node in a flow also provides access to its data lineage.
The Lineage view is also available in the flow, via the configuration panel of source and target nodes.
For a source node, using as follows:
And for a target node, also using :
2.5.5. Access to the data lineage from the dashboards
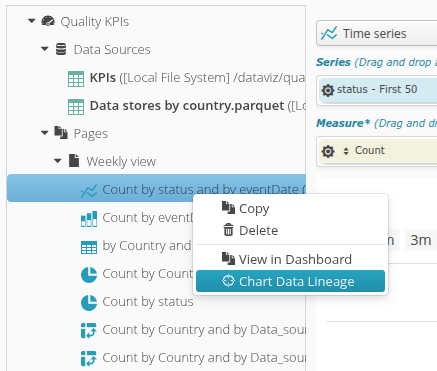
Finally, each dashboard has a target icon that gives access to its corresponding data lineage :

The data lineage of an individual chart can also be opened with a right-click in the editing environment: