5. Scheduling and launching flows, creating notifications
5.1. Planning and running flows
Flows let you use your mouse to design processing for the production phase, making it very easy to run flows.
Tale of Data lets you perform processing that has been modelled in directed and connected acyclic graphs (i.e. processors all must be, even if indirectly, connected).
If a flow is valid, the run button for the flow  will be activated on the toolbar:
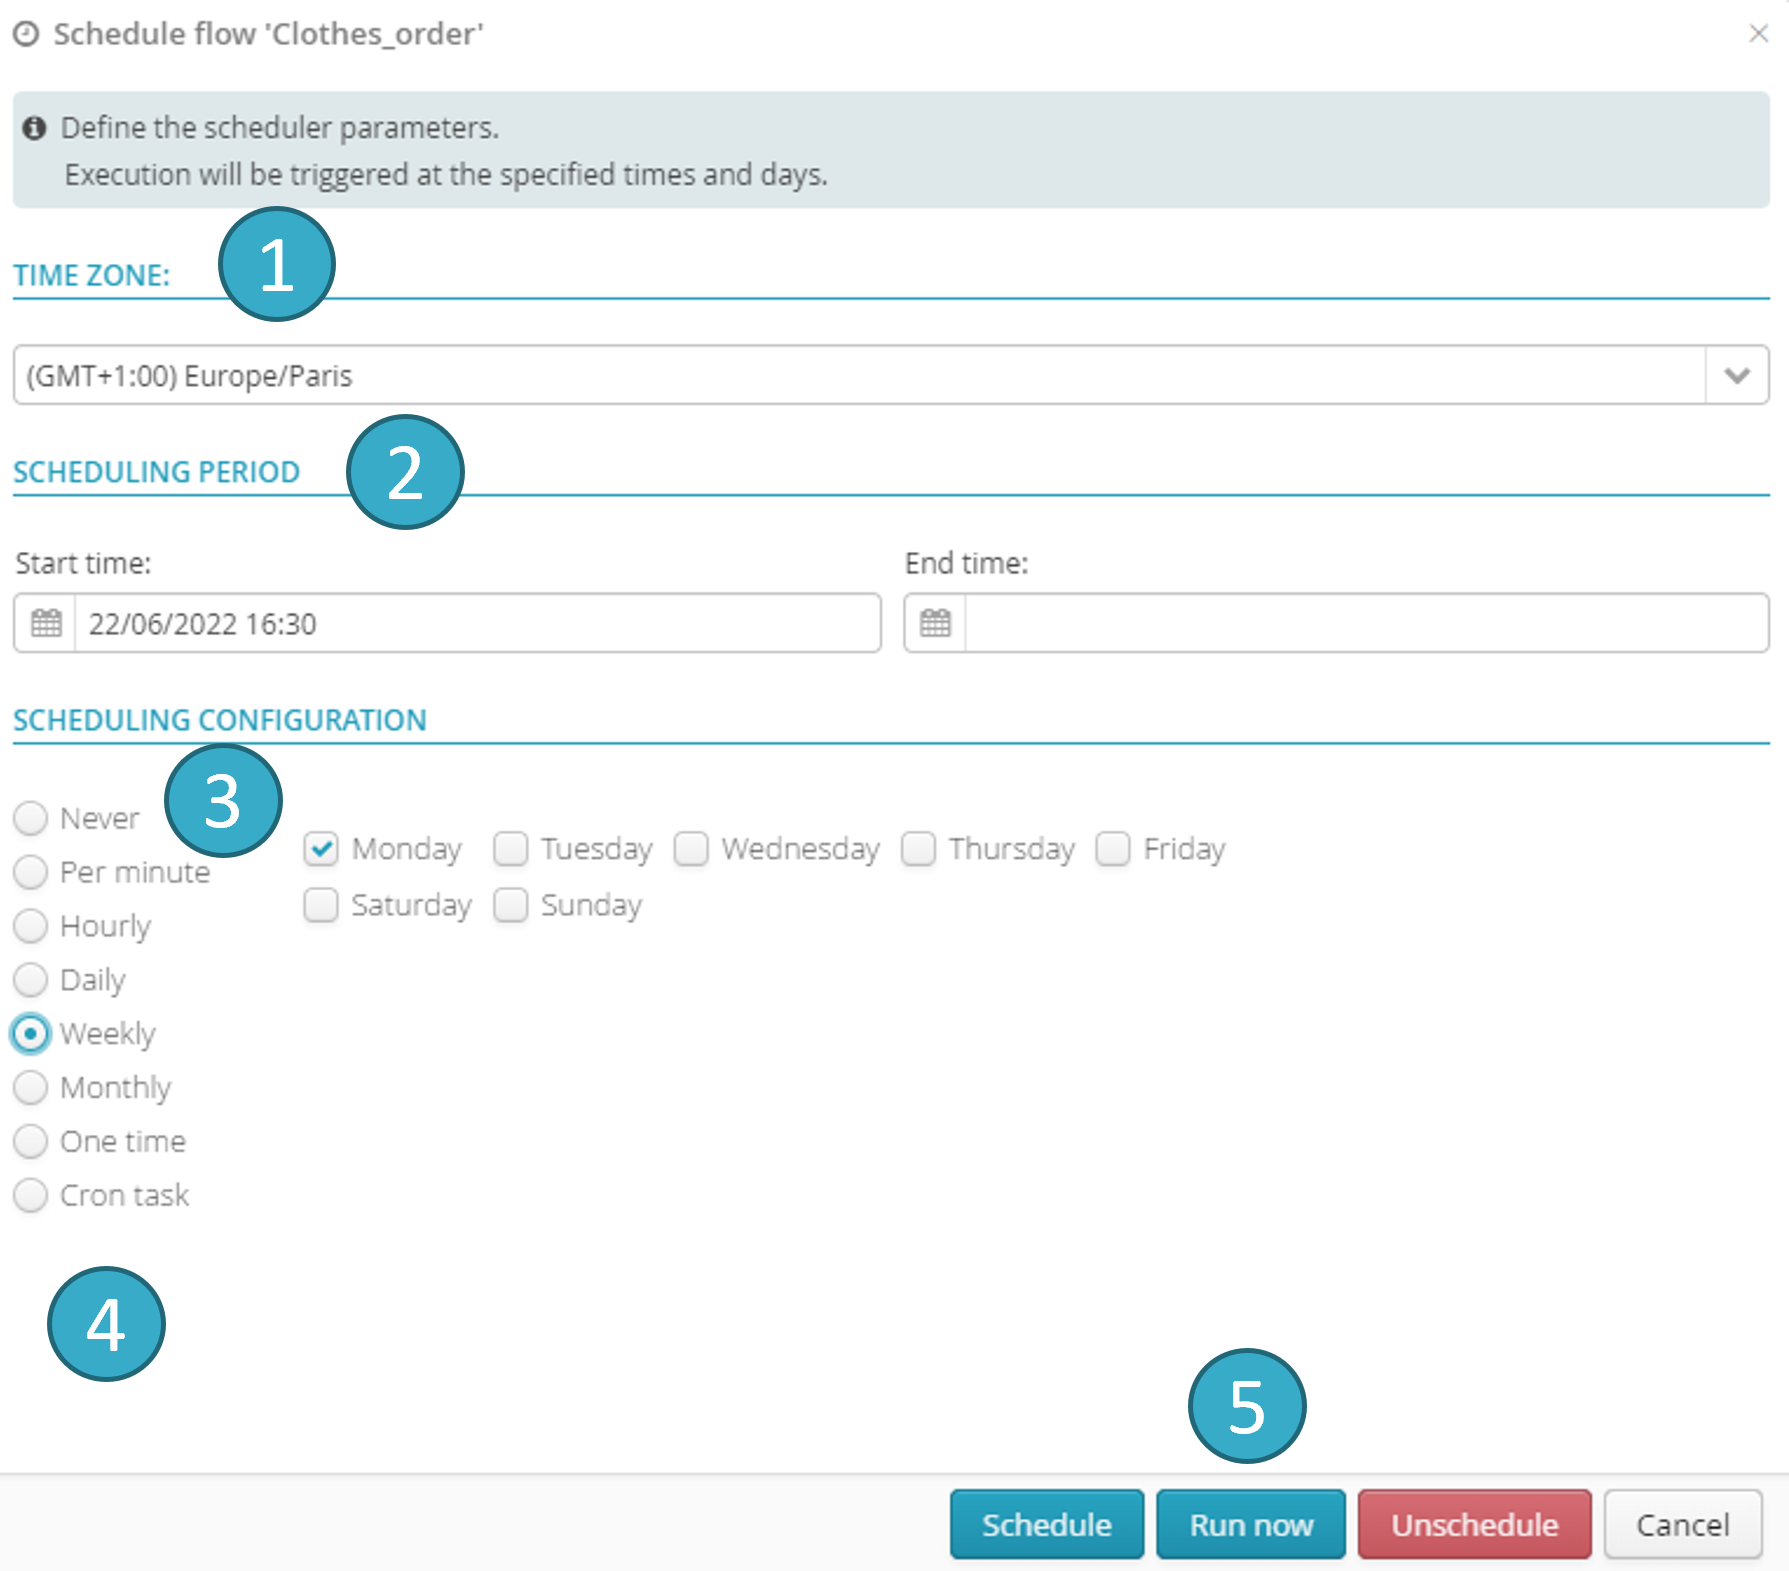
Click the button to open a dialogue window that lets you schedule the running of the flow. You can:
Set a schedule range (start/end date/time)
: running cannot start outside this period.
Set runs to repeat at intervals of between one minute and one month
.
Specify (experts only) a cron expression
[2].
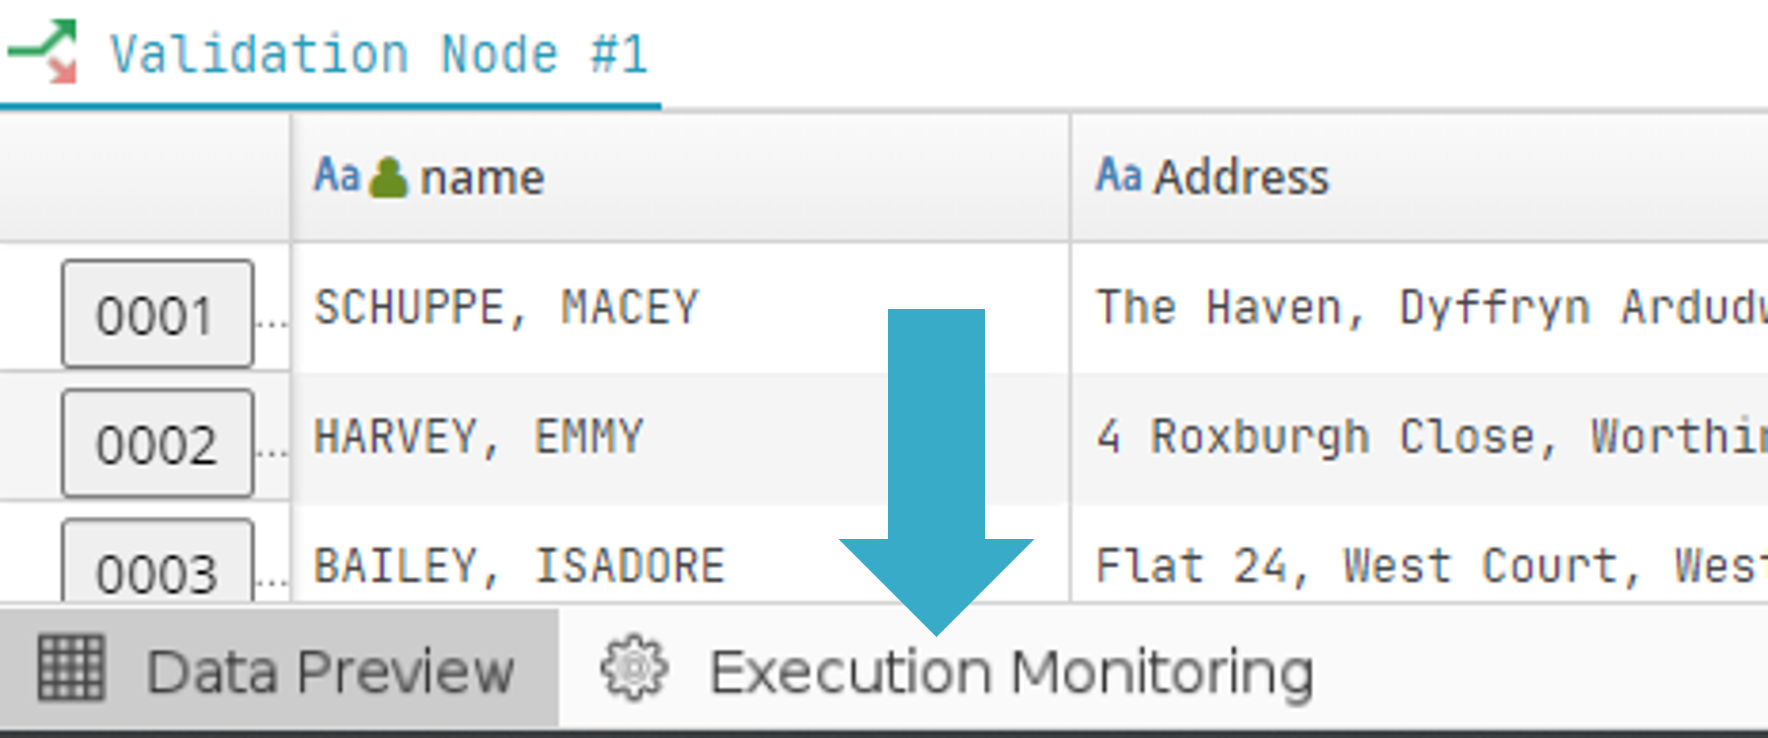
Flows are orchestrated via a server that is different from the main web application server. The events associated with the running of a flow (start, progress, success, failure) can however be accessed via the web interface. Click Execution Monitoring at the bottom left of the screen (beside Data Preview) for information on this:
You will then see a list of the most recent flow runs (by default, the flows run in the last 10 days). The following information will be available:
Run status (Success, Failure, In progress).
Details: click a button to go to the catalog where, if the run was successful, you will find all the sinks it fed. If it failed, error messages will be shown.
Successful vs total tasks.
Successful vs total sub-tasks. Since a run is a distributed process, it will not necessarily complete all the sub-tasks allocated in the run schedule. The run may therefore conclude successfully even though some sub-tasks are still outstanding.
Data read in octets AND as a number of records.
Data written in octets AND as a number of records.
Actual start and end times (if the run has not yet finished, the end date will be blank).
Total duration of the flow run.
Start time as originally scheduled.
Next run time, if this is a recurring schedule and if at least one run remains.
If the flow is being run, when a progress event is received the cells concerned will turn yellow for a few seconds:

If the run is successful, click Display results (see fig. above) to open a dialogue window with a link to each dataset that the flow created or altered:
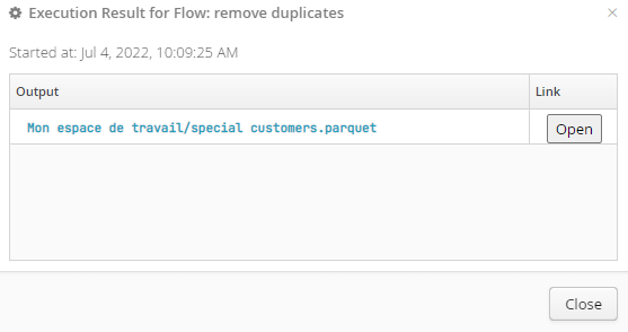
Click Open (see fig. above) to the right of each dataset produced by a sink to preview the data via the catalog.
5.2. Including a notification in a flow
Notifications are added to sinks (alias sink) to report when records written to a sink meet an activation criterion. For example: receive a notification when a sink collecting invalid records writes a record.
To add a notification in the bottom right configuration zone, click the bell-shaped notification icon  :
:
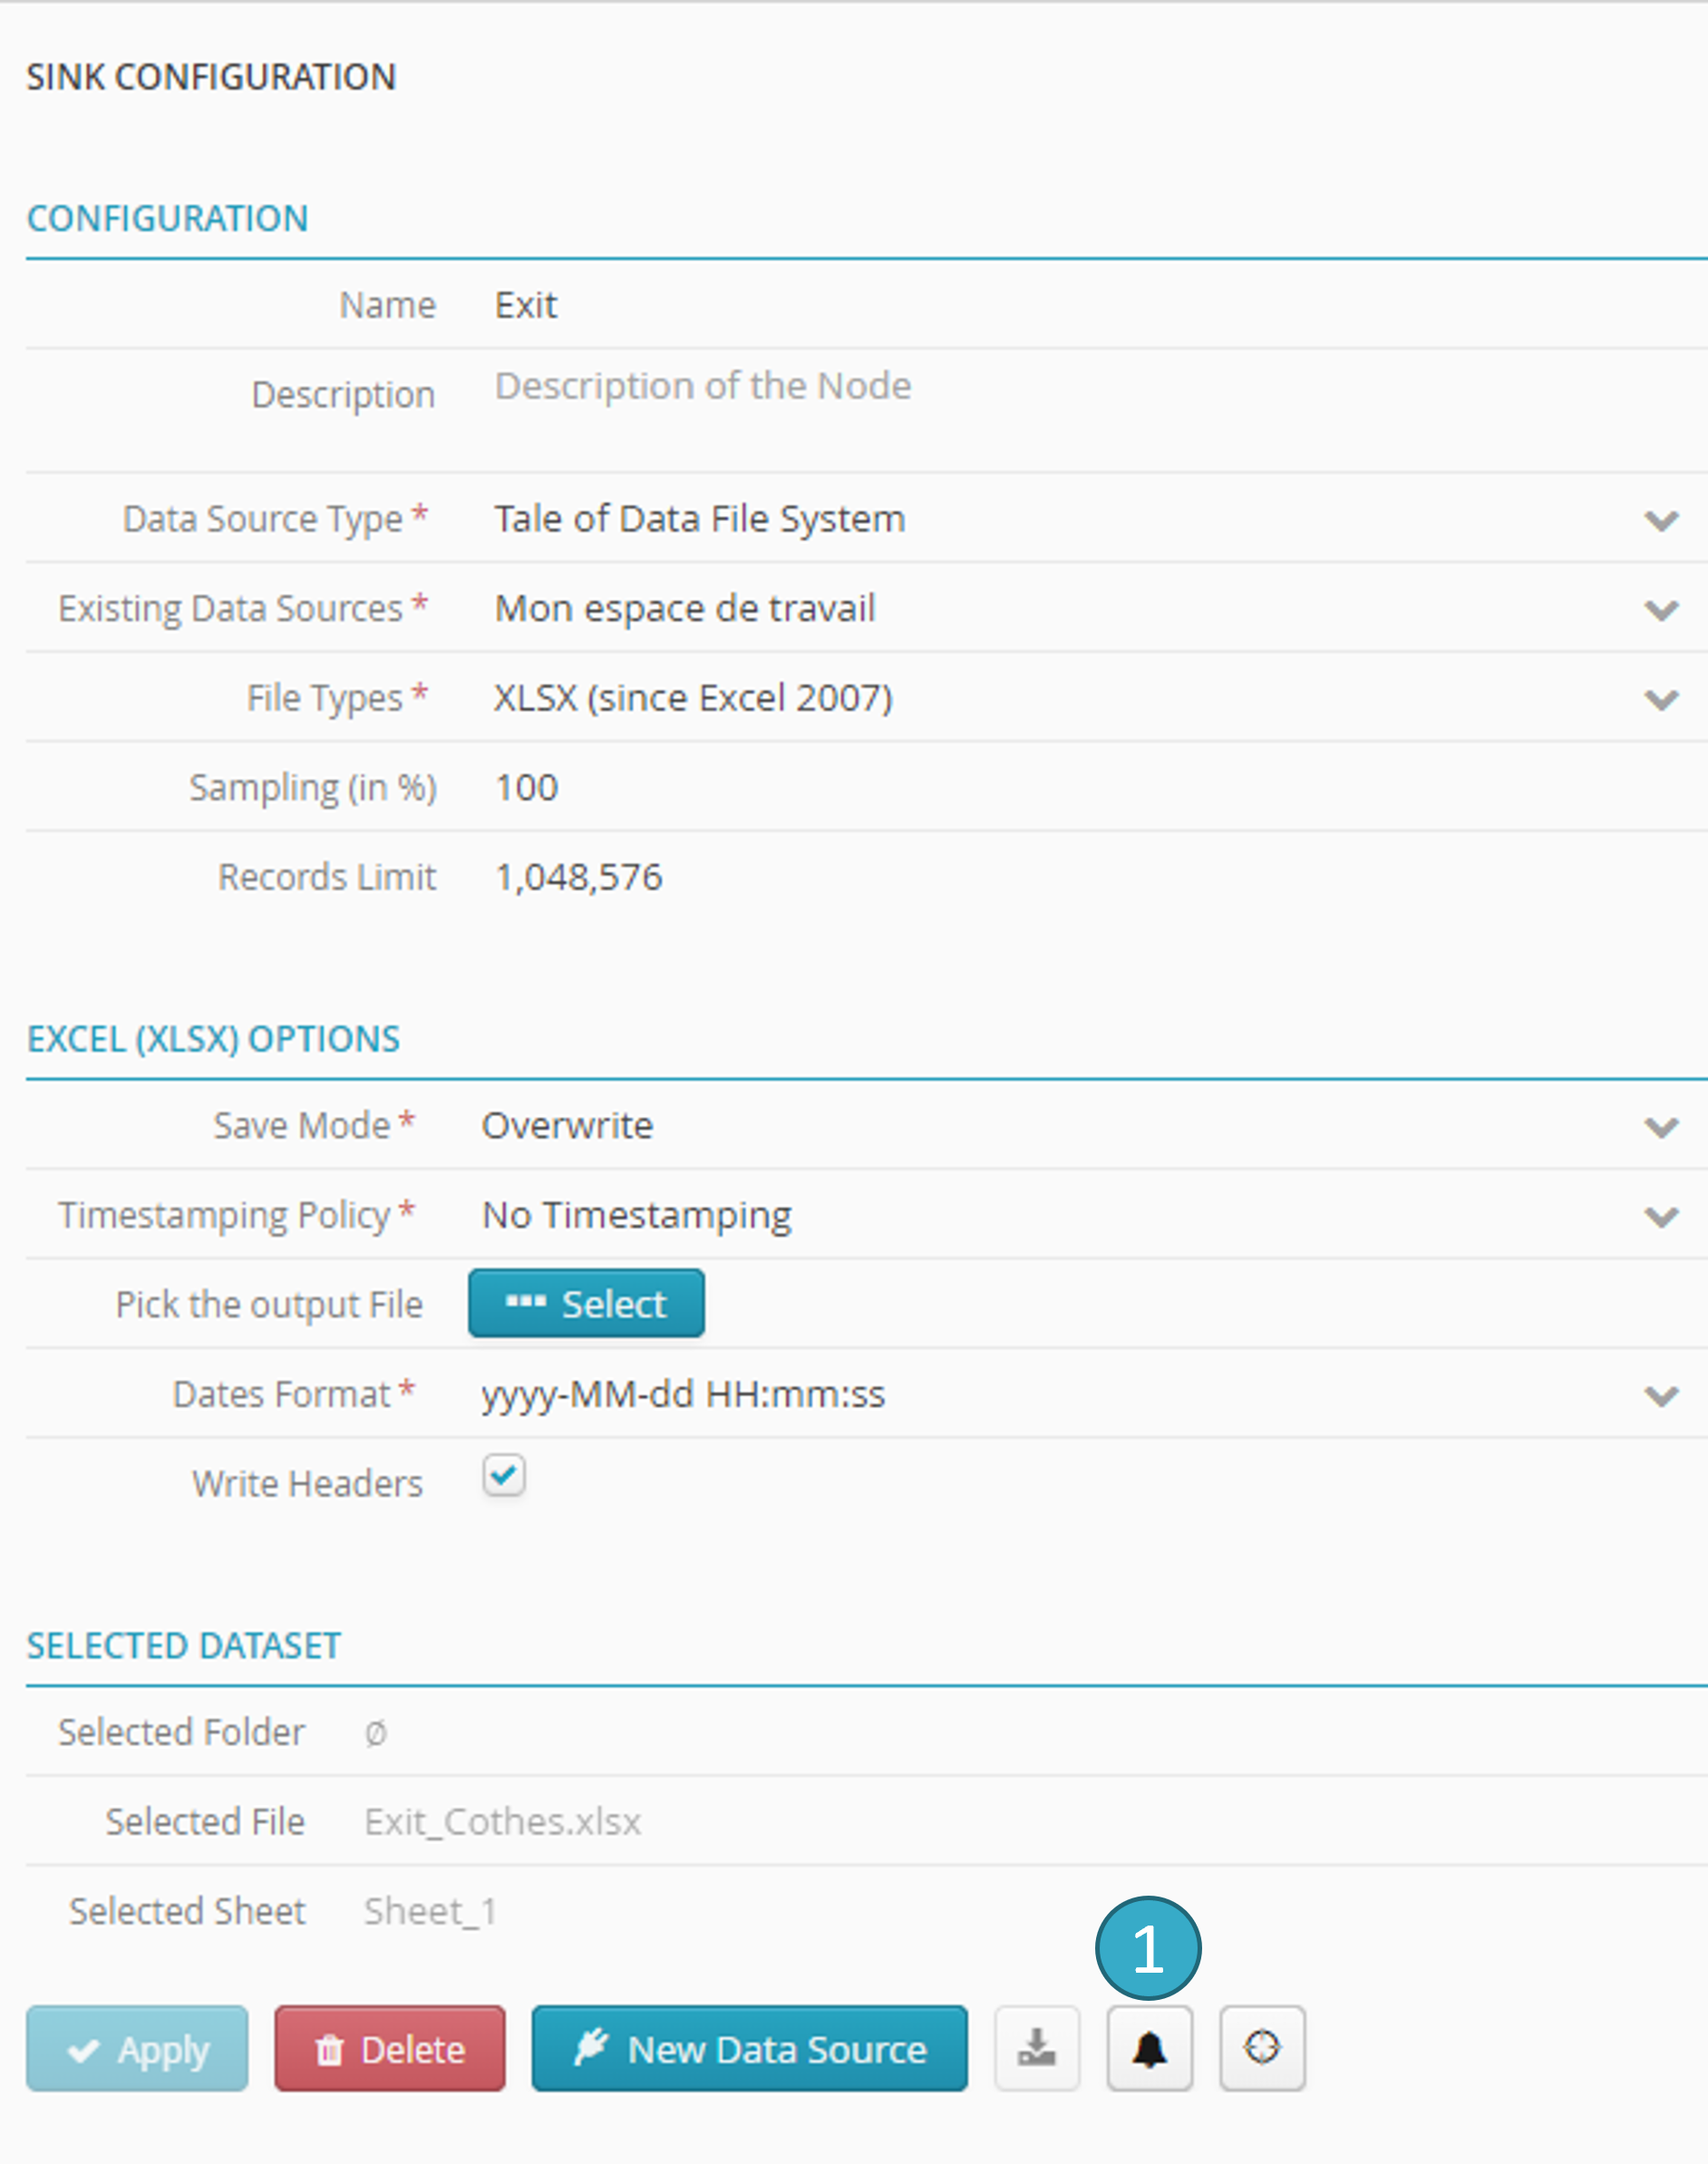
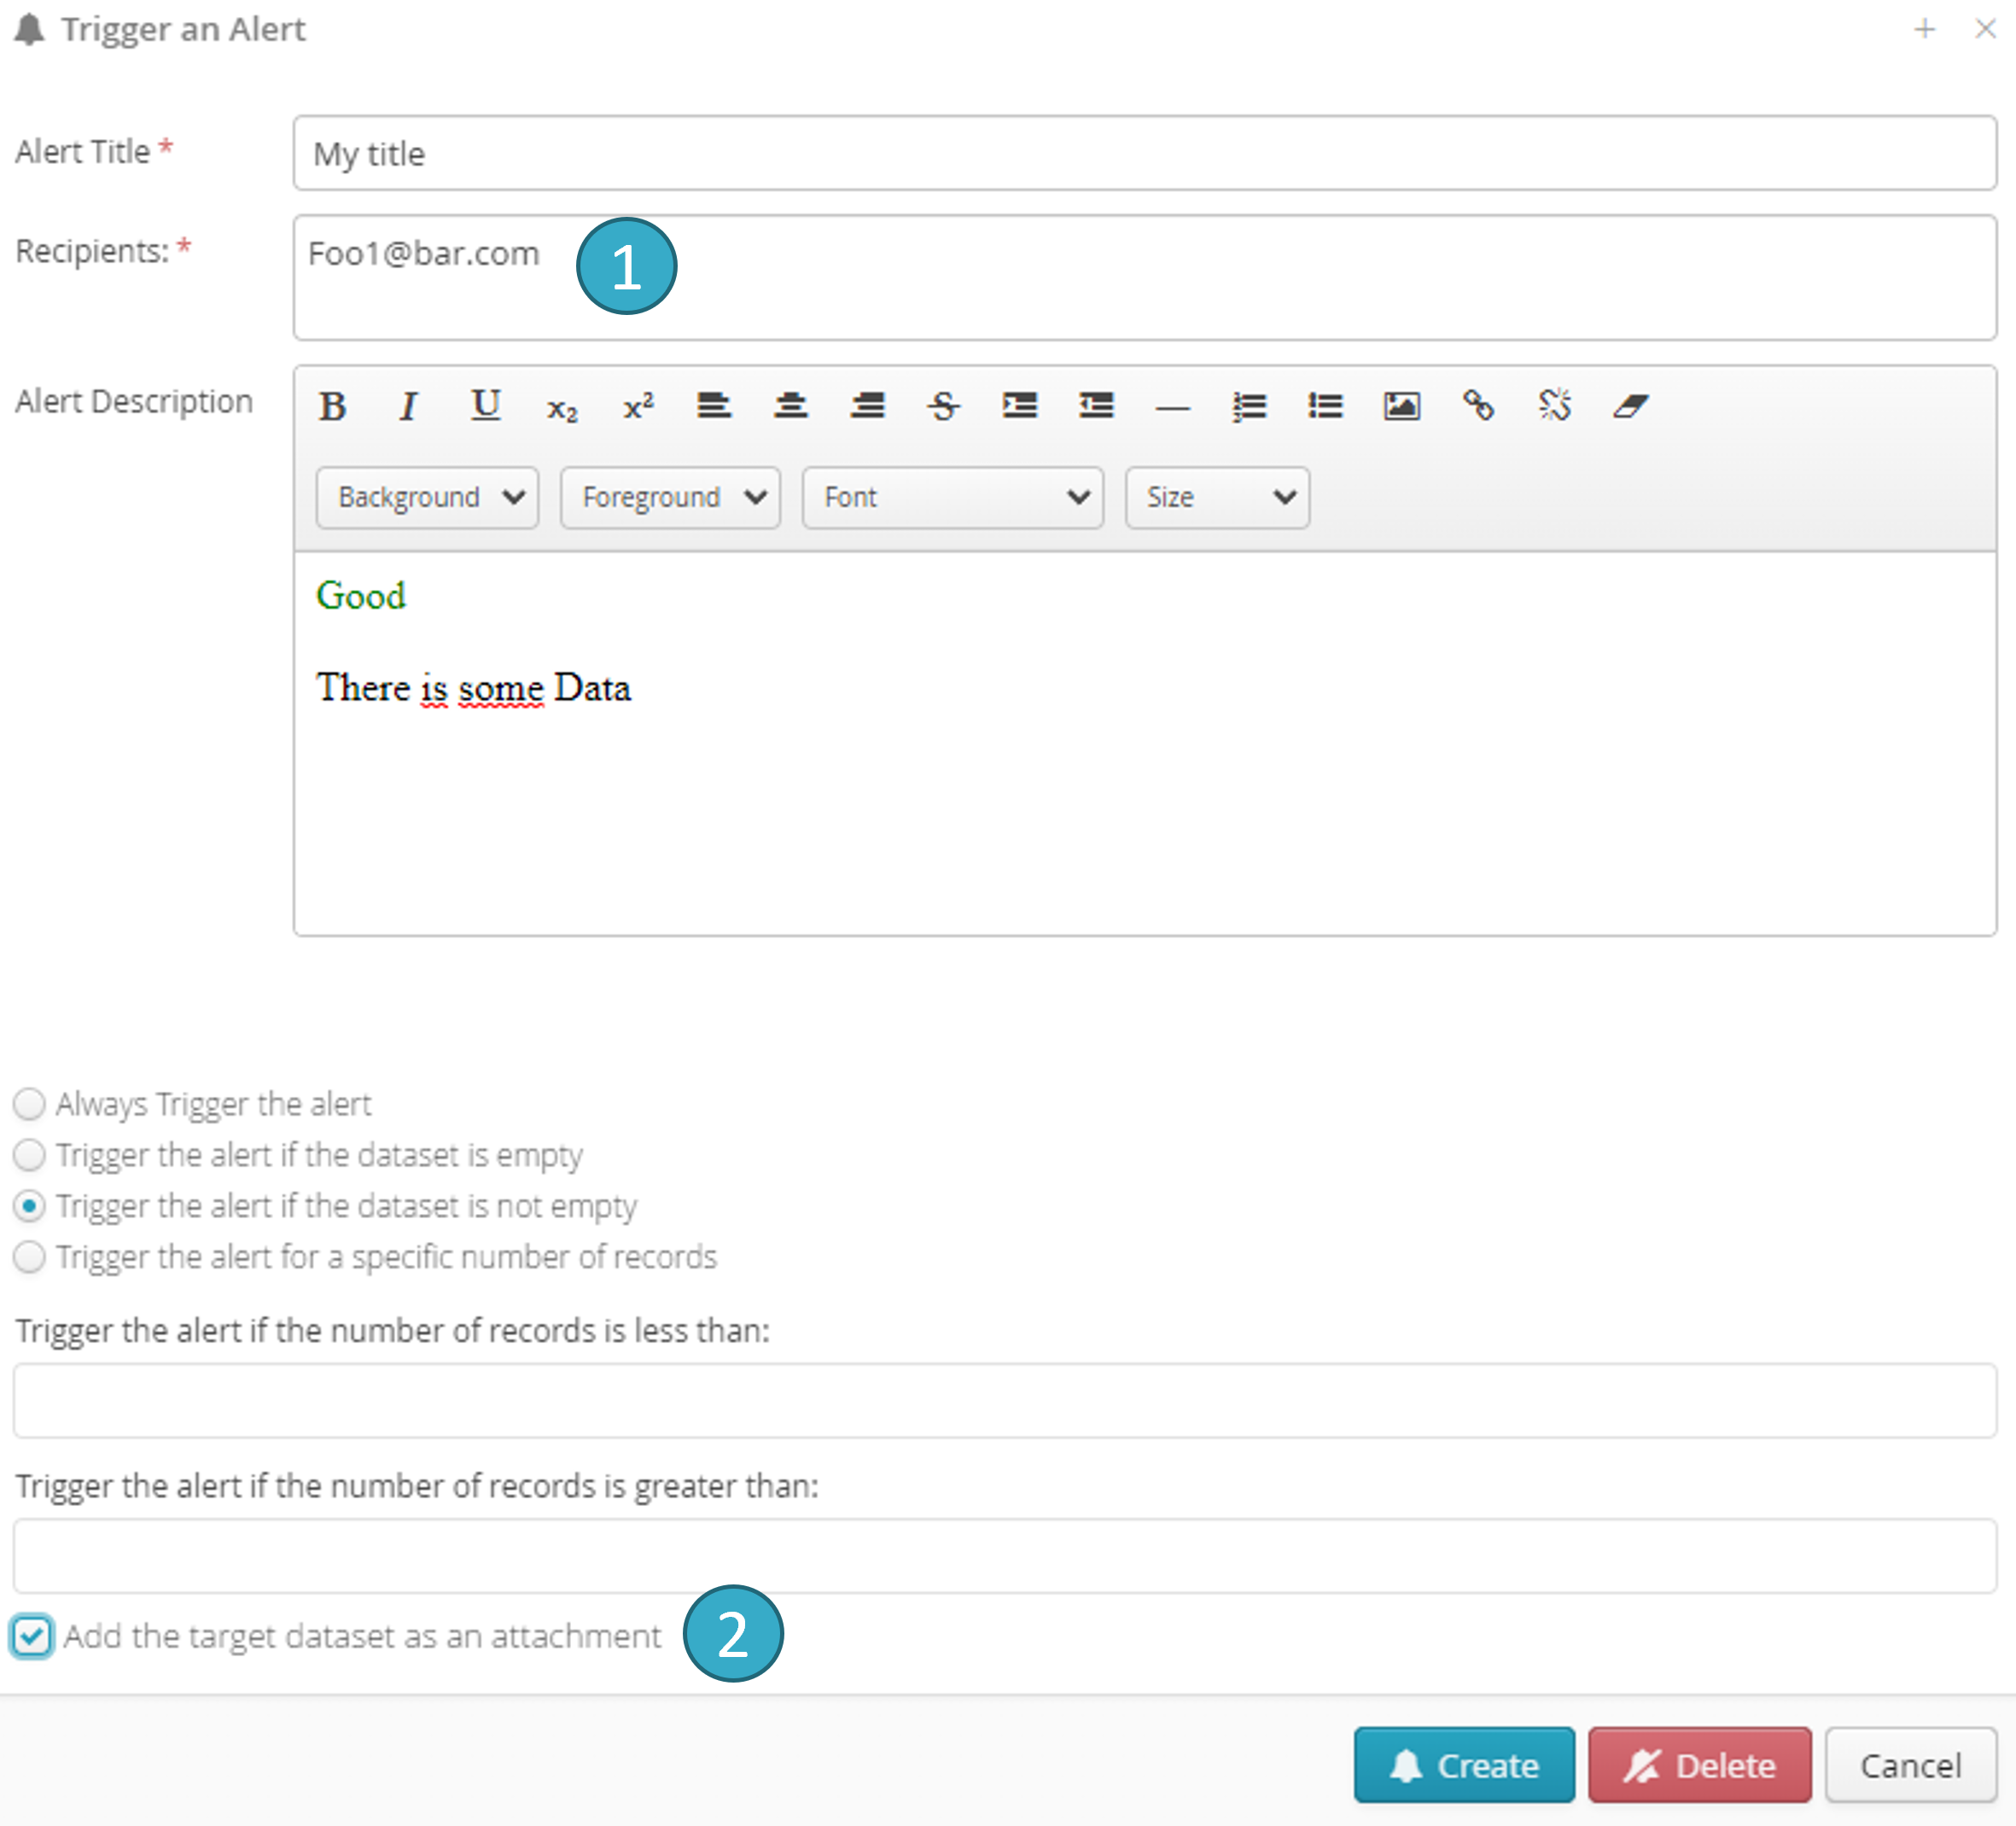
You can set a min/max number of records that must be written to the sink when the flow is run:
When a notification has been set up, the Notification icon will turn red:

Don’t forget to click Apply to record the changes in the sink and activate the notification.
If notification triggering conditions are met at execution, an email will be sent to the people named in the Recipients field  . You can enter several recipients by separating their email addresses by commas.
You can also attach the sink dataset to the email notification by ticking Add the dataset as an attachment  .
.
Caution
By default, attachment size cannot exceed 2 mega-octets (this parameter can be increased. Please contact us).
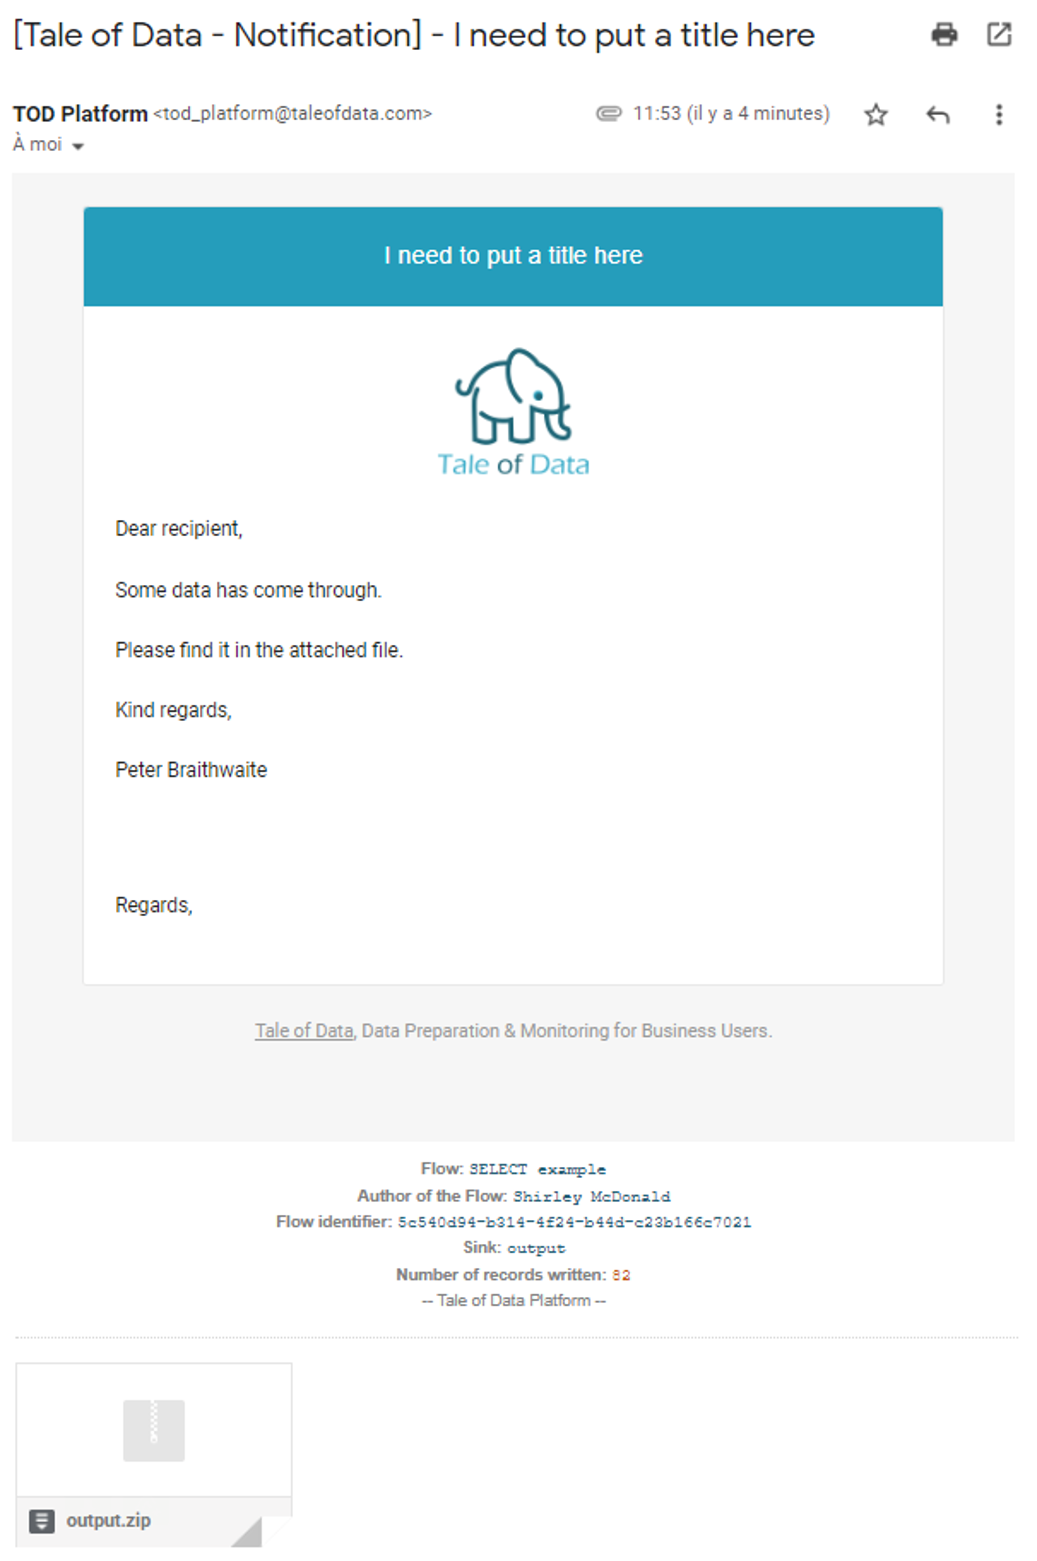
If the sink is an Excel file that does not exceed the size limit, that Excel file will be sent as an attachment. This functionality can be very useful if combined with writing from a flow to a tab in an existing Excel file. Tale of Data thus lets your update Excel charts by writing to tabs containing data that feeds into those charts.
If the sink is not an Excel file (or is an Excel file but is too big), a zipped CSV file will be sent as an attachment. Tale of Data can limit the number of CSV rows to ensure the attachment does not exceed the max size.
Example of a notification email with attachment:
5.3. Scheduling and running flow sequences
Note
If you want to learn more about this feature, an e-learning tutorial is available below:
How to set up a Flow Sequence
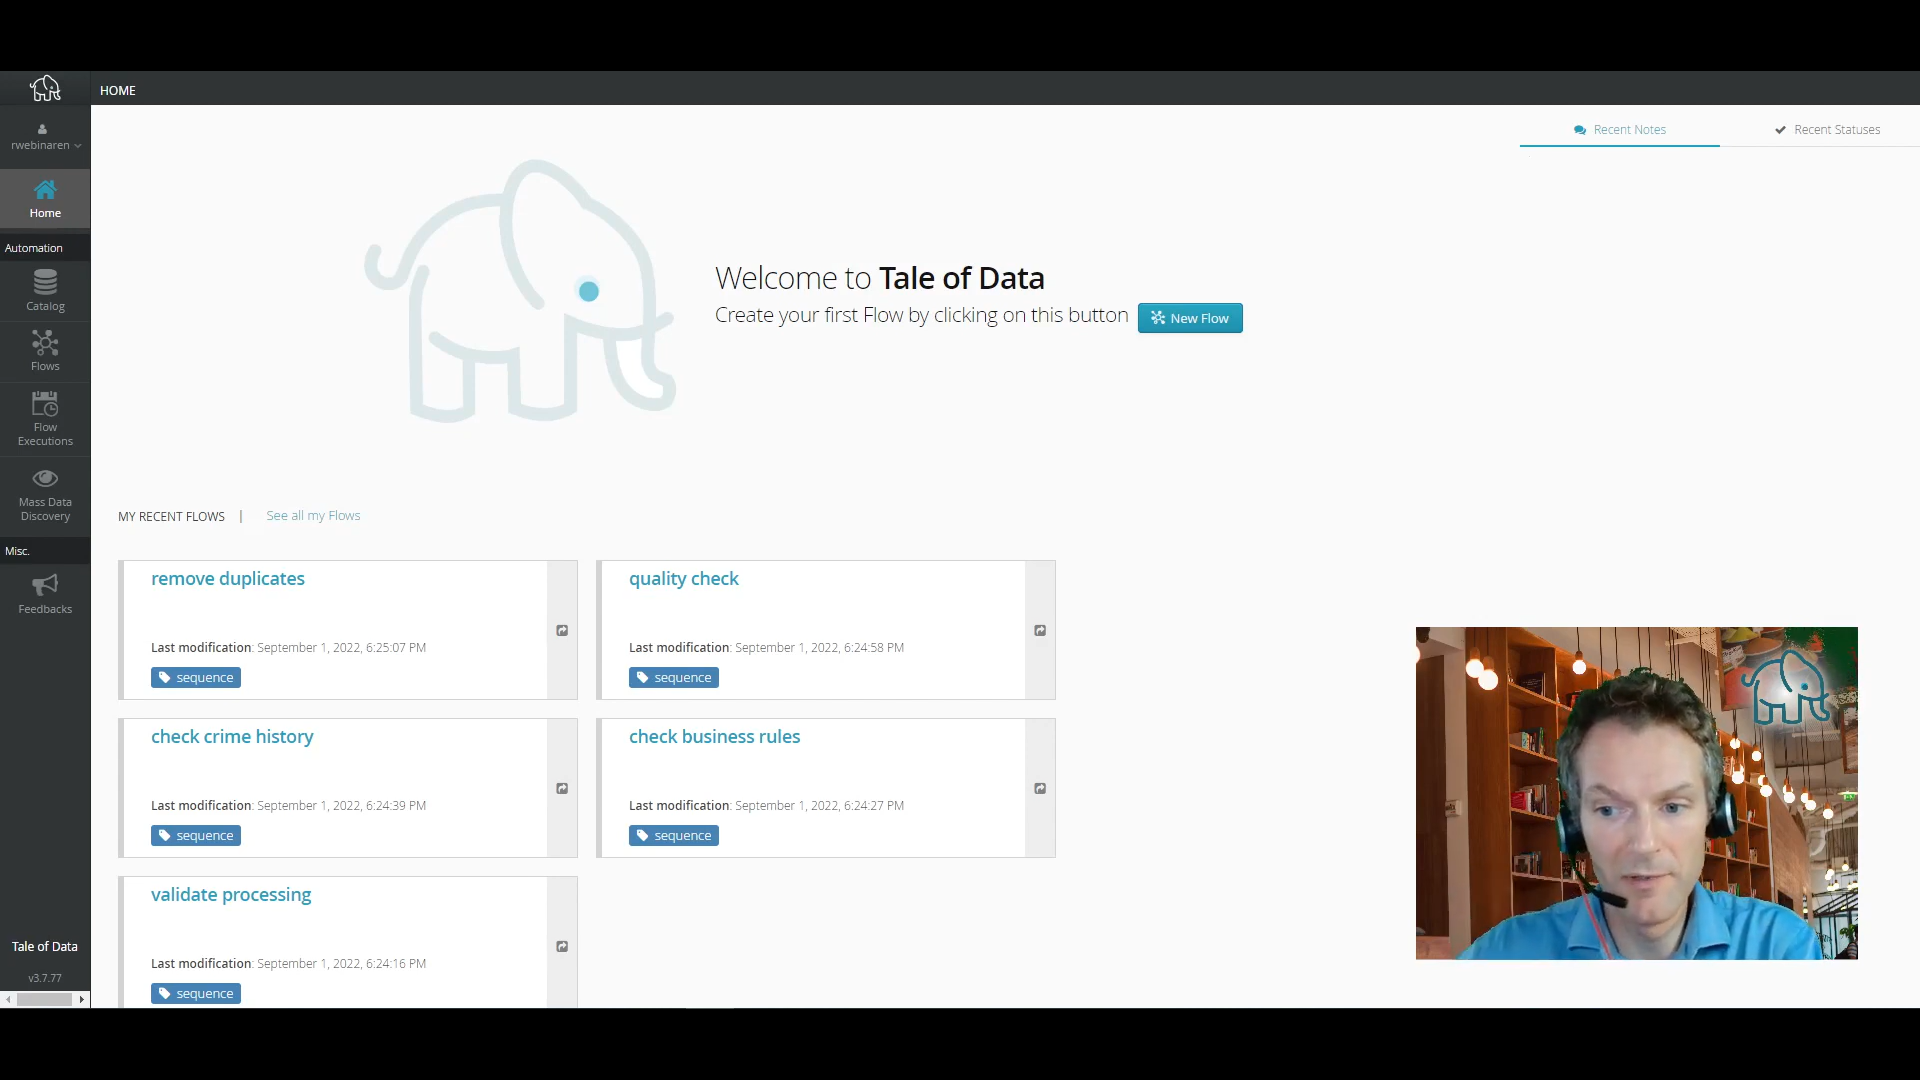
In this video we explain how you can set up and run a Flow Sequence. What this means is that instead of manually running one flow after another, you can let Tale of Data do this for you. And benefit from the same scheduling features that exist for running flows.
Flow Sequence lets you run a set of flows in a preferred order, secure in the knowledge that no flow in the sequence can start until the previous flow has finished..
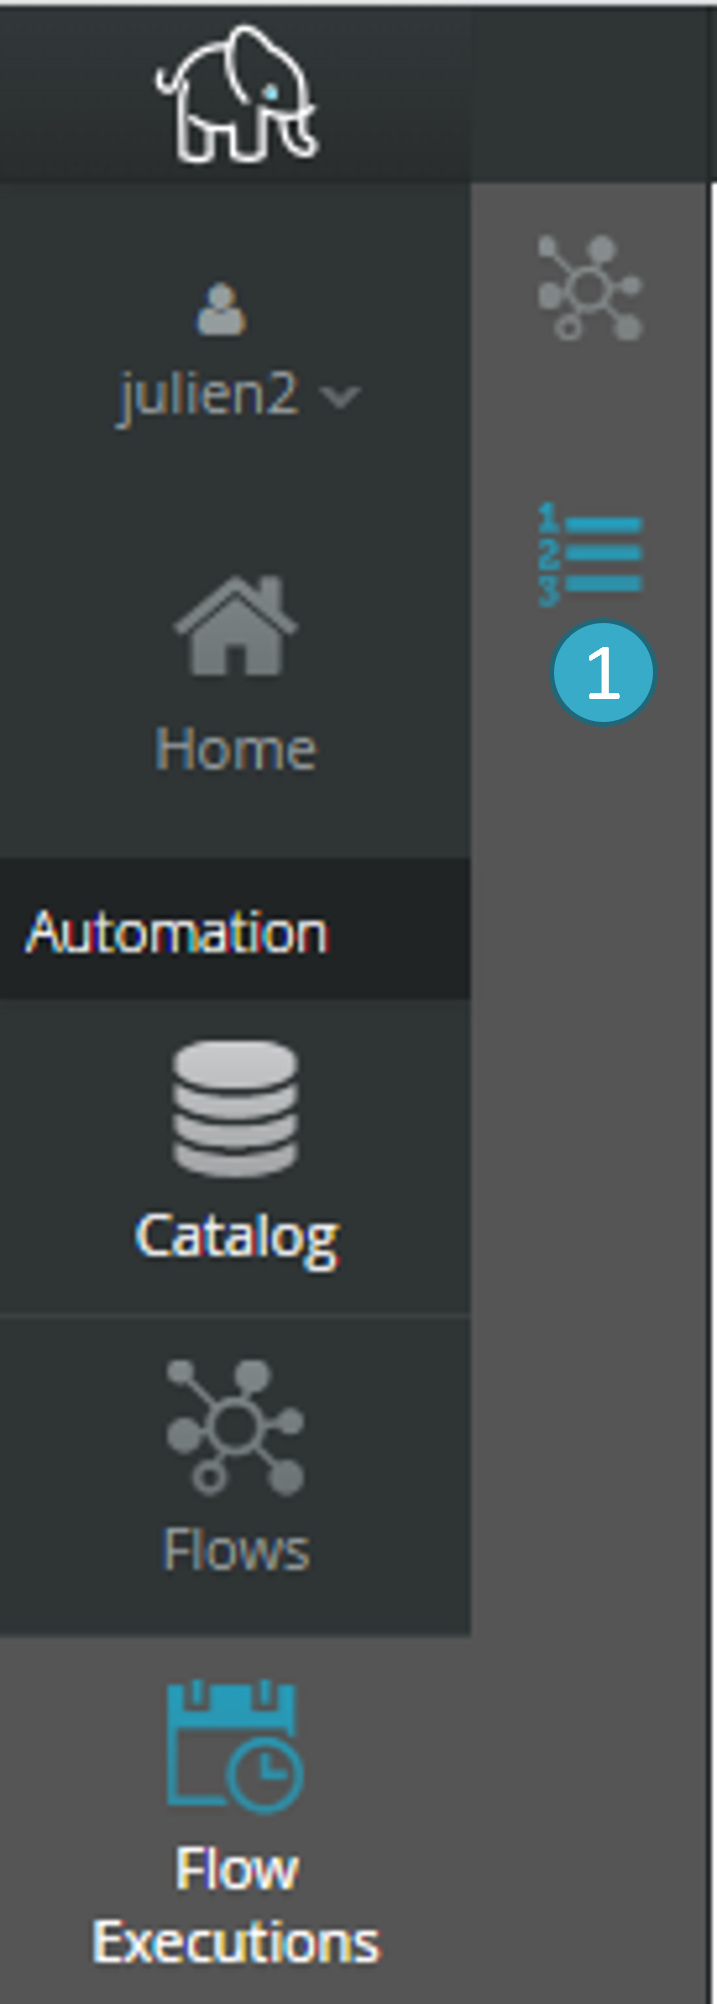
Access the flow sequence management view via the Flow execution menu by clicking the List icon  .
.
Sequence view lets you create/alter/run/delete flow sequences.
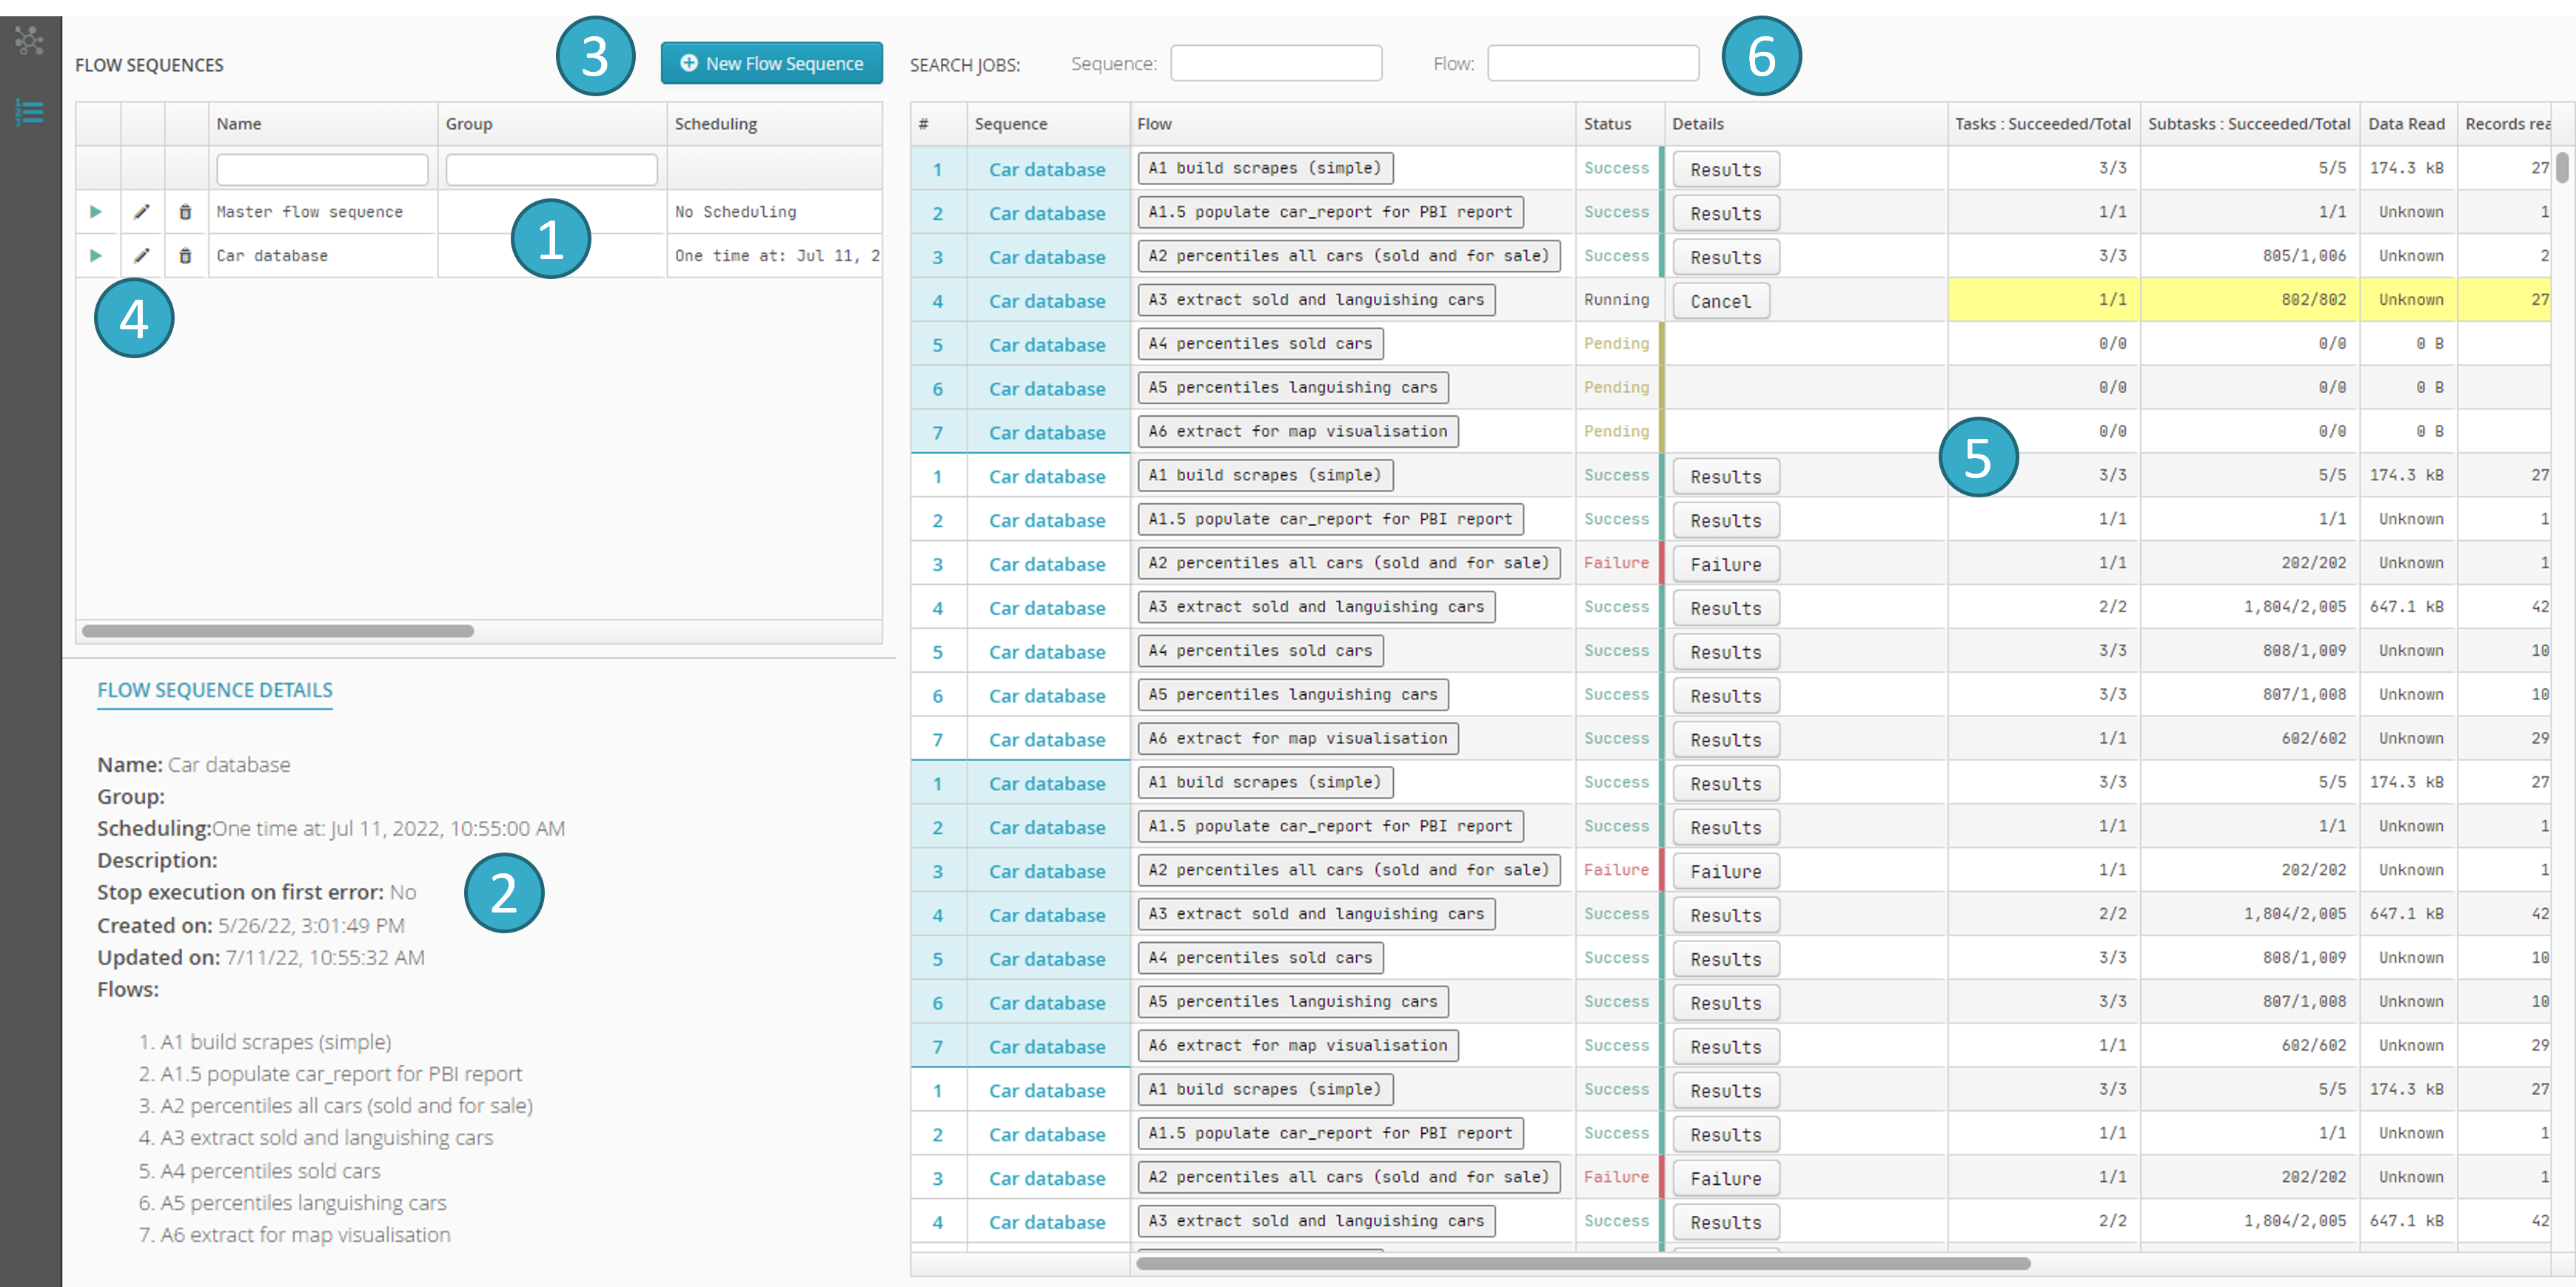
Details of the sequence
 selected from the previous list, including:
The list of flows in the sequence.
The Stop run at first error option.
The zone for running sequences
 containing information similar to that shown in the flow run view (see Scheduling and running flows) with two extra columns on the left, showing the sequence to which the currently running flow belongs.
The filtering zone
 where you can view a subset of sequences or flows.
To add a new sequence, click the button  :
:

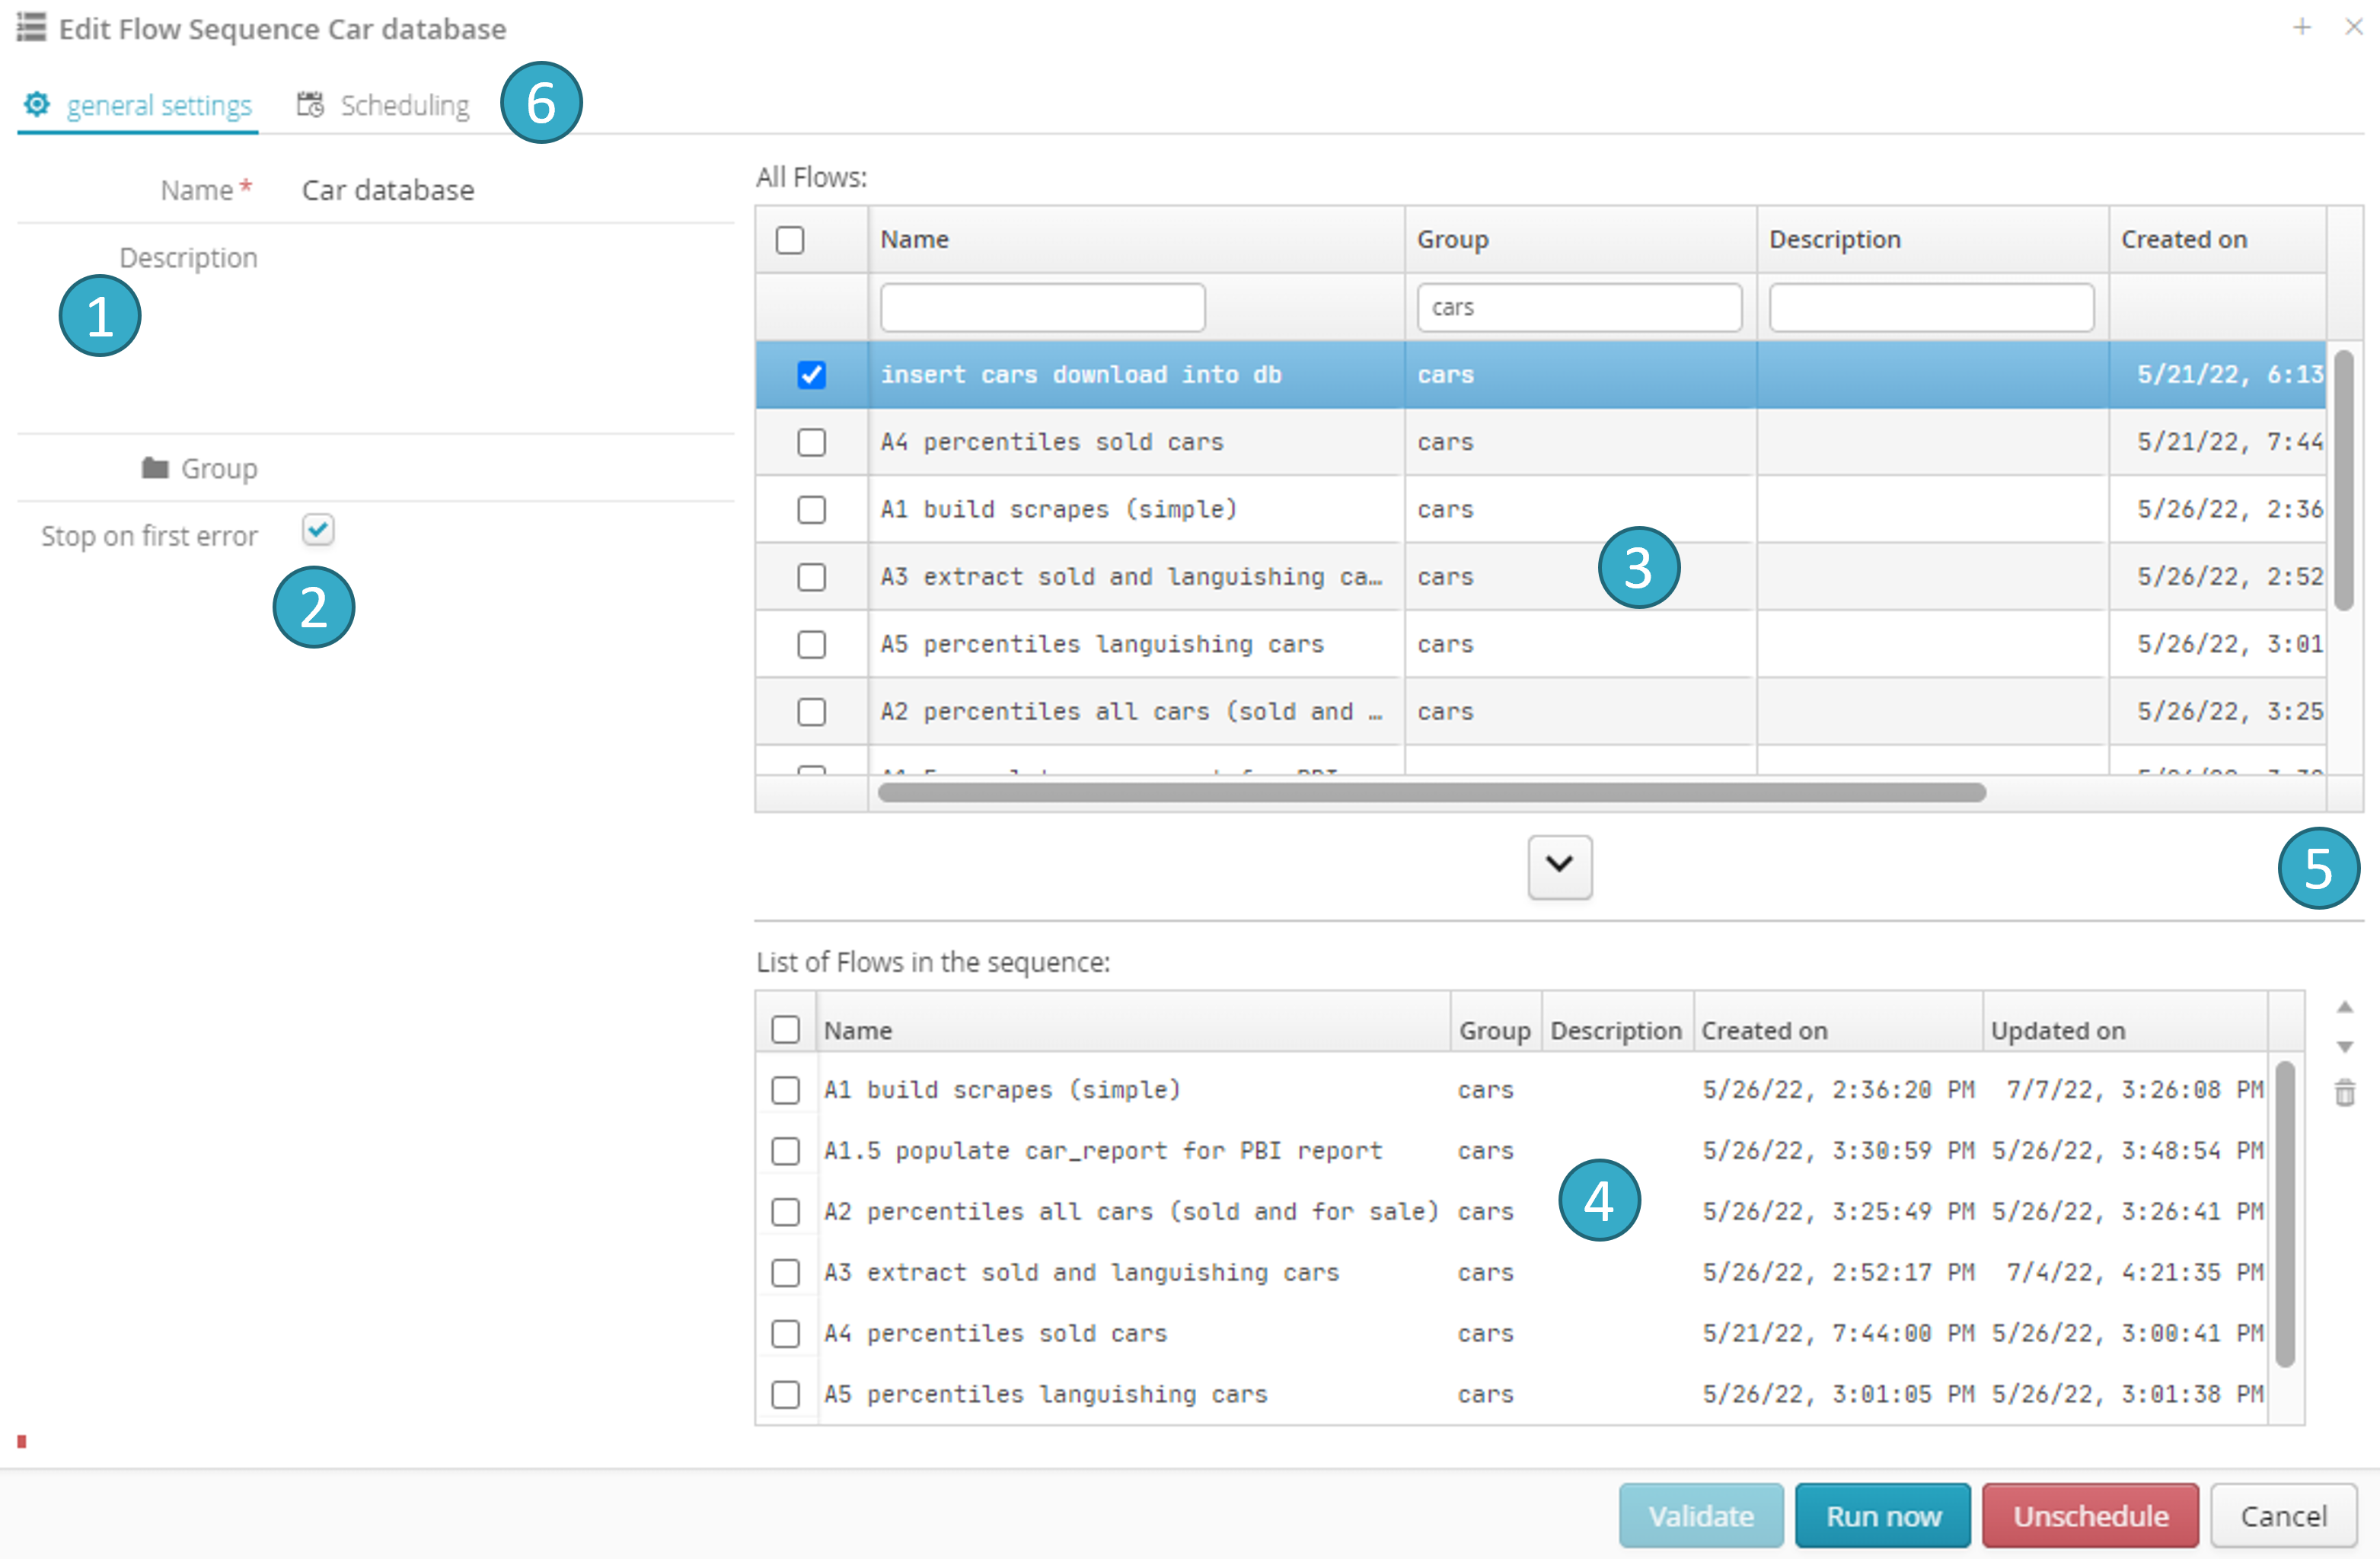
Stop run at the first error
 . Select this option to stop the sequence at the first error. No flows will be run after the error.
Zone listing sequence flows
 . Click the button between the 2 zones to add a flow to the sequence.
Zone with buttons
 for re-ordering or deleting the flows in a sequence.
Sequence scheduling zone
 (see Scheduling and running flows).
5.4. Batch mode runs
Flows can be run in batch mode.
To run a flow in batch mode, you must designate a source parameter node (which MUST be file-type) and run the flow sequentially several times, each time changing the dataset to which the parameter source node is directed.
Caution
A flow will contain max one parameter source node.
The same flow can therefore be applied to multiple datasets in succession and the results of all the runs can be collected.
Batch datasets MUST be file-type and have the same structure as the parameter source node. All file types (CSV, Excel, XML, JSON) are accepted.
5.4.1. Configuration of batch mode
To configure batch mode for a flow, open the flow in the editor and click the vertical Batch button  to the right of the screen:
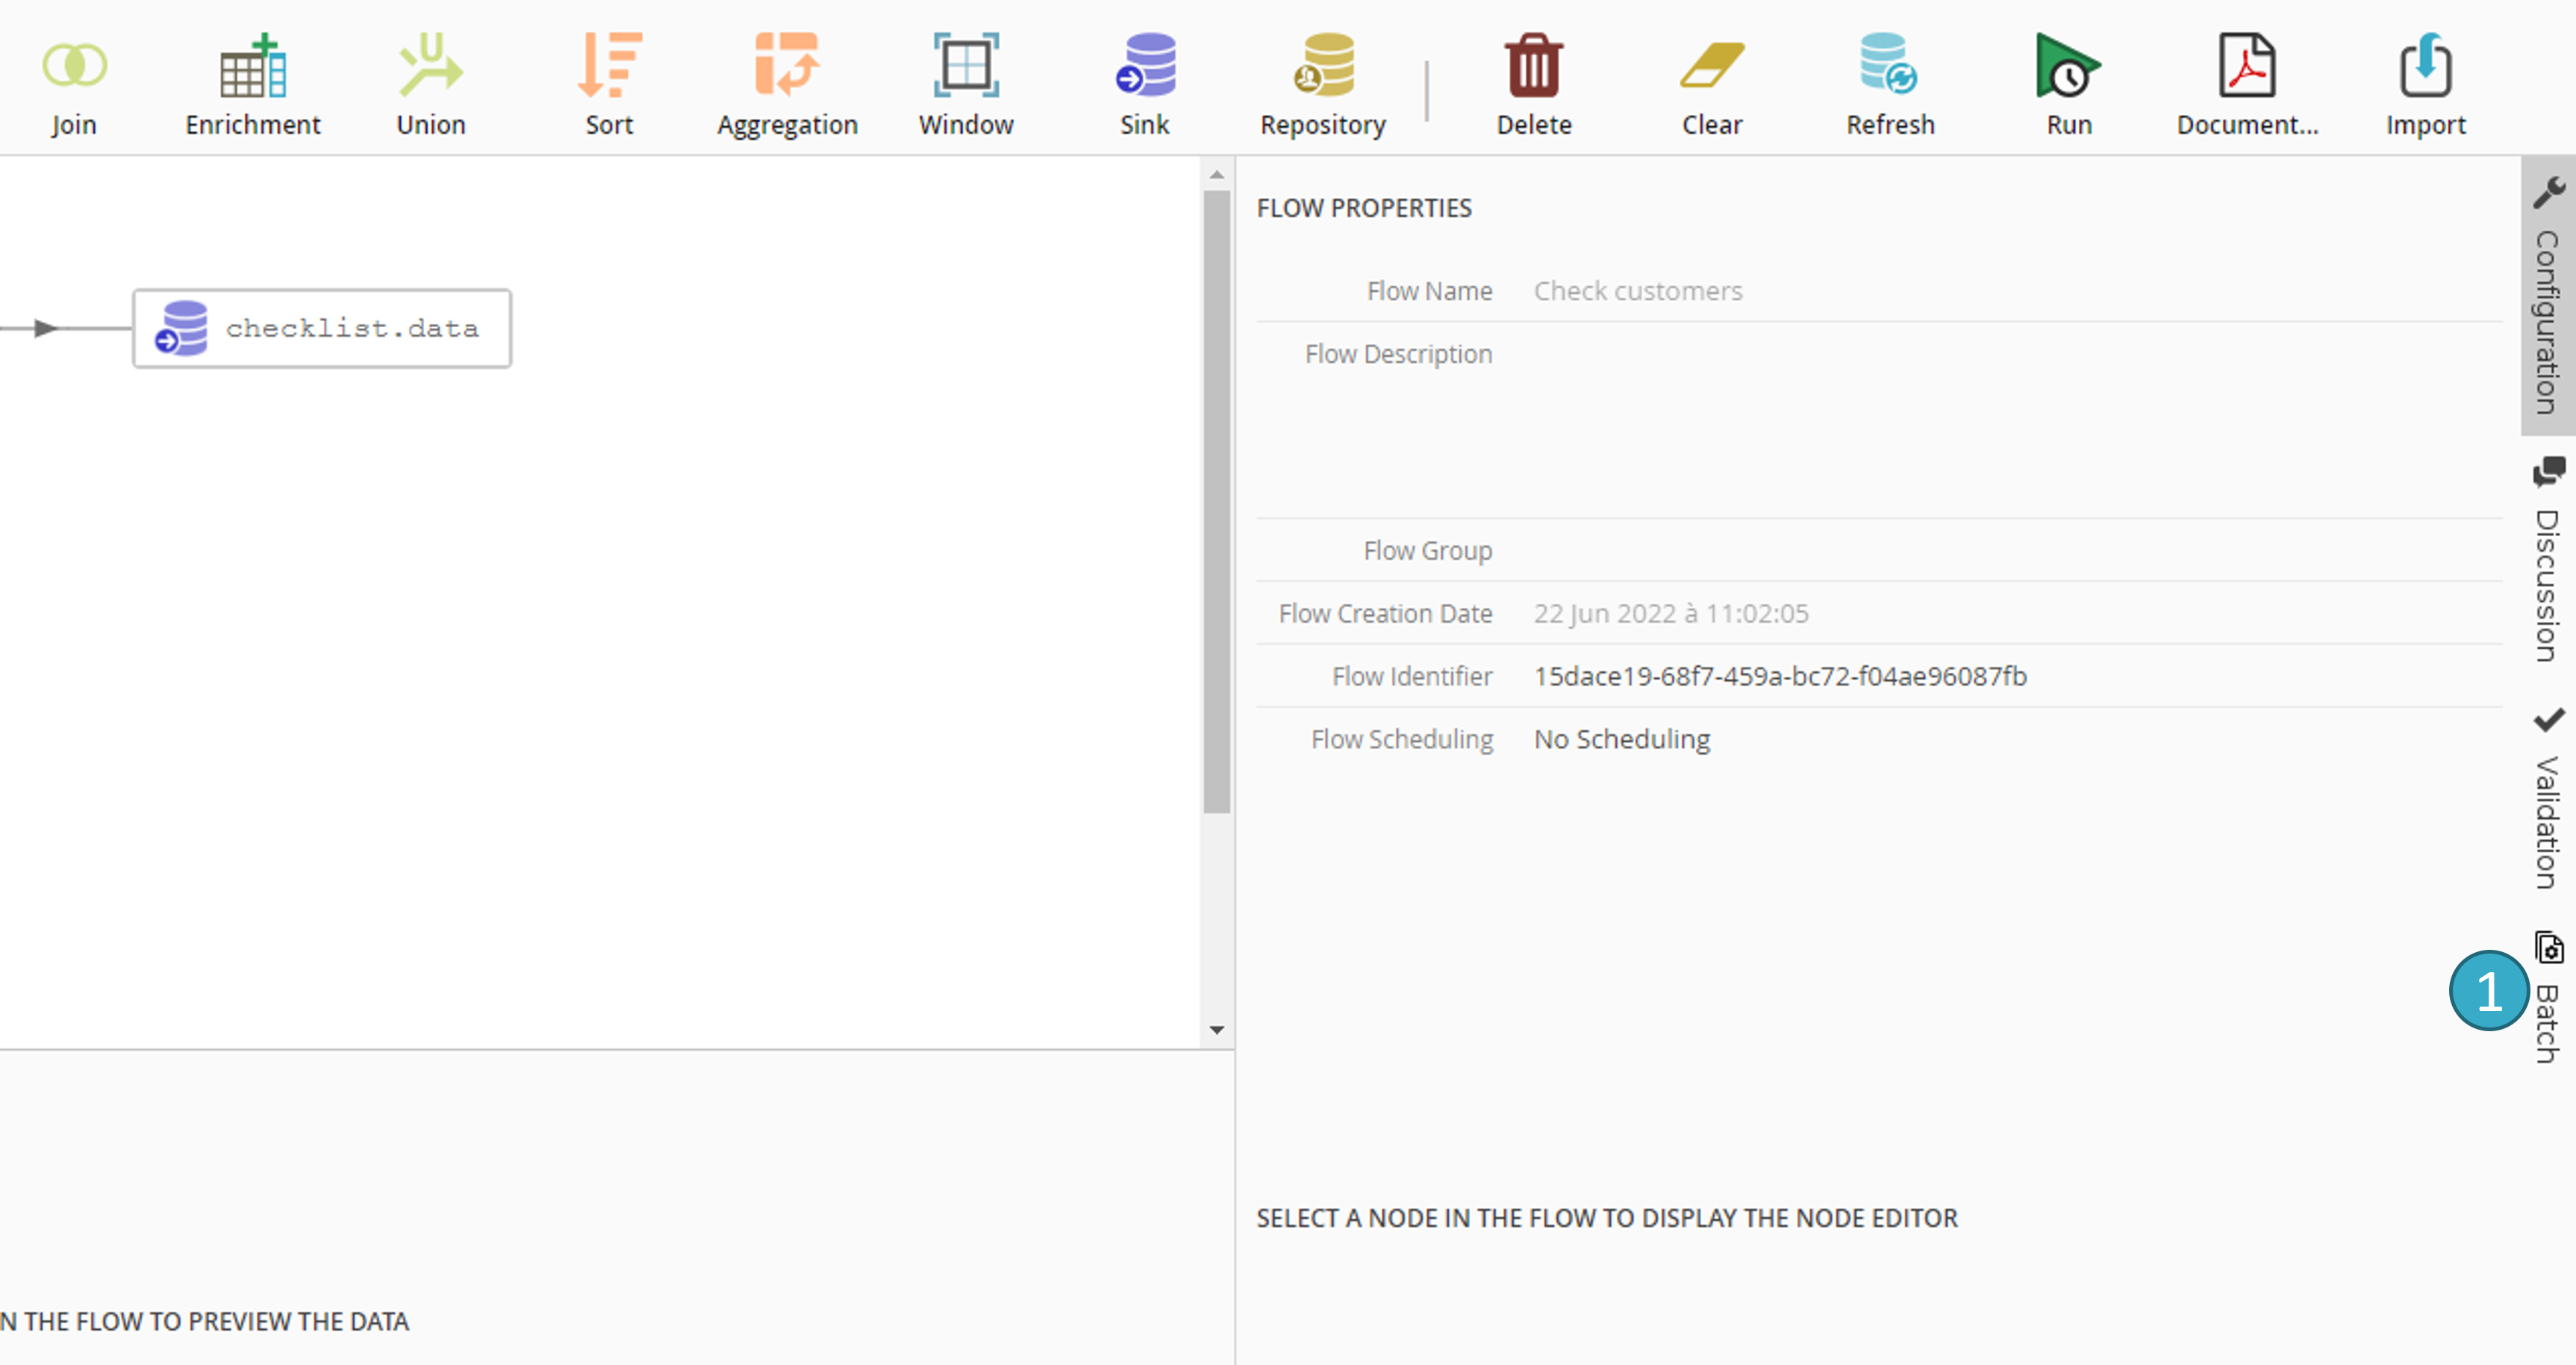
Note
Batch mode is configured for the entire flow. It is not linked to any specific source node.
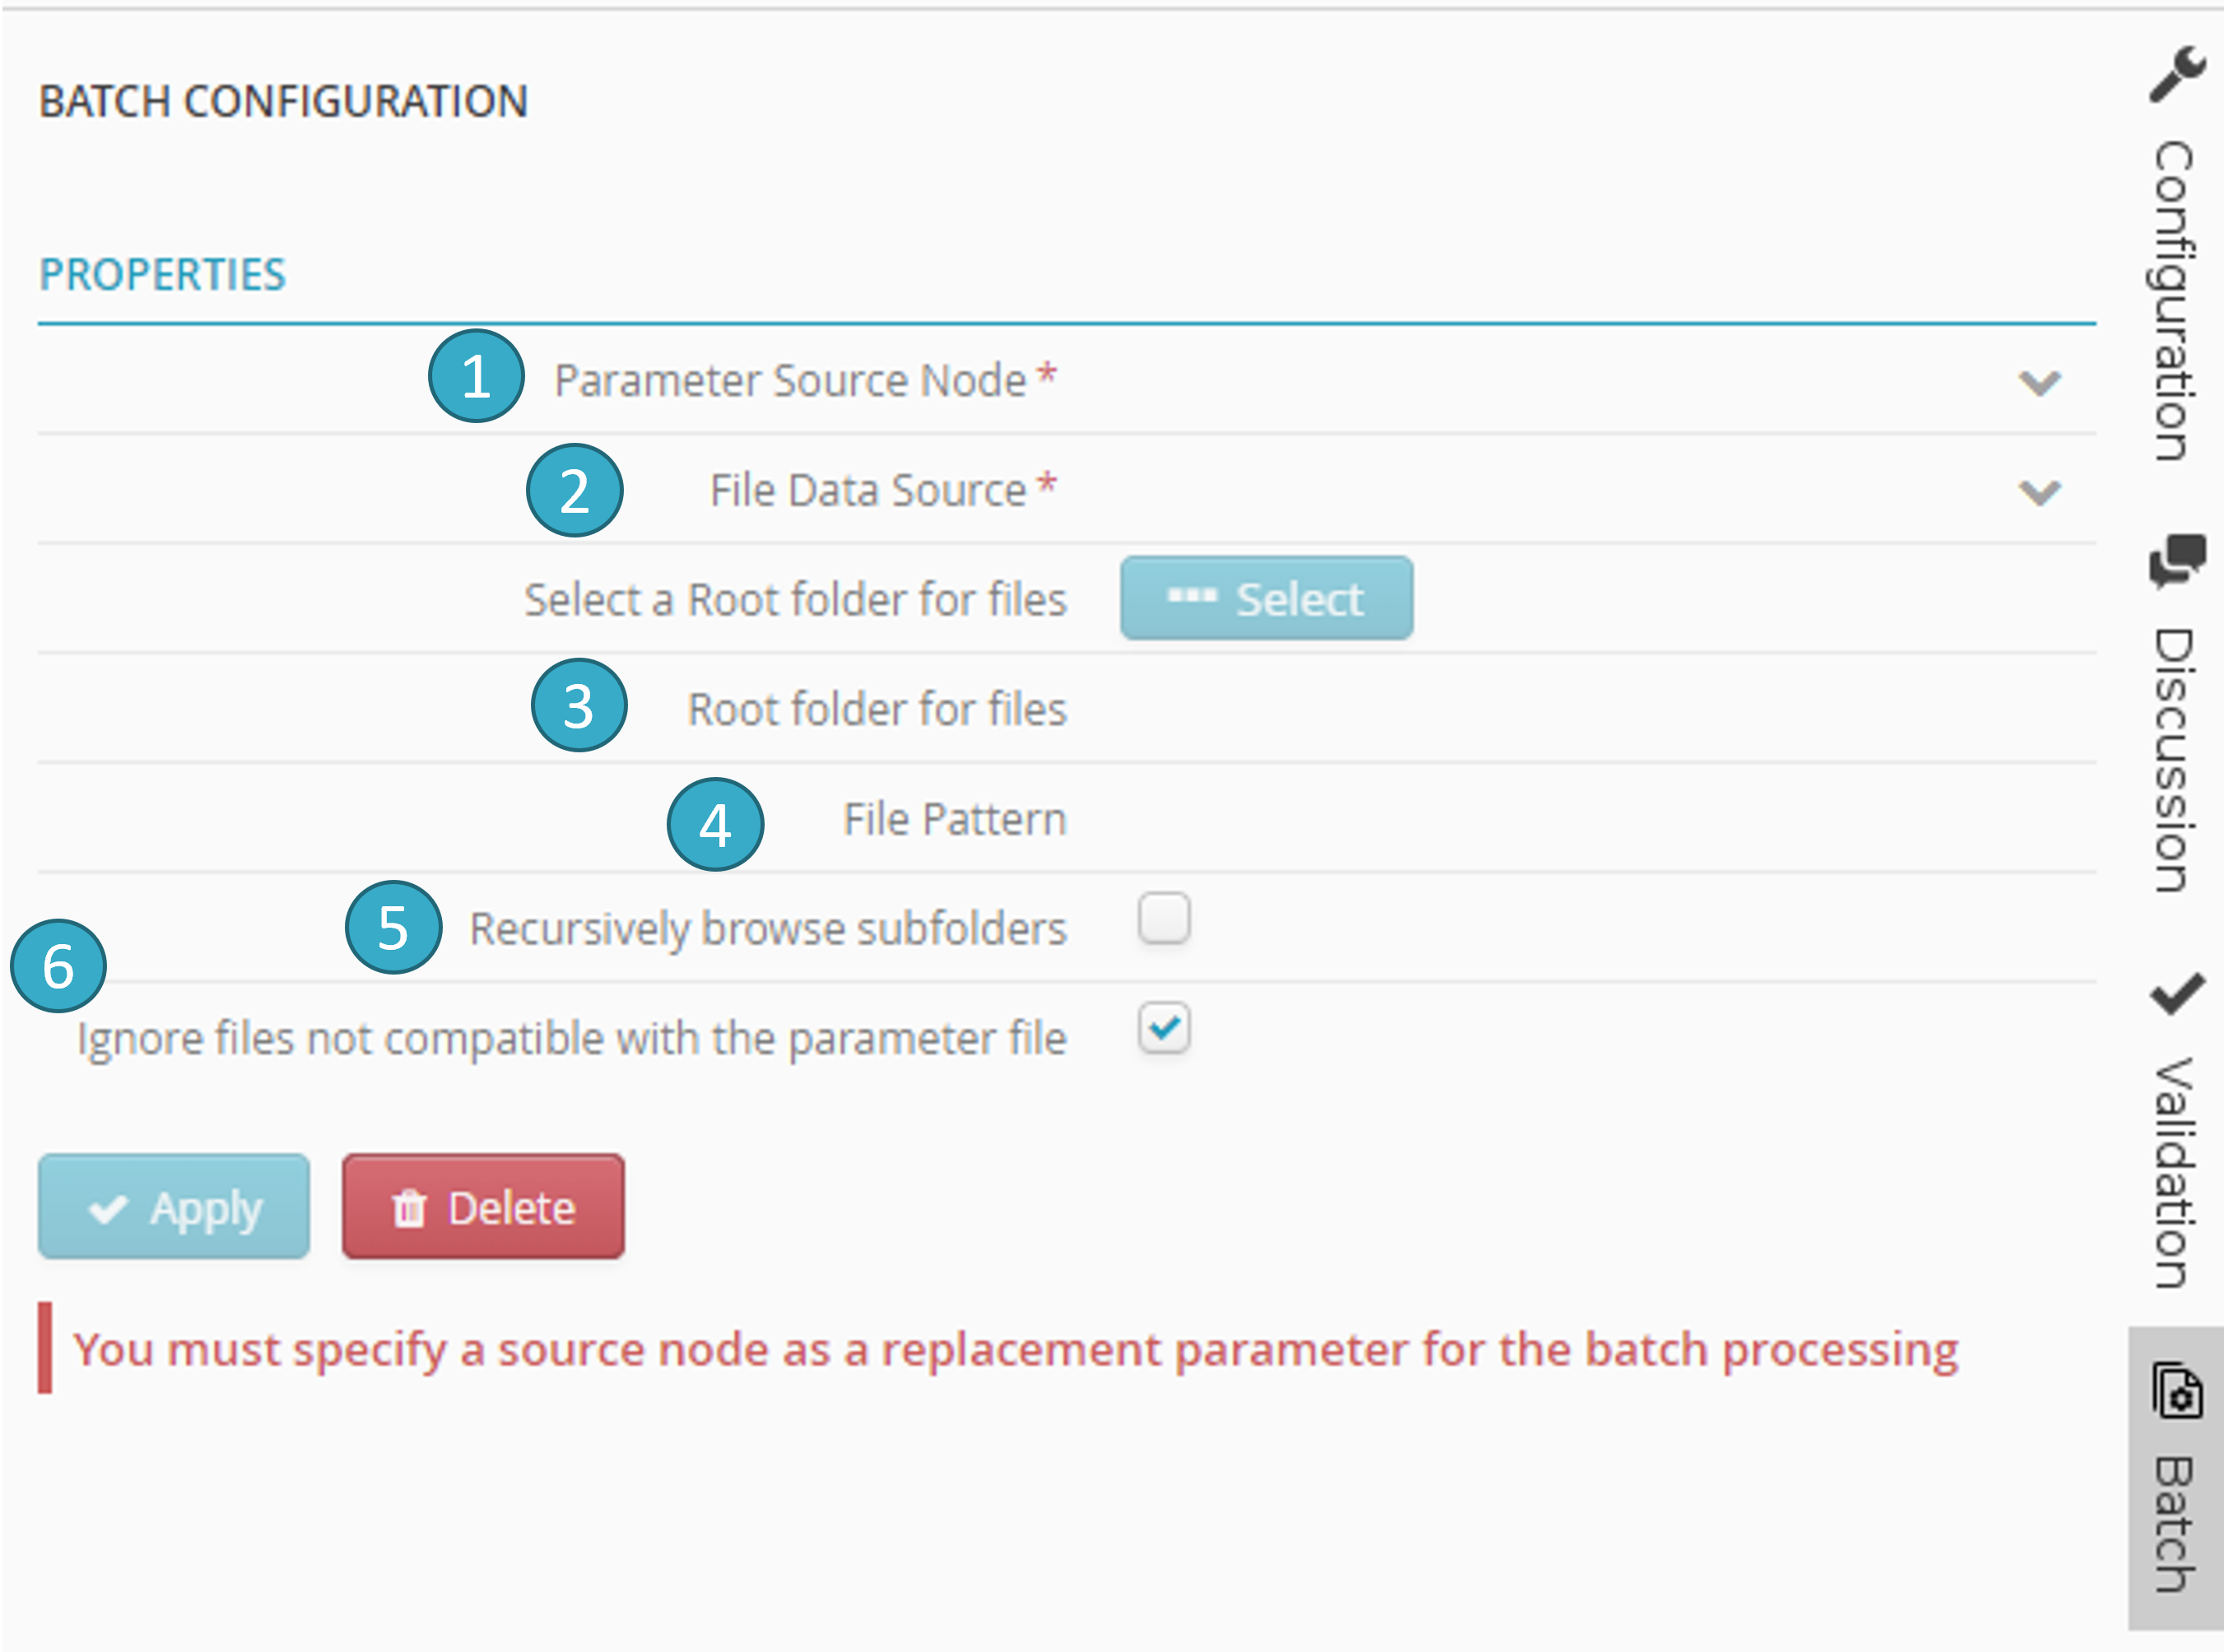
You will then be taken to the batch configuration screen. To configure a batch you must specify the following properties:
Parameter source node
 : this is a placeholder source node that at each iteration reads the data in each file in the batch.
Data source file
 : this is the data source that will be searched for files to include in the batch. It must be a file-type data source (e.g. My workspace, Azure Blob Storage, Amazon s3, SFTP site etc.).
File root repository
 : this is a root repository that will be searched for files to include in the batch. If no repository is specified, the batch files will be sought in the root of the data source file specified in the previous step.
File pattern
 : Pattern (the special characters * and ? are allowed) for the names of the files to be included in the batch. If this field is left blank, all files found will be included in the batch.
Browse sub-folders recursively
 : if you tick this option, the sub-repositories of the file root repository will be searched in turn for files to include in the batch (and so on, recursively).
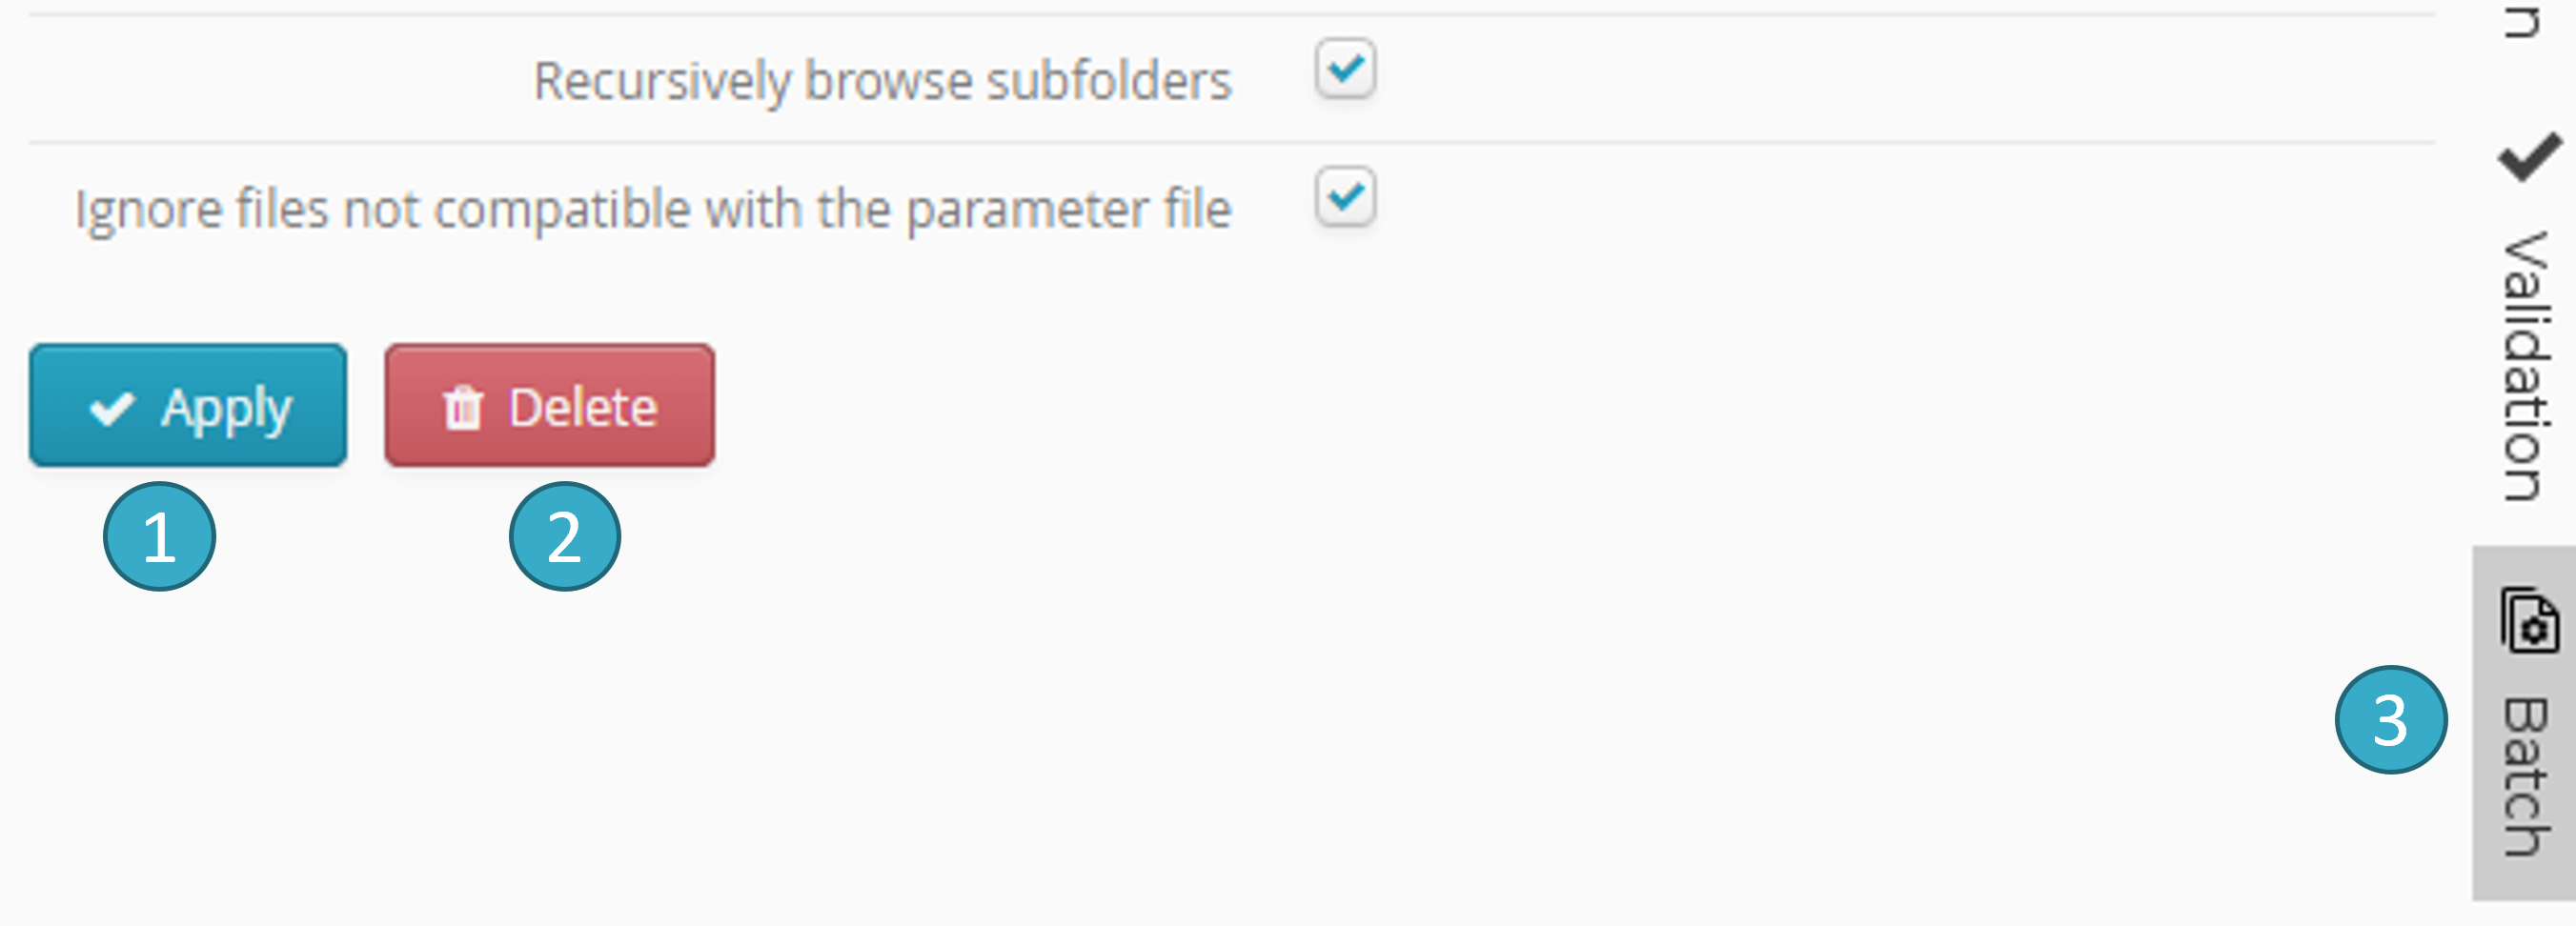
Ignore files that are not compatible with the parameter file
 : files for inclusion in the batch MUST be the same type as the parameter source node file (i.e. if the parameter source node file is a CSV, then all the files in the batch must be CSV). The structure (number of fields) and properties (e.g. date format, first-line headers and separators for a CSV file) must also be the same. If you tick this option, incompatible files (e.g. blank files) will be automatically removed from the batch. If you do not tick it however, an error will be triggered and the batch will fail.
Once batch configuration has ended, click Apply to confirm:
5.4.2. Running a flow in batch mode
Batch mode flows are run in exactly the same way as other flows. Just schedule the run or start it immediately by clicking Run on the toolbar.
5.4.3. Tracking a batch run
When a flow is run in batch mode, progress information will appear in Execution Monitoring:

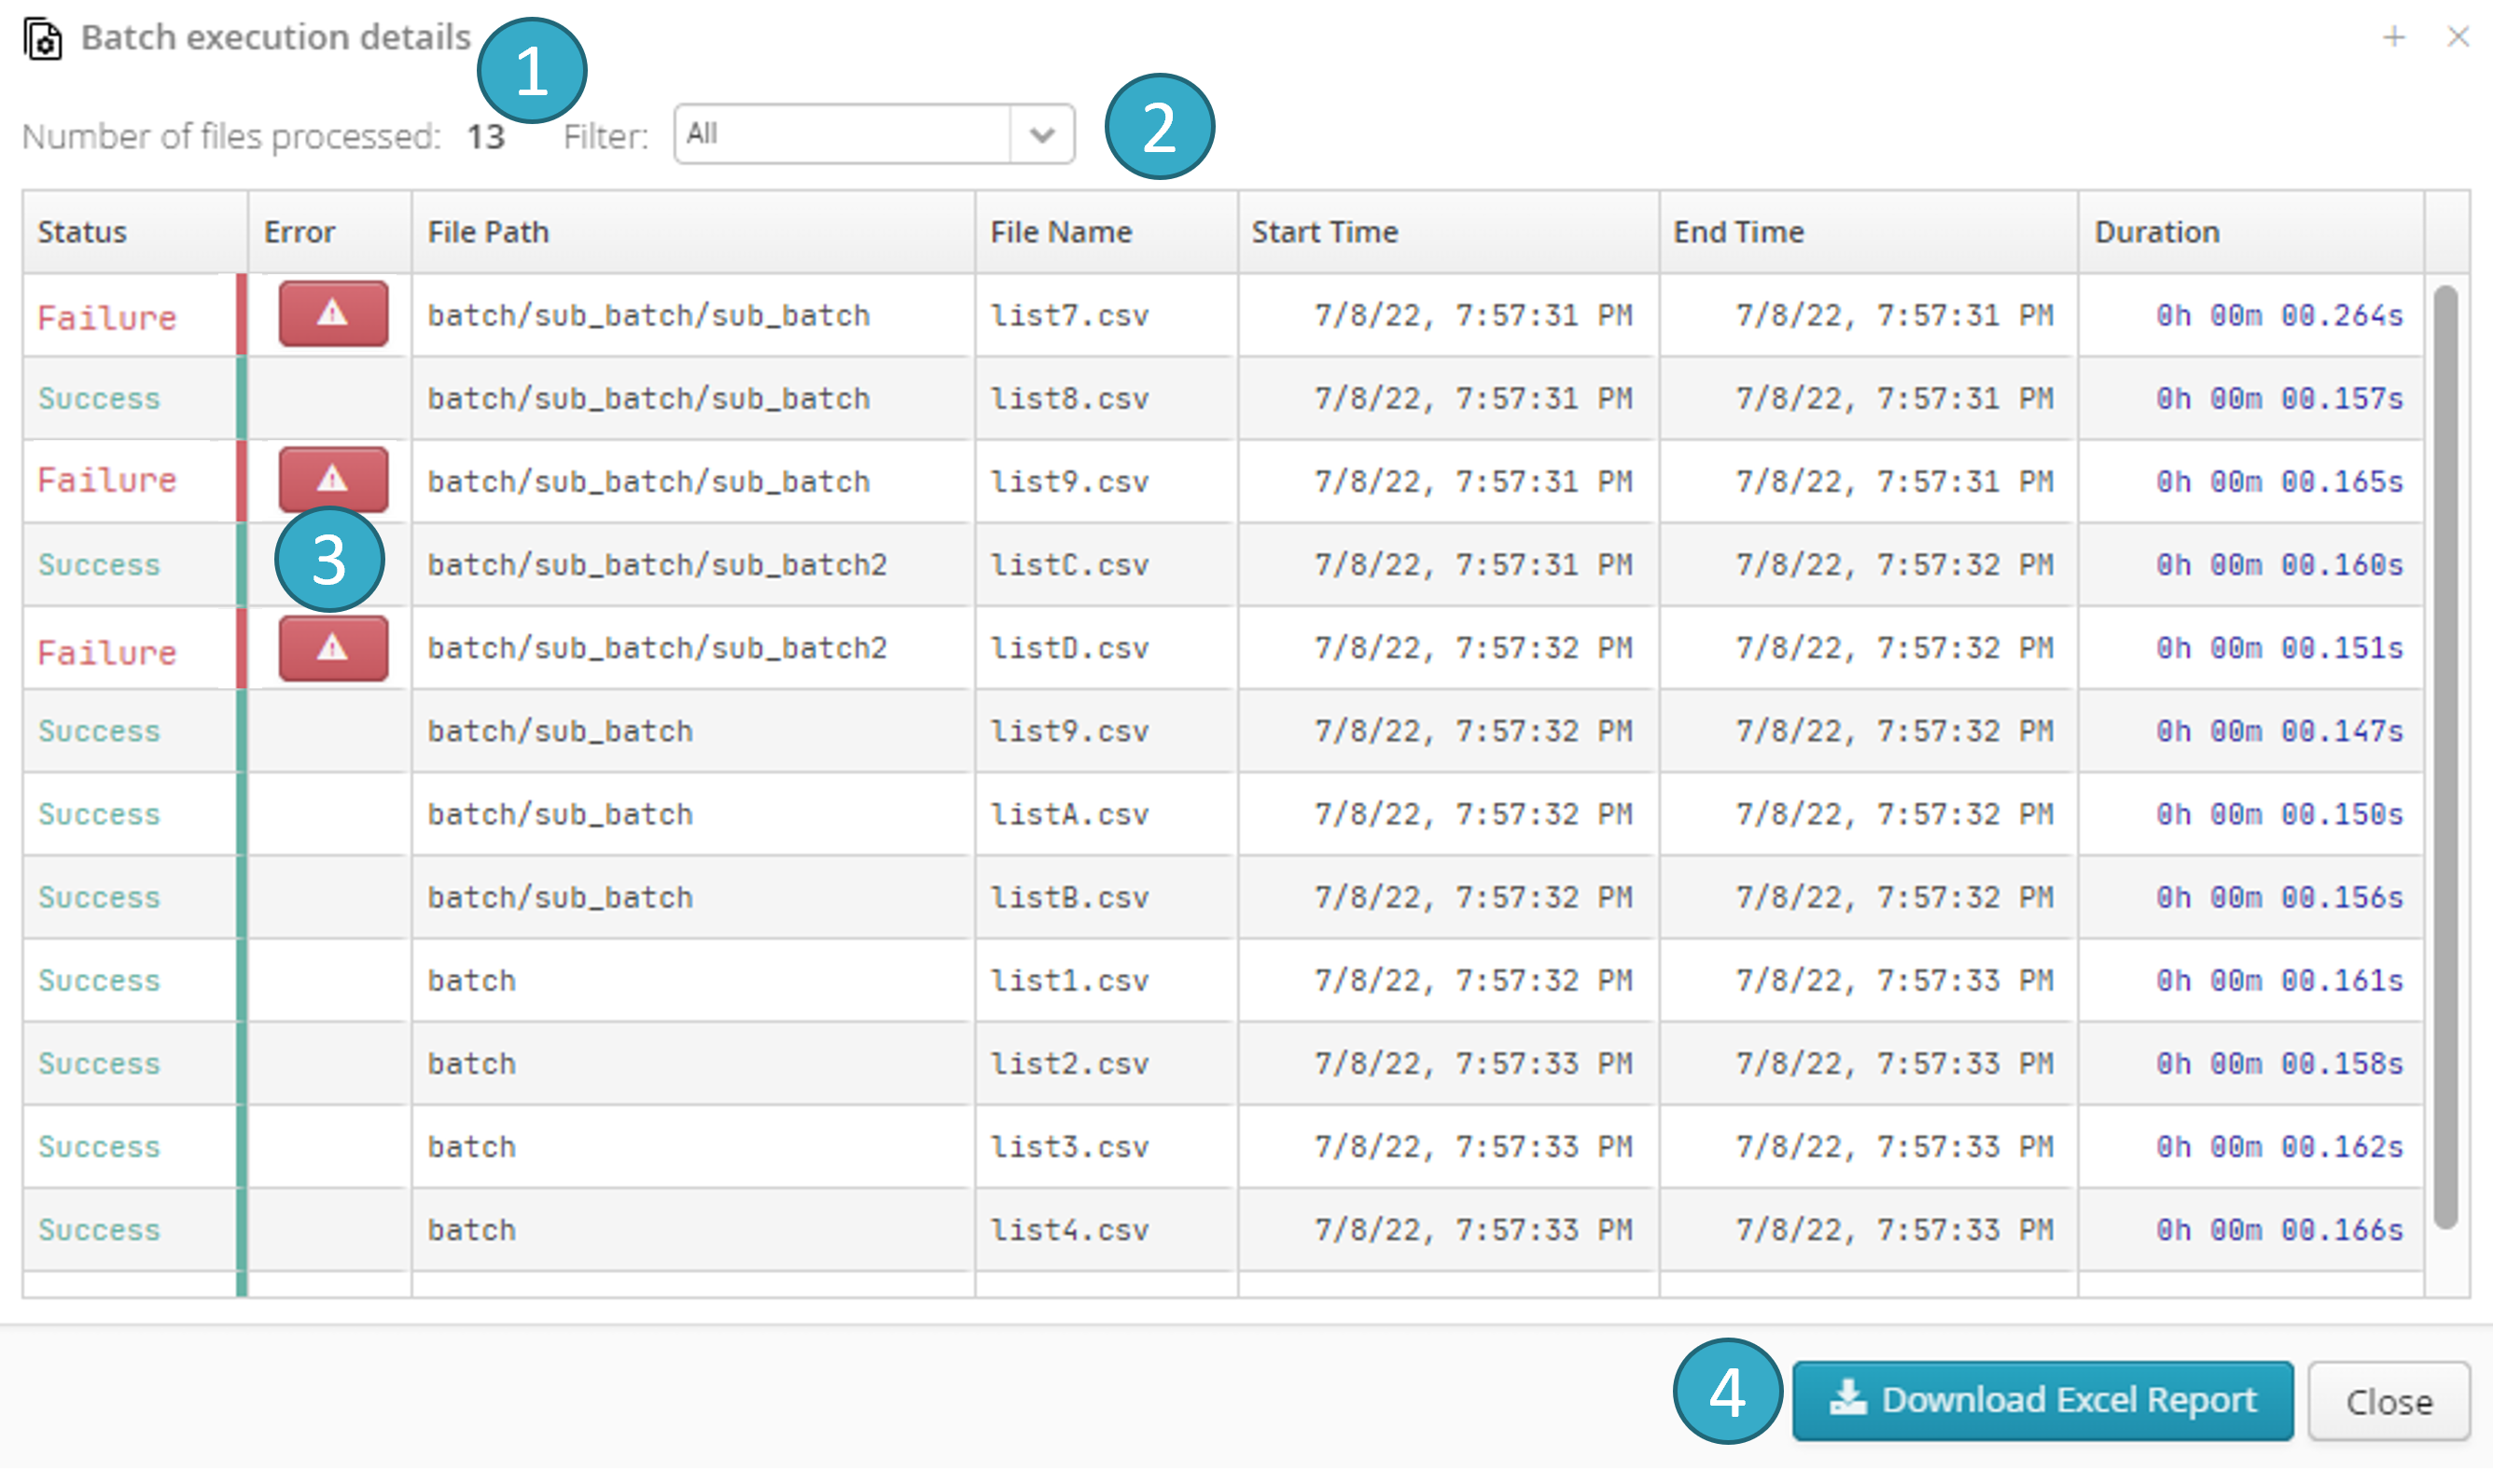
Click the button  to open the Details of batch run window:
This window can be opened as soon as the batch run starts and will display current run status. Each row represents one file processed (or being processed) by the batch.
You can:
Caution
Batch processing will continue even if one or more files fail. Open the Details of batch run window to view failed files at any time.

5.4.4. Important: Good practice when running a flow in batch mode
Batch mode can involve between just a few and several tens of thousands of files.
You should therefore take a number of precautions to avoid very long run times that will use up most of the platform’s CPU resources and memory, to the detriment of other types of processing.
Tip
Always test the flow first without batch mode (i.e. just with source parameter node data). This will show whether there are any performance problems and let you optimise the flow before launching a batch.
Tip
Avoid repeating the same calculations in every batch iteration.
Let’s take this flow as an example:

If we analyze the above flow, we see that the join  between listing_1 and listing_2 (framed in red) is totally separate from the batch iterations (parameter source node framed in blue). When the batch is run, the potentially expensive join
  will be executed identically at each iteration. This could be a big problem if you have thousands or tens of thousands of files to process.
The solution is to pre-calculate the join between listing_1 and listing_2 in a separate flow and then to use the result in the flow that is to be run as a batch as shown below:

If we assume that calculating the join  will take 10 seconds, doing this in batch mode e.g. 10 000 times (if there are 10 000 files in the batch), will take 100 000 seconds or almost 28 hours.
By pre-calculating the join in a separate flow you will therefore save 28 hours of pointless processing.
Caution
Unless your batch contains only a few dozen files, we strongly advise you to use only relational database-type sinks in your flow.
Since it is able to distribute calculations, the Tale of Data engine creates fragmented files (e.g. in Tale of Data a CSV can be a repository made up of many small CSV files).
In a batch with e.g. 10 000 files, the sink can therefore be a CSV fragmented into 10 000 or more sub-files. Using the result of the batch in Tale of Data will affect only performance (= slow reconstitution of data spread across thousands of file fragments). If, however, the aim is to use the batch results in a third-party application (e.g. reporting suite, Data Visualisation solution etc.) then the only really viable solution for big batches is to use a database as the sink.
5.5. Launching flows and flow sequences using API
Tale of Data can be integrated into complex systems via an API to trigger runs. This will let you launch flows and flow sequences, and also get information on the progress and success of those runs. In other words, e.g. a script, another software or an orchestration system can integrate a series of Tale of Data processings at certain points during their runs.
5.5.2. Flow launching API
- Launching a flow
Make the launch by calling the following URL:
https://www.mytaleofdataserver.com/api/v2/flow-engine/run-flow/ flow_uuid / api_key
The’flow uuid can be found in the flow editor when the flow concerned has been opened:
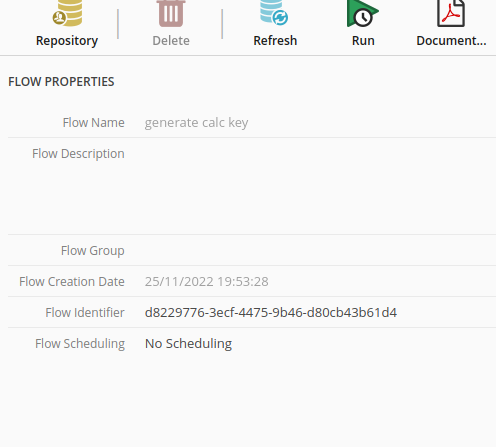
api_keyis the personal API key of the user who is the owner of the flow concerned (see Getting an API key).
The call to launch will return a JSON object with information on launch success that enables the server to be questioned about flow progress:
1{
2  "payload": {
3   "uuid": "89c3573f-dda4-4847-9eac-eb2ea238d5f4"
4},
5   "status"       : "OK",
6   "error_message":""
7}
Enter payload.uuid for the next call to check progress and whether the launched run is going well:
- Call to monitor the run:
Monitor progress by calling:
https://www.mytaleofdataserver.com/api/v2/flow-engine/flow-exec-status/ flow_run_uuid / api_keyflow_run_uuidis the equivalent of thepayload.uuidreturned by API at launch.
Call response will be similar to:
1{
2   "payload"      : "RUNNING",
3   "status"       : "OK",
4   "error_message": ""
5}
Note
- The statuses the call can return (
payloadfield) are: SUCCESSRUNNINGFAILURECANCELLEDUNKNOWN
5.5.3. API launching flow sequences
In the same way as you launch a flow, you can also launch a flow sequence via API.
- Call to launch:
To launch a sequence, just call:
https://www.mytaleofdataserver.com/api/v2/flow-engine/run-sequence/ sequence_uuid / api_keyThe flow sequence uuid
sequence_uuidcan be found in flow sequence view, when the flow concerned has been opened: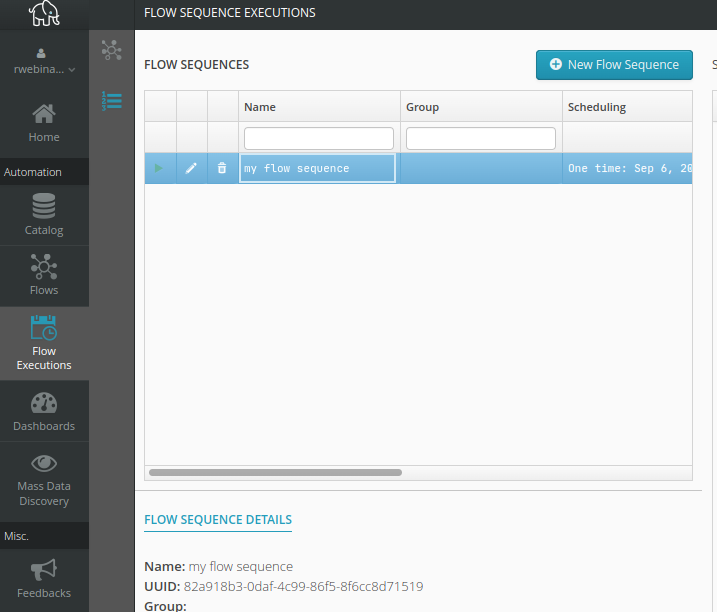
api_keyis the personal API key of the user who is the owner of the flow sequence concerned (see Getting an API key).
The call to launch will return a JSON object with information on launch success that enables the server to be questioned about the progress of the flow sequence:
1{
2   "sequence_run_uuid": "d16239d3-b3f5-4f69-b99c-fa955735c4cb",
3   "error_message"    : null
4}
The error_message field will show null unless there is an error.
- Call to monitor the run:
Checks will be made using:
https://www.mytaleofdataserver.com/api/v2/flow-engine/sequence-exec-status/ sequence_run_uuid / api_keysequence_run_uuidis the equivalent of thesequence_run_uuidreturned by the call launching the sequence.
In the example below of a response to a status check call , Task 1 is running and Task 2 and Task 3 are waiting:
 1{
 2   "sequence_run_uuid": "d16239d3-b3f5-4f69-b99c-fa955735c4cb",
 3   "items_status_list": [
 4      {
 5         "task_uuid": "2e53ff48-5fa7-4559-b7dd-7cbacc2652e8",
 6         "task_name": "Task 1",
 7         "status"   : "RUNNING",
 8         "error"    : null
 9      },
10      {
11         "task_uuid": "a06573ce-13fc-47fc-8f6d-dd764e4c2386",
12         "task_name": "Task 2",
13         "status"   : "WAITING",
14         "error"    : null
15      },
16      {
17         "task_uuid": "47a49198-61b4-4569-833a-c094f1b53477",
18         "task_name": "Task 3",
19         "status"   : "WAITING",
20         "error"    : null
21      }
22   ],
23   "error_message": null,
24   "success"      : false,
25   "finished"     : false
26}
A little later, Task 1, Task 2 and Task 3 have all finished running:
 1{
 2"sequence_run_uuid": "d16239d3-b3f5-4f69-b99c-fa955735c4cb",
 3"items_status_list": [
 4   {
 5      "task_uuid": "2e53ff48-5fa7-4559-b7dd-7cbacc2652e8",
 6      "task_name": "Task 1",
 7      "status"   : "SUCCESS",
 8      "error"    : null
 9   },
10   {
11      "task_uuid": "a06573ce-13fc-47fc-8f6d-dd764e4c2386",
12      "task_name": "Task 2",
13      "status"   : "SUCCESS",
14      "error"    : null
15   },
16   {
17      "task_uuid": "47a49198-61b4-4569-833a-c094f1b53477",
18      "task_name": "Task 3",
19      "status"   : "SUCCESS",
20      "error"    : null
21   }
22],
23"error_message": null,
24"success"      : true,
25"finished"     : true
26}
Note
- The
items_status_list[n].payloadfields can display the following statuses: WAITINGRUNNINGSUCCESSFAILURECANCELLED
Note
Depending on sequence settings, the failure of some sequence flows will not prevent the sequence itself completing its run. For more details, see the section on the configuration of flow sequences.


5.5.1. Getting an API key
All Tale of Data users who hold an Entreprise licence can launch flows in their environments via API. You need a personal API key, which you can request from Tale of Data support.
Note
Afterwards, API entry points will be recorded as:
https://www.mytaleofdataserver.com:/api/v2/flow-engine/<endpoint>www.mytaleofdataserver.comwill be replaced by the URL of your Tale of Data server.