7.5. Transformation configuration and use
Transformations
 .
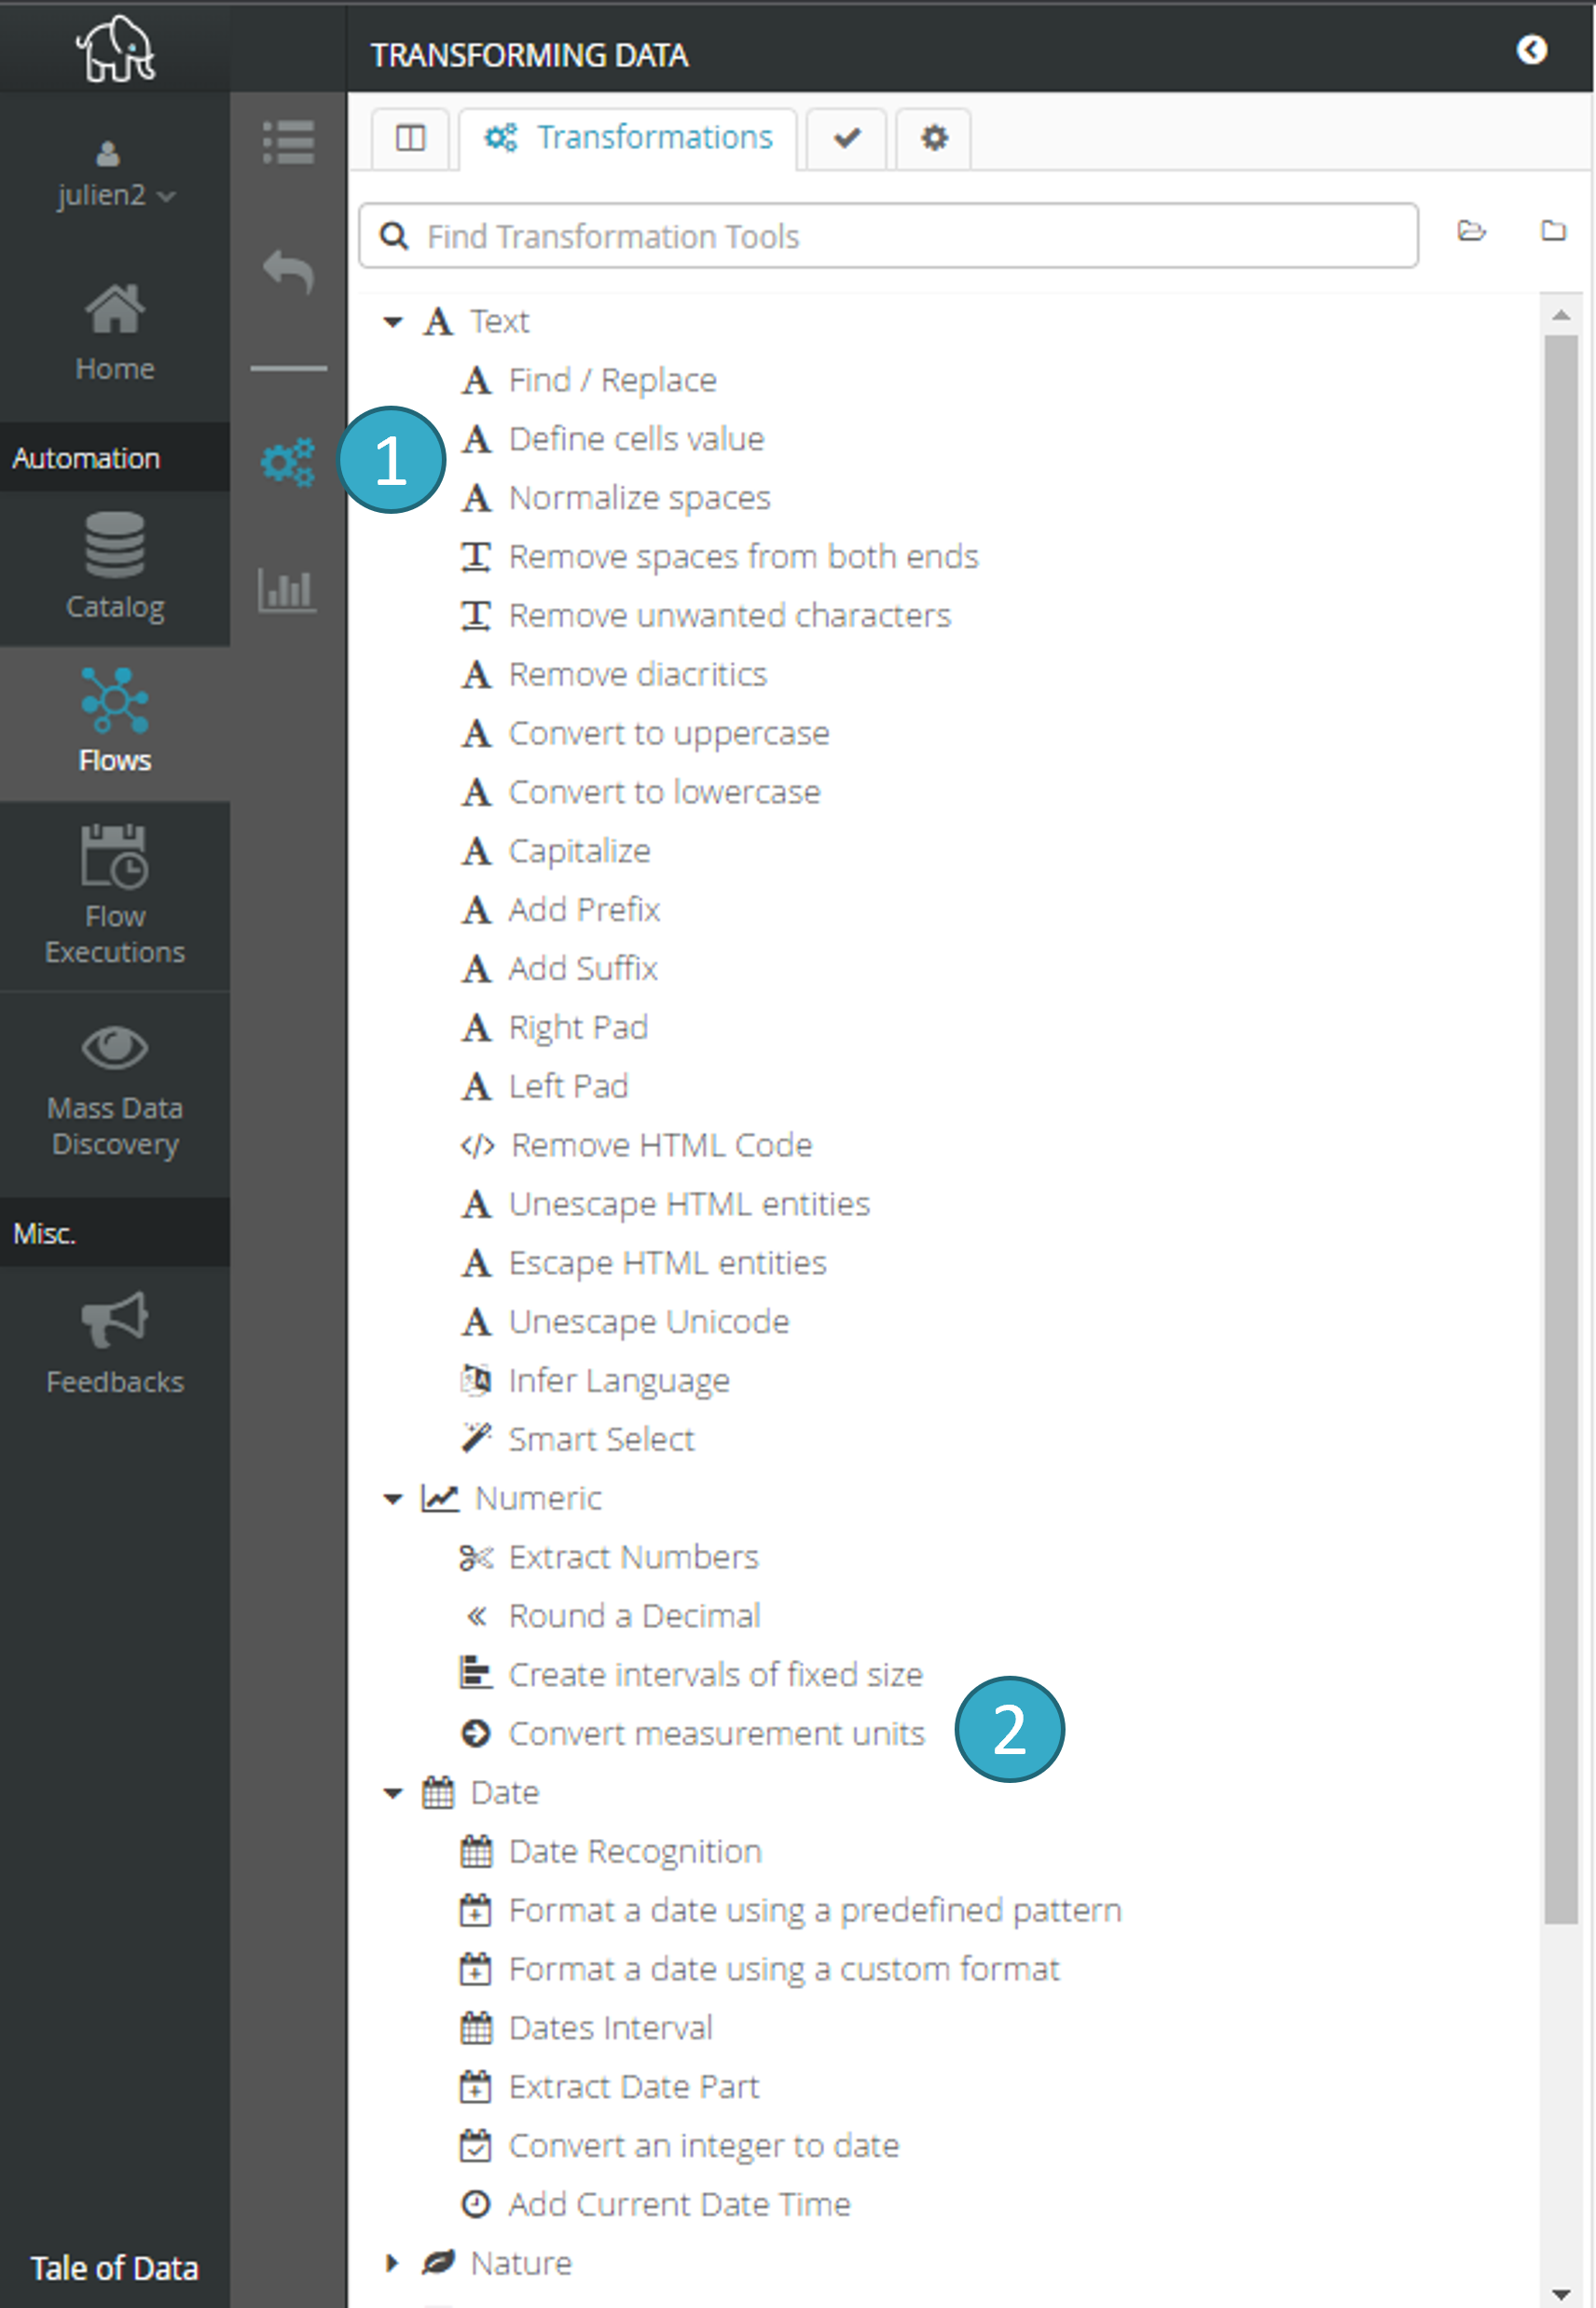
.Palette of available transformations
 . Click to select a transformation.
Caution
If filters are added during a transformation, that transformation will apply only to the dataset records that have been accepted by the filter.
Help zone
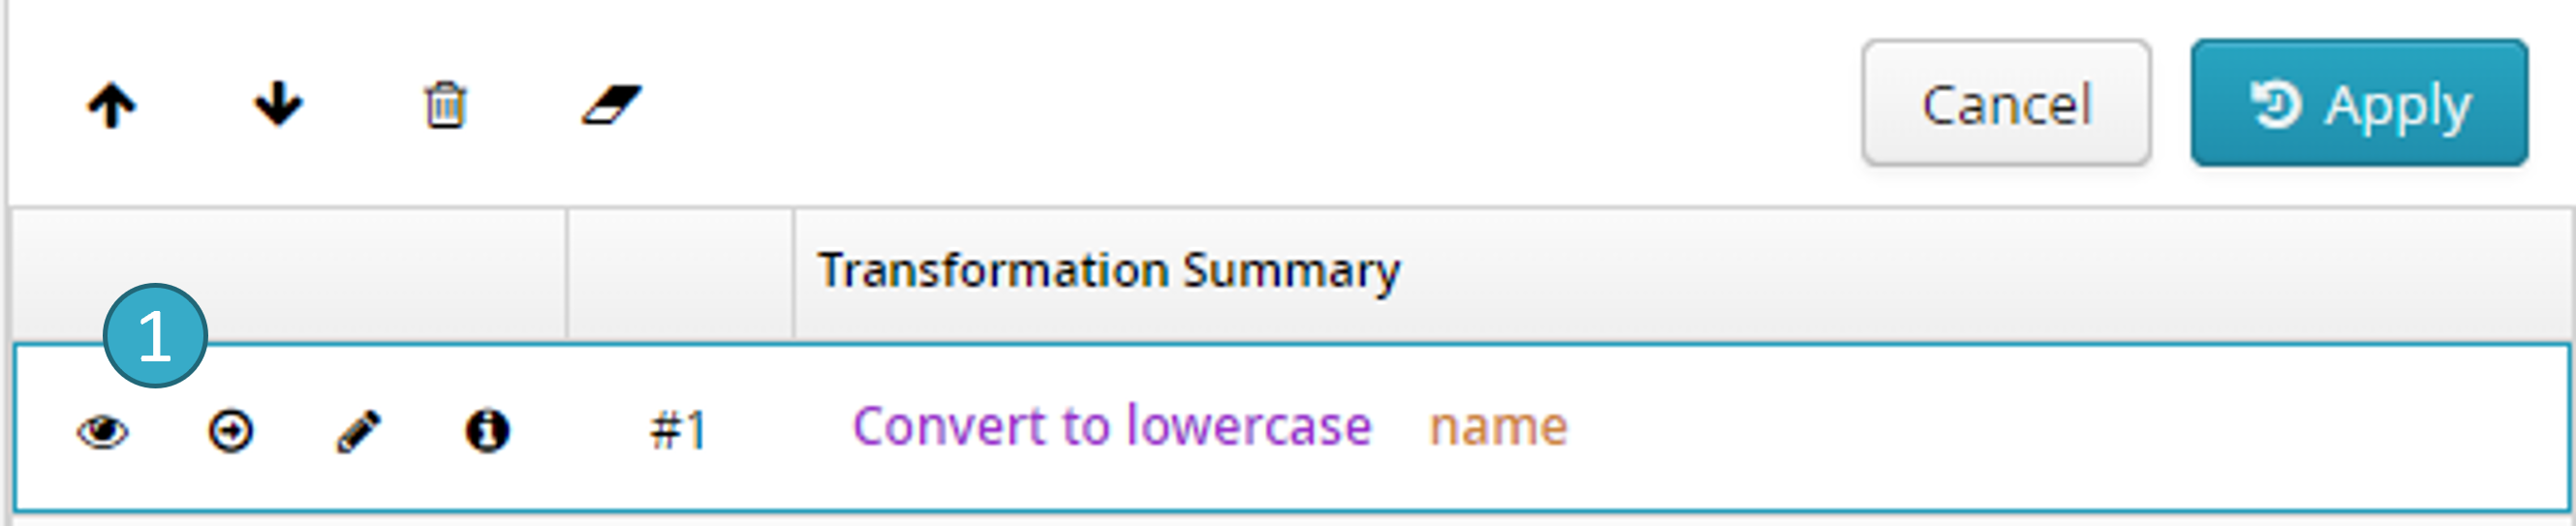
describing what the transformation does (hide it by clicking ‘-‘ in the top left of the zone).List of fields
to which the transformation will apply (you can select multiple fields using Shift or Ctrl) and of all the options available for the current transformation.Apply
 applies the current transformation to the dataset. Preview
  shows the changes the current transformation will make.
7.6. Quick access to transformations
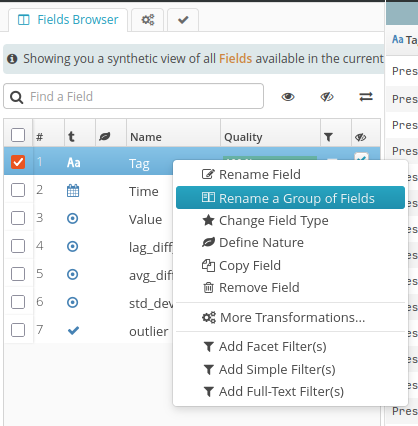
Field Browser gives fast access to some frequently used transformations. To call these up, right-click the selected field(s) in Field Browser:
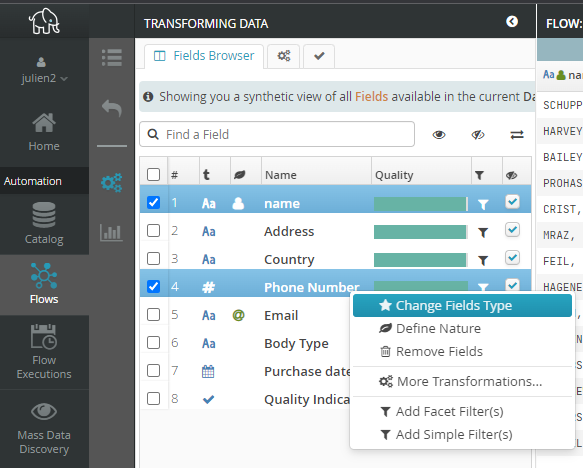
Tip
The Field Browser pop-up menu also lets you add filters to selected fields
7.7. Viewing the changes made by a transformation
The Change View Window of a transformation presents as shown below:
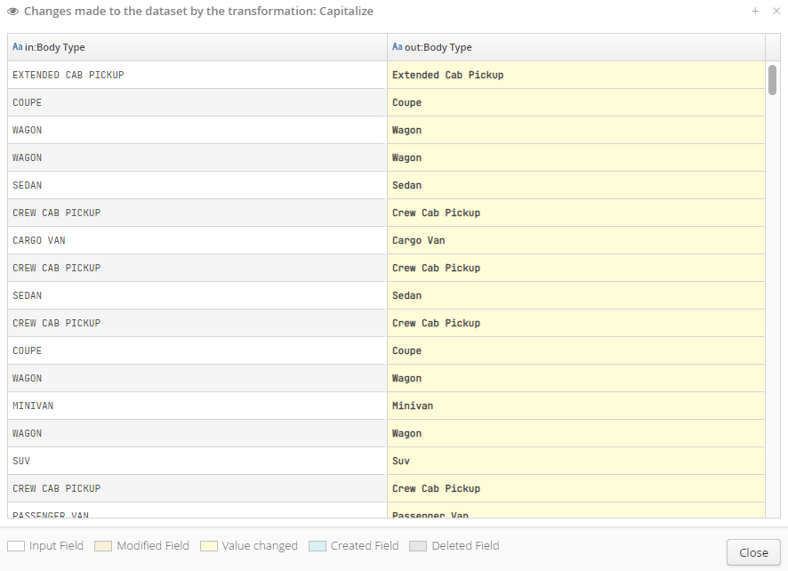
Changes are organized using 5 criteria:
Input field (white).
Modified field (beige).
Modified value (yellow).
New field (blue).
Deleted field (gray).
You can view the changes made by a transformation in 2 locations:
In the configuration zone of any transformation, i.e. before the transformation is applied by clicking Preview:
In Transformation History, i.e. after you have clicked to apply the transformation

7.8. Field transformations
7.8.1. Add a Column
Create a new field. By default, this will be empty. If you enter the default value, you can allocate the same value to all the cells.
The transformation will use the active filter(s).
Note
Practical example : Add a Column
Before Transformation:
ID |
Name |
Age |
|---|---|---|
1 |
Alice |
30 |
2 |
Bob |
25 |
Transformation Configuration:
New Column Name: “Location”
Column Type: “Text”
Default Value: “Unknown”
After Transformation:
ID |
Name |
Age |
Location |
|---|---|---|---|
1 |
Alice |
30 |
Unknown |
2 |
Bob |
25 |
Unknown |
In this example, the transformation adds a new column named “Location” to the dataset. Each row in the dataset is updated to include the default value “Unknown” in the new column.
7.8.2. Concat columns
Create a new field by concatenating multiple existing fields.
The transformation will apply to multiple fields.
The transformation will use the active filter(s).
Note
Practical example : Concat Columns
Before Transformation:
First name |
Name |
Date of Birth |
|---|---|---|
John |
Doe |
1990-01-01 |
Jane |
Smith |
1985-05-23 |
Transformation Configuration:
Target Columns:
FirstName,LastName,DateOfBirthNew column name:
FullNameJoin Text: ” “
Concat missing values:
trueDelete concatenated columns:
true
After Transformation:
FullName |
|---|
John Doe 1990-01-01 |
Jane Smith 1985-05-23 |
In this example, the transformation takes the values from the ‘FirstName’, ‘LastName’, and ‘DateOfBirth’ columns and merges them into a new ‘FullName’ column. Each piece of data is separated by a space, providing a clear, readable format that combines critical information into a single column. As expected, the concatenated columns have been deleted.
7.8.3. Copy a Column
Create a new field that is a copy of an existing field.
The transformation will apply to just one field.
The transformation will not use the active filter(s).
Note
Practical example : Copy a Column
Before Transformation:
ID |
Name |
Age |
|---|---|---|
1 |
Alice |
30 |
2 |
Bob |
25 |
3 |
Carol |
28 |
Transformation Configuration:
Target Column: Age
Target Column: Age_Copy
After Transformation:
ID |
Name |
Age |
Age_Copy |
|---|---|---|---|
1 |
Alice |
30 |
30 |
2 |
Bob |
25 |
25 |
3 |
Carol |
28 |
28 |
In this example, the transformation has successfully created a new column named Age_Copy and duplicated the data from the Age column into it for each record. This allows for data manipulation or analysis on Age_Copy while keeping the original Age data intact.
7.8.4. Split Column
Divide a field into multiple fields by using one or more separators.
The transformation will apply to just one field.
The transformation will use the active filter(s).
Note
Practical example : Split Column
Before Transformation:
FullName |
|---|
Jane Doe |
John Smith Jr |
Alice Johnson |
Transformation Configuration:
Target Column: ‘FullName’
Split Pattern: Space (’ ‘)
Fixed Output Columns Number: 3
After Transformation:
FullName |
FullName.split |
FullName.split_1 |
|---|---|---|
Jane |
Doe |
|
John |
Smith |
Jr |
Alice |
Johnson |
7.8.5. Merge columns
Fill in the missing values in the first field with the first value found in the other selected fields.
The transformation will apply to multiple fields.
The transformation will use the active filter(s).
Note
Practical example : Merge columns
Before Transformation:
FirstName |
MiddleName |
|---|---|
John |
Patrick |
Audrey |
|
Bob |
Gerald |
Transformation Configuration:
Source Columns: “FirstName”, “MiddleName”
Delete Merged Columns:
true
After Transformation:
FirstName |
|---|
John |
Audrey |
Bob |
In the above example, we can see that on the second row, since “FirstName” is empty, it’s the “Audrey” value from the “MiddleName” column that has been retained and placed in the merged column (i.e. “FirstName”).
7.8.6. Change Column type
Change or override field type (e.g. change field type from numeric to text).
The transformation will apply to one or more fields.
The transformation will not use the active filter(s).
Note
Practical example : Change Column type
Before Transformation:
ID |
Name |
Date of Birth |
|---|---|---|
1 |
Alice |
“1985-04-12” |
2 |
Bob |
“1990-08-23” |
Transformation Configuration:
Target Column: City
New Data Type: Date (from String)
After Transformation:
ID |
Name |
Date of Birth |
|---|---|---|
1 |
Alice |
1985-04-12T00:00:00 |
2 |
Bob |
1990-08-23T00:00:00 |
In this example, the “Date of Birth” column was originally stored as strings. The transformation configuration specifies that this column should be converted to a Date type. After applying the transformation, the “Date of Birth” column in each row reflects the new data type: Dates instead of Strings.
7.8.7. Fill the missing values
Fill in the missing values in one or more fields with the last non-blank value found.
Visual example:
Date |
Forecast |
11/05/2019 |
800 |
12/05/2019 |
|
13/05/2019 |
|
21/05/2019 |
950 |
22/05/2019 |
|
23/05/2019 |
After the transformation, the following table will be produced:
Date |
Forecast |
11/05/2019 |
800 |
12/05/2019 |
800 |
13/05/2019 |
800 |
21/05/2019 |
950 |
22/05/2019 |
950 |
23/05/2019 |
950 |
The transformation will apply to one or more fields.
The transformation will use the active filter(s).
Note
Practical example : Fill the missing (trailing) values
Before Transformation:
Consider the following dataset representing sales data. The dataset has missing values in the “Sales Amount” and “Customer Name” columns.
Date |
Sales Amount |
Customer Name |
Region |
|---|---|---|---|
2024-01-01 |
100 |
John Doe |
North |
2024-01-02 |
North |
||
2024-01-03 |
200 |
Jane Smith |
East |
2024-01-04 |
East |
||
2024-01-05 |
West |
||
2024-01-06 |
300 |
Mike Johnson |
West |
2024-01-07 |
South |
Transformation Configuration:
Target Columns: “Sales Amount”, “Customer Name”
Filters: None (all rows considered)
After Transformation:
The transformed dataset fills the missing “Sales Amount” and “Customer Name” values with the last observed values:
Date |
Sales Amount |
Customer Name |
Region |
|---|---|---|---|
2024-01-02 |
100 |
John Doe |
North |
2024-01-01 |
100 |
John Doe |
North |
2024-01-03 |
200 |
Jane Smith |
East |
2024-01-04 |
200 |
Jane Smith |
East |
2024-01-05 |
200 |
Jane Smith |
West |
2024-01-06 |
300 |
Mike Johnson |
West |
2024-01-07 |
300 |
Mike Johnson |
South |
In this example, the missing values in “Sales Amount” and “Customer Name” were replaced by the most recent available values from the preceding rows. This makes the dataset complete without any missing or empty values, allowing for better analysis and decision-making.
7.8.8. Rename column
Change the name of a field.
The transformation will apply to a single field.
The transformation will not use the active filter(s).
Note
Practical example : Rename column
Before Transformation:
ProductID |
ProductName |
Price |
Quantity |
|---|---|---|---|
001 |
Apple |
0.50 |
100 |
002 |
Banana |
0.30 |
150 |
003 |
Cherry |
1.20 |
200 |
Transformation Configuration:
Target Column: “ProductName”
New Field Name: “ItemName”
After Transformation:
ProductID |
ItemName |
Price |
Quantity |
|---|---|---|---|
001 |
Apple |
0.50 |
100 |
002 |
Banana |
0.30 |
150 |
003 |
Cherry |
1.20 |
200 |
7.8.9. Rename several columns
Rename multiple fields in a single operation. This transformation is accessible via a shortcut by right-clicking.
A window will then appear, allowing you to configure the renaming of multiple fields at once.
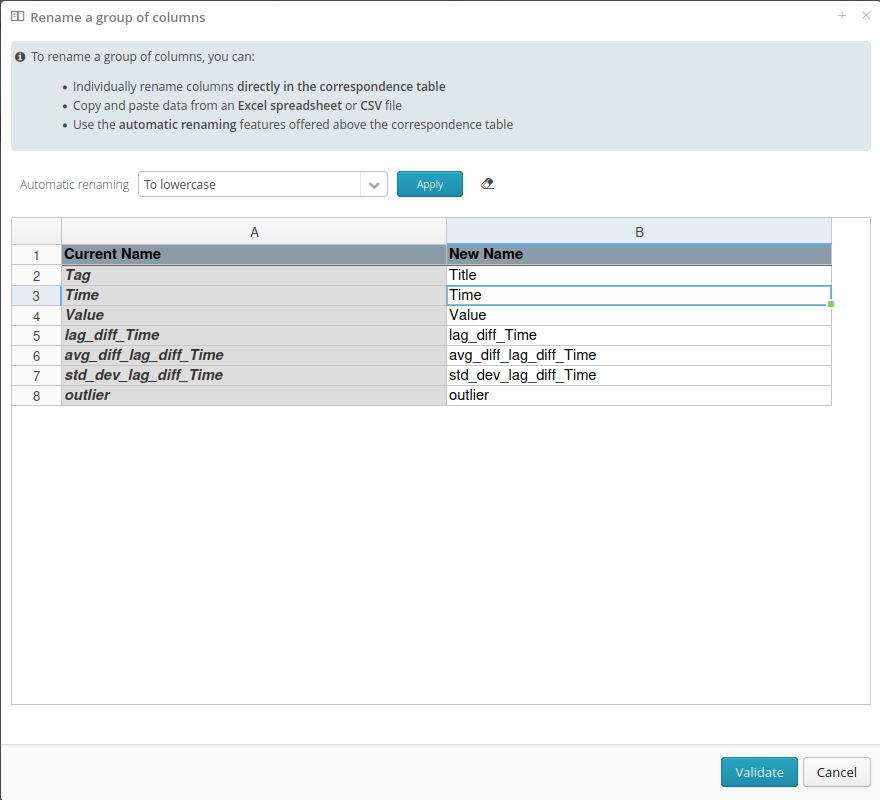
The white lines area can receive copy-pasted content from outside, allowing you to modify the names before importing them into Tale of Data. Several automatic renaming options are available: convert to lowercase, convert to uppercase, Find / Replace, Find / Replace with Regex, Valid SQL column name, Add a prefix, Add a suffix, as well as an option to reset the changes if needed.
The transformation itself remains available in the transformation editor.
Note
Practical example : Rename several columns
Before Transformation:
Consider a dataset with the following columns and data:
ID |
First_Name |
Last_Name |
Age |
City |
|---|---|---|---|---|
1 |
John |
Doe |
28 |
New York |
2 |
Jane |
Smith |
34 |
Los Angeles |
3 |
Alice |
Johnson |
45 |
Chicago |
Transformation Configuration:
For this example, the following configuration is chosen to rename the columns:
Automatic renaming :
Add suffix“_X”
After Transformation:
ID |
First_Name_X |
Last_Name_X |
Age_X |
City_X |
|---|---|---|---|---|
1 |
John |
Doe |
28 |
New York |
2 |
Jane |
Smith |
34 |
Los Angeles |
3 |
Alice |
Johnson |
45 |
Chicago |
7.8.10. Reorder Columns
Reorder the fields in a dataset.
The transformation will apply to multiple fields.
The transformation will not use the active filter(s).
Note
Practical example : Reorder Columns
Before Transformation:
CustomerID |
OrderDate |
ProductName |
Quantity |
Price |
|---|---|---|---|---|
101 |
2024-01-01 |
Widget A |
10 |
2.50 |
102 |
2024-01-02 |
Widget B |
5 |
5.00 |
103 |
2024-01-03 |
Widget C |
2 |
7.50 |
Transformation Configuration:
Desired **Columns Order:
ProductName, Quantity, Price, OrderDate, CustomerID
After Transformation:
ProductName |
Quantity |
Price |
OrderDate |
CustomerID |
|---|---|---|---|---|
Widget A |
10 |
2.50 |
2024-01-01 |
101 |
Widget B |
5 |
5.00 |
2024-01-02 |
102 |
Widget C |
2 |
7.50 |
2024-01-03 |
103 |
7.8.11. Remove Column
Delete one or more fields.
The transformation will apply to one or more fields.
The transformation will not use the active filter(s).
Note
Practical example : Remove Column
Before Transformation:
Employee ID |
Name |
Age |
Department |
|---|---|---|---|
001 |
Alice |
30 |
RH |
002 |
Bob |
24 |
Marketing |
003 |
Carol |
29 |
Development |
Transformation Configuration:
Target Columns: “Age”, “Department”
After Transformation:
Employee ID |
Name |
|---|---|
001 |
Alice |
002 |
Bob |
003 |
Carol |
7.8.12. Transpose columns to rows
Transpose the values of selected fields in one record per field, e.g. in the dataset below:
Country Name |
1960 |
1961 |
Afghanistan |
414.371 |
491.378 |
Angola |
550.05 |
454.708 |
Albania |
2024.184 |
2280.874 |
Using the following parameters to make the transformation:
List of fields: 1960 and 1961.
Header sink field: Year.
Value sink field: Level.
Result:
Country Name |
Year |
Level |
Afghanistan |
1960 |
414.371 |
Angola |
1960 |
550.05 |
Albania |
1960 |
2024.184 |
Afghanistan |
1961 |
491.378 |
Angola |
1961 |
454.708 |
Albania |
1961 |
2280.874 |
The transformation will apply to multiple fields.
The transformation will not use the active filter(s).
Note
Practical example : Transpose columns to rows
Before Transformation:
Consider a dataset representing sales data across different quarters for various products:
Product ID |
Q1 Sales |
Q2 Sales |
Q3 Sales |
Q4 Sales |
|---|---|---|---|---|
101 |
1500 |
1800 |
2000 |
2100 |
102 |
1700 |
1600 |
1950 |
2000 |
103 |
1600 |
1700 |
1800 |
1900 |
Transformation Configuration:
Columns to unpivot: Q1 Sales, Q2 Sales, Q3 Sales, Q4 Sales
Unpivot Strategy : Unpivot selected columns.
Target Column for Headers: Quarter
Target Column for Values: Sales
Note: Another option was to select the Product ID column and choose the strategy Unpivot all columns except selected ones. The result would have been the same, with the added possibility of adding columns to be dynamically transposed.
After Transformation:
The dataset after applying the transformation would look like this:
Product ID |
Quarter |
Sales |
|---|---|---|
101 |
Q1 Sales |
1500 |
101 |
Q2 Sales |
1800 |
101 |
Q3 Sales |
2000 |
101 |
Q4 Sales |
2100 |
102 |
Q1 Sales |
1700 |
102 |
Q2 Sales |
1600 |
102 |
Q3 Sales |
1950 |
102 |
Q4 Sales |
2000 |
103 |
Q1 Sales |
1600 |
103 |
Q2 Sales |
1700 |
103 |
Q3 Sales |
1800 |
103 |
Q4 Sales |
1900 |
After the transformation, the sales data is more structured for time-series analysis or visualization, where each product’s sales data is now associated with a specific quarter in a single column, “Quarter,” and the corresponding sales amount in the “Sales” column.
7.8.13. Mask sensitive data
Hide sensitive data to protect its confidentiality.
Several masking strategies are available:
Semantic masking
Deterministic masking
Mask everything
Mask the first n characters
Keep the first n characters
Mask the last n characters
Mask the characters between two positions
Keep the characters between two positions
Mask digits
Use Preview for an advance view of masking results.
The transformation will apply to multiple text fields.
The transformation will use the active filter(s).
Note
Practical example : Mask sensitive data
Before Transformation:
Customer Name |
Email address |
Phone Number |
|---|---|---|
John Doe |
123-456-7890 |
|
Jane Smith |
098-765-4321 |
Transformation Configuration:
Target Column: Email Address, Phone Number
Masking strategies:
Email Address: Mask all characters
Phone Number: Preserve the last four characters, mask the rest
After Transformation:
Customer Name |
Email address |
Phone Number |
|---|---|---|
John Doe |
xxxxxxxxxxxxxxxx |
xxx-xxx-7890 |
Jane Smith |
xxxxxxxxxxxxxxxx |
xxx-xxx-4321 |
In this example, the transformation masks all characters of the email addresses to protect the user’s identity, while for phone numbers, it preserves the last four characters to maintain some level of information without revealing the full number. This approach helps in scenarios where partial data is sufficient for testing or analytical purposes.
7.9. Record transformations
7.9.1. Create Integer Sequence
To configure the “Add Numeric Row Identifiers” transformation, the user needs to specify several parameters:
Target Column Name : The name of the new column to be added, which will contain the sequence of integer values.
Filters : A set of conditions that determine which rows of the dataset will receive the integer sequence. Rows that do not meet these conditions will have a null value in the new column.
The transformation first creates an internal row identifier for each row in the dataset using a unique monotonically increasing number. It then applies the specified filters to determine which rows should receive a sequence number. If a row meets the filter conditions, it is assigned a unique sequence number in the new column. If a row does not meet the filter conditions, the new column for that row is set to null.
Finally, the dataset is sorted by the internal row identifier to maintain the original order, and the sequence column is added to the dataset.
Note
Practical example : Add Numeric Row Identifiers
Before Transformation:
ID |
Name |
Age |
Country |
|---|---|---|---|
1 |
John |
28 |
USA |
2 |
Maria |
34 |
Canada |
3 |
Lee |
23 |
China |
4 |
Anna |
45 |
USA |
Transformation Configuration:
Target column name:
SequenceNumberFilters:
Country = 'USA'
After Transformation:
ID |
Name |
Age |
Country |
SequenceNumber |
|---|---|---|---|---|
1 |
John |
28 |
USA |
12 |
2 |
Maria |
34 |
Canada |
null |
3 |
Lee |
23 |
China |
null |
4 |
Anna |
45 |
USA |
21 |
In this example, the transformation added a new column, SequenceNumber, to the dataset. The sequence starts from 0 for the first row that meets the filter condition (Country = 'USA'). Rows that do not meet the filter condition have null in the SequenceNumber column. The transformation maintains the original order of the dataset and only modifies the content based on the configured parameters.
7.9.2. Delete Filtered Rows
Delete filtered records.
The transformation will use the active filter(s).
Note
Practical example : Delete Filtered Rows
Before Transformation:
Consider the following dataset:
ID |
Name |
Age |
Country |
|---|---|---|---|
1 |
Alice |
30 |
USA |
2 |
Bob |
25 |
Canada |
3 |
Charlie |
35 |
USA |
4 |
David |
40 |
UK |
5 |
Eve |
28 |
Canada |
Transformation Configuration:
The user wants to remove all rows where the “Country” column has the value “USA”.
Filter Condition: Country = “USA”
After Transformation:
After applying the “Delete Filtered Rows” transformation with the above filter, the resulting dataset would be:
ID |
Name |
Age |
Country |
|---|---|---|---|
2 |
Bob |
25 |
Canada |
4 |
David |
40 |
UK |
5 |
Eve |
28 |
Canada |
In this example, the transformation removed the rows where the “Country” was “USA” (rows with IDs 1 and 3). The remaining dataset only includes rows where the “Country” is not “USA”.
7.9.3. Delete Empty Rows
Delete blank records. In a blank record all the fields will be blank.
The transformation will not use the active filter(s).
Note
Practical example : Delete Empty Rows
To illustrate how the Delete Empty Rows transformation works, let’s consider the following example:
Before Transformation:
ID |
Name |
Age |
|
|---|---|---|---|
1 |
John |
28 |
|
2 |
|||
3 |
|||
4 |
|||
5 |
Robert |
29 |
Transformation Configuration:
No configuration required
After Transformation:
ID |
Name |
Age |
|
|---|---|---|---|
1 |
John |
28 |
|
5 |
Robert |
29 |
Explanation:
Row 2, 3, and 4 are removed because they are empty.
After the transformation, the dataset only includes rows where all selected columns have non-empty, non-blank values, thus ensuring that the remaining data is complete and valid.
7.10. Text transformations
7.10.1. Add a prefix
Add a prefix to the values in the selected field.
The transformation will apply to just one field.
The transformation will use the active filter(s).
Note
Practical example : Add a prefix
Before Transformation:
ID |
Name |
Phone Number |
|---|---|---|
1 |
John Doe |
123456789 |
2 |
Jane Smith |
|
3 |
Bob Brown |
987654321 |
Transformation Configuration:
Target Column: Phone Number
Prefix: +1-
Add to Missing Values: Yes
After Transformation:
ID |
Name |
Phone Number |
|---|---|---|
1 |
John Doe |
+1-123456789 |
2 |
Jane Smith |
+1- |
3 |
Bob Brown |
+1-987654321 |
In this example, the transformation adds the prefix “+1-” to each phone number. For Jane Smith, who originally had an empty phone number, the prefix is added because the ‘Add to Missing Values’ option is enabled, resulting in “+1-“.
7.10.2. Add a suffix
Add a suffix to the values in the selected field.
The transformation will apply to just one field.
The transformation will use the active filter(s).
Note
Practical example : Add a suffix
Before Transformation:
ID |
Name |
City |
|---|---|---|
1 |
Alice |
New York |
2 |
Bob |
|
3 |
Charlie |
Los Angeles |
Transformation Configuration:
Target Column: City
Suffix: ” - USA”
Add to Missing Values: Yes
After Transformation:
ID |
Name |
City |
|---|---|---|
1 |
Alice |
New York - USA |
2 |
Bob |
- USA |
3 |
Charlie |
Los Angeles - USA |
In this example, the transformation appends “- USA” to each entry in the ‘City’ column. Notice that even the blank entry for Bob has been updated to include the suffix, demonstrating the effect of enabling the addition of the suffix to missing values.
7.10.3. Attribute a value to cells
Attribute the same value to all the cells in a field. If the new value is blank, the content of the cells will be deleted.
The transformation will apply to just one field.
The transformation will use the active filter(s).
Note
Practical example : Attribute a value to cells
Before Transformation:
ID |
Name |
Statut |
|---|---|---|
1 |
Alice |
Actif |
2 |
Bob |
Inactif |
3 |
Charlie |
Actif |
Transformation Configuration:
Target Column: Statut
New Value: Pending Review
After Transformation:
ID |
Name |
Statut |
|---|---|---|
1 |
Alice |
Pending Review |
2 |
Bob |
Pending Review |
3 |
Charlie |
Pending Review |
In this example, the transformation was configured to update the ‘Status’ column of all records to ‘Pending Review’. This could be useful in scenarios where a review process is required for all members, regardless of their current status. The transformation ensures that every record’s status is updated uniformly, facilitating a streamlined review process.
7.10.4. Capitalize
Capitalize the first letter of each word in each cell in the selected field(s). Can be applied to the first word only by selecting the First word only option.
The transformation will apply to one or more fields.
The transformation will use the active filter(s).
Note
Practical example : Capitalize a selection
Before Transformation:
ID |
Description |
Charlie |
|---|---|---|
1 |
APPLE PIE FROM STORE |
bakery items |
2 |
fresh orange JUICE |
beverages |
3 |
chocolate Bar |
confectionery |
Transformation Configuration:
Selected Columns: Description, Category
Capitalization Type: Capitalize each word
After Transformation:
ID |
Description |
Charlie |
|---|---|---|
1 |
Apple Pie From Store |
Bakery Items |
2 |
Fresh Orange Juice |
Beverages |
3 |
Chocolate Bar |
Confectionery |
In this example, the transformation is configured to capitalize each word in the ‘Description’ and ‘Category’ columns. After applying the transformation, all the words in these columns start with an uppercase letter, enhancing the text’s appearance and making it more formal and readable.
7.10.5. Right Pad
Complete to the right, with a given string of characters, all cells in the selected field.
Visual example:
A cell bcd, a completion string a and a length 4, will give bcda.
A cell bcda, a completion string a and a length 4, will give bcda.
The transformation will apply to just one field.
The transformation will use the active filter(s).
Note
Practical example : Right pad
Before Transformation:
ID |
Name |
City |
|---|---|---|
1 |
Alice |
New York |
2 |
Bob |
LA |
3 |
Clara |
San Diego |
Transformation Configuration:
Target Column: City
Pad String: “*”
Pad Size: 9
After Transformation:
ID |
Name |
City |
|---|---|---|
1 |
Alice |
|
2 |
Bob |
|
3 |
Clara |
|
7.10.6. Left Pad
Complete to the left, with a given string of characters, all cells in the selected field.
Visual example:
A cell bcd, a completion string a and a length 4, will give bcda.
A cell abcd, a completion string a and a length 4, will give bcda.
The transformation will apply to just one field.
The transformation will use the active filter(s).
Note
Practical example : Left pad
Before Transformation:
ID |
Name |
Description |
|---|---|---|
1 |
Alice |
Manager |
2 |
Bob |
Assistant |
3 |
Charlie |
Regional Manager |
Transformation Configuration:
Target Column: ‘Description’
Pad String: “*”
Size: 20
After Transformation:
ID |
Name |
Description |
|---|---|---|
1 |
Alice |
|
2 |
Bob |
|
3 |
Charlie |
|
In this example, the Description column has been transformed to ensure each entry is exactly 20 characters long, using spaces to pad shorter descriptions. This formatting might be particularly useful for generating reports or aligning outputs for better readability.
7.10.7. Convert to lowercase
Convert all the characters in each cell of the selected field to lower case
Visual example: “CONTENT of a Cell” will become “content of a cell”.
The transformation will apply to one or more fields.
The transformation will use the active filter(s).
Note
Practical example : Convert to lowercase
Before Transformation:
ID |
Name |
|
|---|---|---|
1 |
Alice |
|
2 |
Bob |
|
3 |
Charlie |
Transformation Configuration:
Target Columns: Name, Email
After Transformation:
ID |
Name |
|
|---|---|---|
1 |
alice |
|
2 |
bob |
|
3 |
charlie |
7.10.8. Convert to uppercase
Convert all the characters in each cell of the selected field to upper case.
Visual example: “CONTENT of a Cell” will become “CONTENT OF A CELL”.
The transformation will apply to one or more fields.
The transformation will use the active filter(s).
Note
Practical example : Convert to uppercase
Before Transformation:
ID |
Name |
City |
|---|---|---|
1 |
John Doe |
new york |
2 |
Jane Smith |
los angeles |
Transformation Configuration:
Target Columns: Name, City
After Transformation:
ID |
Name |
City |
|---|---|---|
1 |
JOHN DOE |
NEW YORK |
2 |
JANE SMITH |
LOS ANGELES |
7.10.9. Unescape HTML entities
Convert the HTML entities of each cell in the selected field to characters.
For example:
Entité HTMLwill becomeEntité HTML.
Entité HTMLdevientEntité HTML.
The transformation will apply to one or more fields.
The transformation will use the active filter(s).
Note
Practical example : Unescape HTML entities
Before Transformation:
ID |
Description |
|---|---|
1 |
|
2 |
|
Transformation Configuration:
Target Columns: Description
After Transformation:
ID |
Description |
|---|---|
1 |
|
2 |
|
In this example, the transformation decodes HTML entities in the “Description” column to restore their readable form. For example, “<div>” becomes “<div>” and “'” becomes the single apostrophe “‘”.
7.10.10. Escape HTML entities
Convert the eligible characters in each cell in the selected field into their HTML entity format.
For example: Entité HTML will become Entité HTML.
The transformation will apply to one or more fields.
The transformation will use the active filter(s).
Note
Practical example : Escape HTML entities
Before Transformation:
Name |
Description |
|---|---|
John Doe |
|
Jane Smith |
|
Transformation Configuration:
Colonnes cibles :
Description
After Transformation:
Name |
Description |
|---|---|
John Doe |
|
Jane Smith |
|
In this example, the Description column has HTML-sensitive characters like <, >, and &. The transformation replaces these characters with their HTML entity equivalents (<, >, and &) to prevent them from being misinterpreted as HTML tags or entities when displayed in a web environment. This ensures that the text is displayed exactly as intended.
7.10.11. Unescape Unicode
Convert Unicode [7] code points into characters (glyphs) in each selected field.
Visual example:
Biblioth\\u00E8quewill becomeBibliothèque.
Mus\\ u00E9ewill becomeMusée.
For further information :
Unicode on Wikipedia.
Unicode code point in Wikipedia.
The transformation will apply to one or more fields.
The transformation will use the active filter(s).
Note
Practical example : Unescape Unicode
Before Transformation:
ID |
Description |
|---|---|
1 |
\u0048ello |
2 |
World\u0021 |
3 |
\u0047ood \u004Dorning |
Transformation Configuration:
Target Columns: [‘Description’]
After Transformation:
ID |
Description |
|---|---|
1 |
Hello |
2 |
World! |
3 |
Good Morning |
In this example, the transformation decodes Unicode sequences in the “Description” column to convert them into readable text. For example, “u0048” becomes “H” and “u0021” becomes “!”.
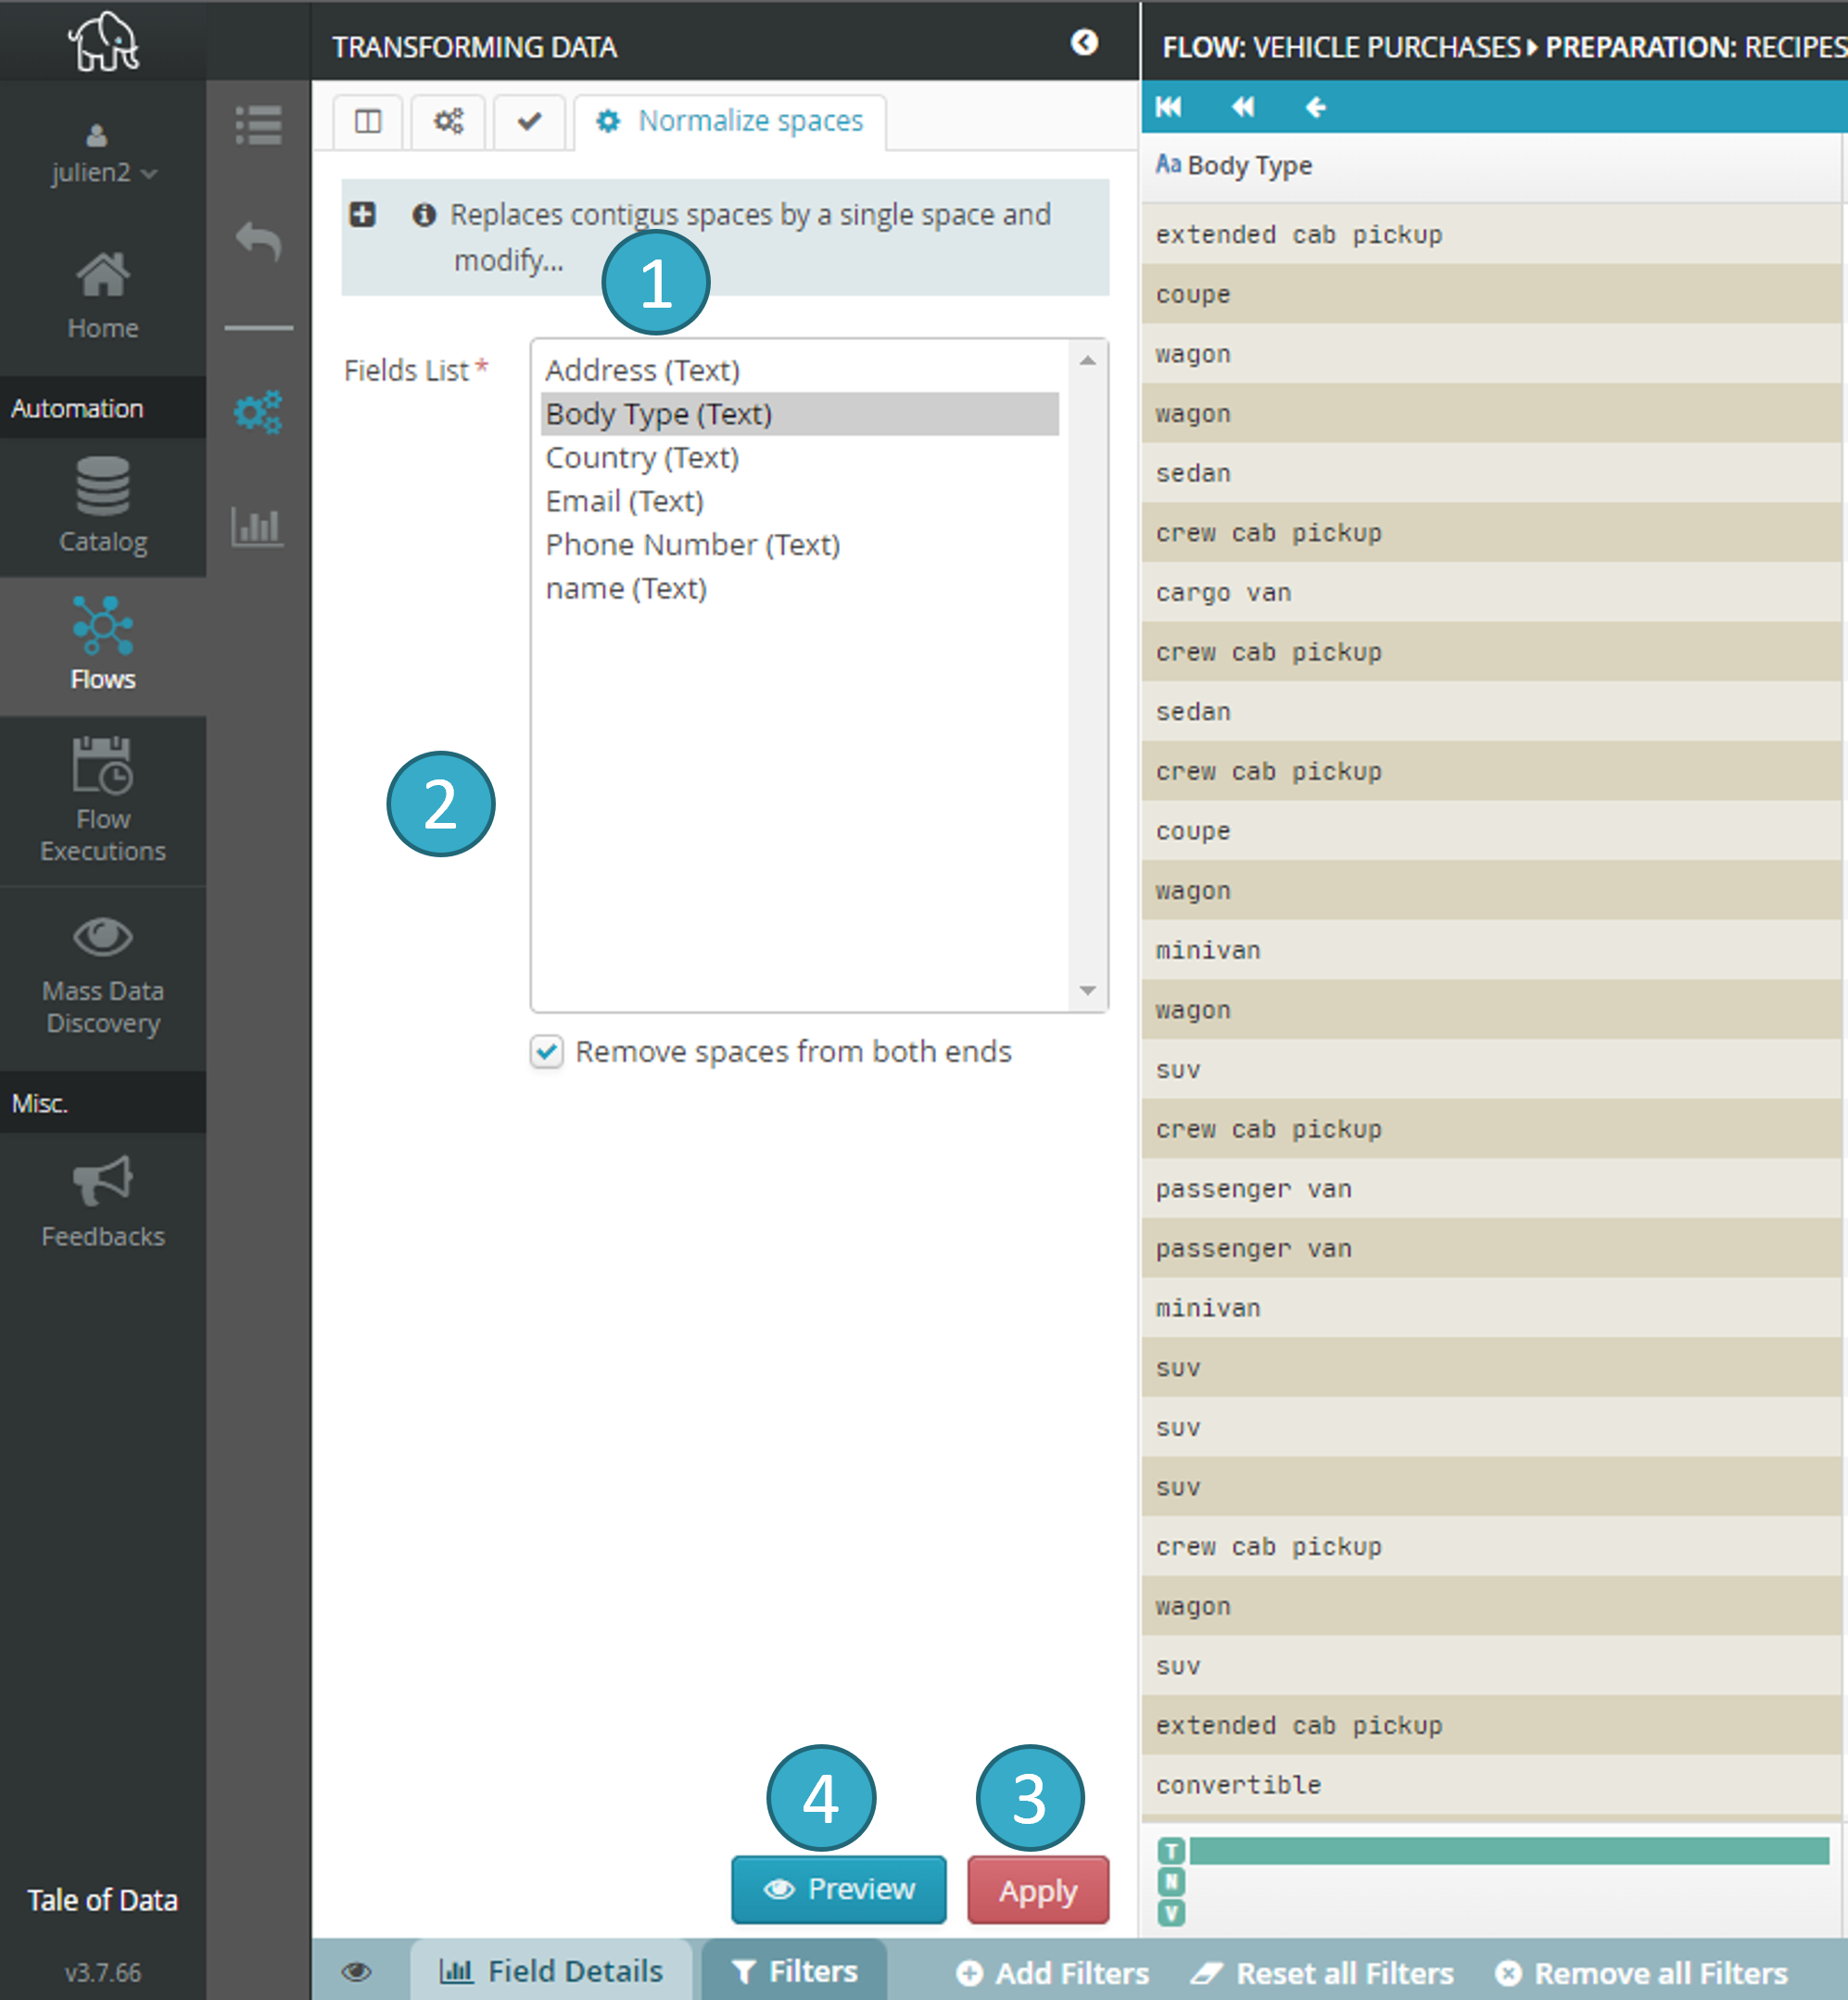
7.10.12. Normalize spaces
Delete consecutive spaces (and any character similar to a space: tabs, returns, etc.) and replace them with a single space (ASCII + 10).
The transformation will apply to one or more fields.
The transformation will use the active filter(s).
Note
Practical example : Normalize spaces
Before Transformation:
ID |
Description |
Price |
|---|---|---|
1 |
Apple, fresh fruit |
$1.50 |
2 |
Banana, tropical fruit |
$0.50 |
3 |
Carrot, vegetable |
$0.30 |
Transformation Configuration:
Target Columns: Description
Remove spaces from both ends:
true
After Transformation:
ID |
Description |
Price |
|---|---|---|
1 |
Apple, fresh fruit |
$1.50 |
2 |
Banana, tropical fruit |
$0.50 |
3 |
Carrot, vegetable |
$0.30 |
In this example, the transformation was applied to the ‘Description’ column. Extra spaces within the descriptions were removed, and spaces at the beginning and end of the strings were trimmed.
7.10.13. Find / Replace
Search for multiple text fragments and specify the desired replacement for each of them (you can copy and paste the mappings from Excel).
Several modes are available:
Normal (substring)
Regular expression
Whole word only (≠ parts of a word)
Whole cell only (exact cell match)
Note
Practical example : Find / Replace
Before Transformation:
ID |
Name |
|---|---|
1 |
Budget 2025 |
2 |
Budget 2025 |
3 |
Budget 2025 |
4 |
Budget 2025 |
Transformation Configuration:
Target Column: Year
Find: “24”
Replace with: “25”
Search mode:
NormalCase Sensitive:
Yes
After Transformation:
ID |
Name |
|---|---|
1 |
Budget 2025 |
2 |
Budget 2025 |
3 |
Budget 2025 |
4 |
Budget 2025 |
In this example, the transformation targets the “Year” column. The value “24” is replaced with “25”. Note that in these rows, Budget 20 remains unchanged. This is because the replacement mode is set to Normal (substring), and the text “Budget 20” is part of the word “Budget 2024”.
7.10.14. Infer Language
Recognize the language of each cell in the selected field. The language recognized will be stored in a new field. Available language formats are:
The transformation will apply to just one field.
The transformation will use the active filter(s).
Note
Practical example : Infer Language
Before Transformation:
Record ID |
Description |
|---|---|
1 |
Bonjour, comment ça va? |
2 |
Good morning, how are you? |
3 |
Guten Morgen, wie geht es? |
Transformation Configuration:
Target Column: ‘Description’
Language Format:
Localized Language NameLocalize Language Name in:
EnglishAdd Confidence: Yes
After Transformation:
Record ID |
Description |
Description.language |
Description.confidence |
|---|---|---|---|
1 |
Bonjour, comment ça va? |
French |
0.97 |
2 |
Good morning, how are you? |
English |
0.99 |
3 |
Guten Morgen, wie geht es? |
German |
0.99 |
In this example, the transformation accurately identifies the language of each text entry and provides a confidence score that reflects the certainty of the language inference. This allows for enhanced data analysis and processing based on language-specific criteria.
7.10.15. Remove HTML code
Delete HTML tags, replace HTML and Unicode entities with their text equivalents in the selected fields.
The transformation will apply to one or more fields.
The transformation will use the active filter(s).
Note
Practical example : Remove HTML Code
Before Transformation:
ID |
Description |
Price |
|---|---|---|
1 |
|
$50 |
2 |
|
$30 |
3 |
|
$20 |
Transformation Configuration:
Target Columns:
Description
After Transformation:
ID |
Description |
Price |
|---|---|---|
1 |
Special offer on shoes & gloves |
$50 |
2 |
Buy this item now! |
$30 |
3 |
New stock available in store |
$20 |
In this example, the transformation is applied to the ‘Description’ column of each row. HTML tags such as <b>, <i>, <a href="...">, <p>, and <br> are removed, leaving only the plain text.
7.10.16. Remove diacritics
Delete all diacritics [10] from each cell in the selected field. Accents too are diacritics.
The characters in the following Unicode categories are also considered diacritics:
LM LETTER, Modifier.
SK SYMBOL, Modifier.
MN MARK, Nonspacing.
The transformation will apply to one or more fields.
The transformation will use the active filter(s).
Note
Practical example : Remove diacritics
Before Transformation:
ID |
Name |
City |
|---|---|---|
1 |
José Álvarez |
São Paulo |
2 |
Zoë Kravitz |
Zürich |
3 |
François Père |
Strasbourg |
Transformation Configuration:
Target Columns: Name, City
After Transformation:
ID |
Name |
City |
|---|---|---|
1 |
Jose Alvarez |
Sao Paulo |
2 |
Zoe Kravitz |
Zurich |
3 |
Francois Pere |
Strasbourg |
7.10.17. Remove spaces from both ends
Delete spaces and and all characters similar to spaces (tabs, returns, etc.) at the start or end of a text.
The transformation will apply to one or more fields.
The transformation will use the active filter(s).
Note
Practical example : Remove spaces from both ends
Before Transformation:
ID |
Name |
|
|---|---|---|
1 |
John Doe |
|
2 |
Jane Smith |
|
3 |
Bob Lee |
Transformation Configuration:
Target Columns: Name, Email
After Transformation:
ID |
Name |
|
|---|---|---|
1 |
John Doe |
|
2 |
Jane Smith |
|
3 |
Bob Lee |
In this example, the transformation removes any extra spaces from the beginning and end of the entries in the ‘Name’ and ‘Email’ columns, ensuring that the data is clean and uniformly formatted across the dataset.
7.10.18. Remove unwanted characters
The goal of the “Remove unwanted characters” transformation is to clean and standardize data within a dataset by removing or modifying characters in the data according to specific rules. This helps in ensuring that the data is uniform and free from unwanted characters.
Note
Practical example : Remove unwanted characters
Before Transformation:
ID |
Name |
Address |
|---|---|---|
1 |
Jöhn Döe |
123 Sträßé Blvd |
2 |
Jane Smith |
456 Road St. |
3 |
Alice O’Hara |
789 Avénue Ct. |
Transformation Configuration:
Target Columns: Name, Address
Remove punctuation marks and symbols: Yes
Remove Diacritics: Yes
Remove all Letters: No
Remove all Digits: No
Convert multiple whitespace to single space characters: Yes
Remove leading and trailing whitespace: Yes
Remove all Whitespace: No
After Transformation:
ID |
Name |
Address |
|---|---|---|
1 |
John Doe |
123 Strasse Blvd |
2 |
Jane Smith |
456 Road St |
3 |
Alice OHara |
789 Avenue Ct |
7.11. Numeric transformations
7.11.1. Round a Decimal
Decimal rounding:
If the strategy is to the nearest whole number , the decimal will be rounded up or down to the nearest whole number (2.6 will become 3 and 2.4 will become 22).
If the strategy is to the next whole number above, the decimal will be rounded up to the nearest whole number (2.1 will become 3).
If the strategy is to the next whole number below, the decimal will be rounded down to the nearest whole number (2.6 will become 2)
The transformation will apply to just one field.
The transformation will use the active filter(s).
Note
Practical example : Round a Decimal
Before Transformation:
ID |
Price |
|---|---|
1 |
23.67 |
2 |
89.99 |
3 |
100.01 |
4 |
55.55 |
Transformation Configuration:
Target Column: Price
Rounding Strategy:
ROUND
After Transformation:
ID |
Price |
|---|---|
1 |
24 |
2 |
90 |
3 |
100 |
4 |
56 |
7.11.2. Create intervals of fixed-size
Create fixed-size intervals from a numeric column.
Visual example:
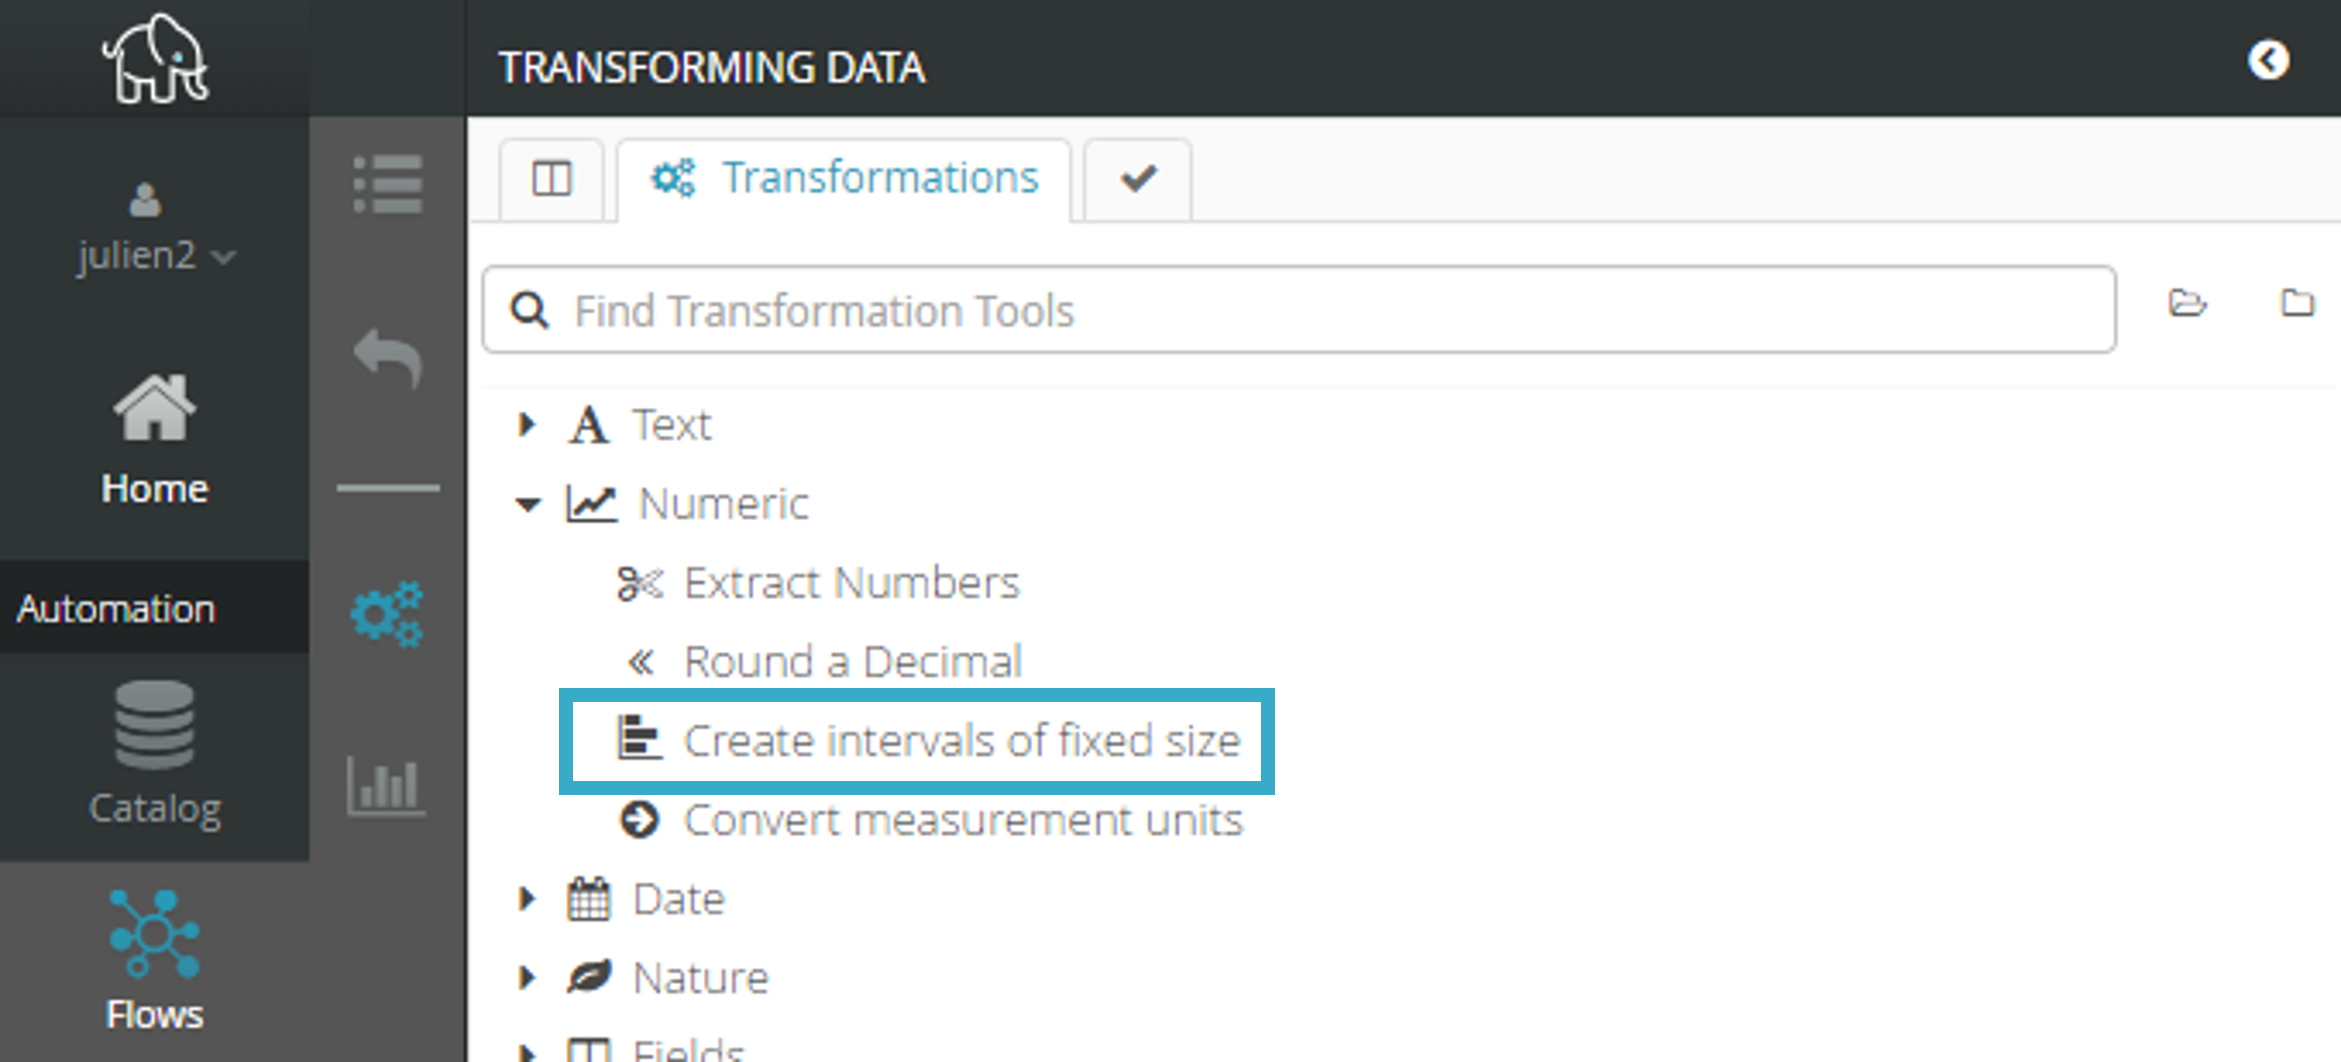
Example:
[0, 10[
[10, 20[
[20, 30[ etc.
This transformation can be used to create e.g. histograms (i.e. bar charts) using continuous values.
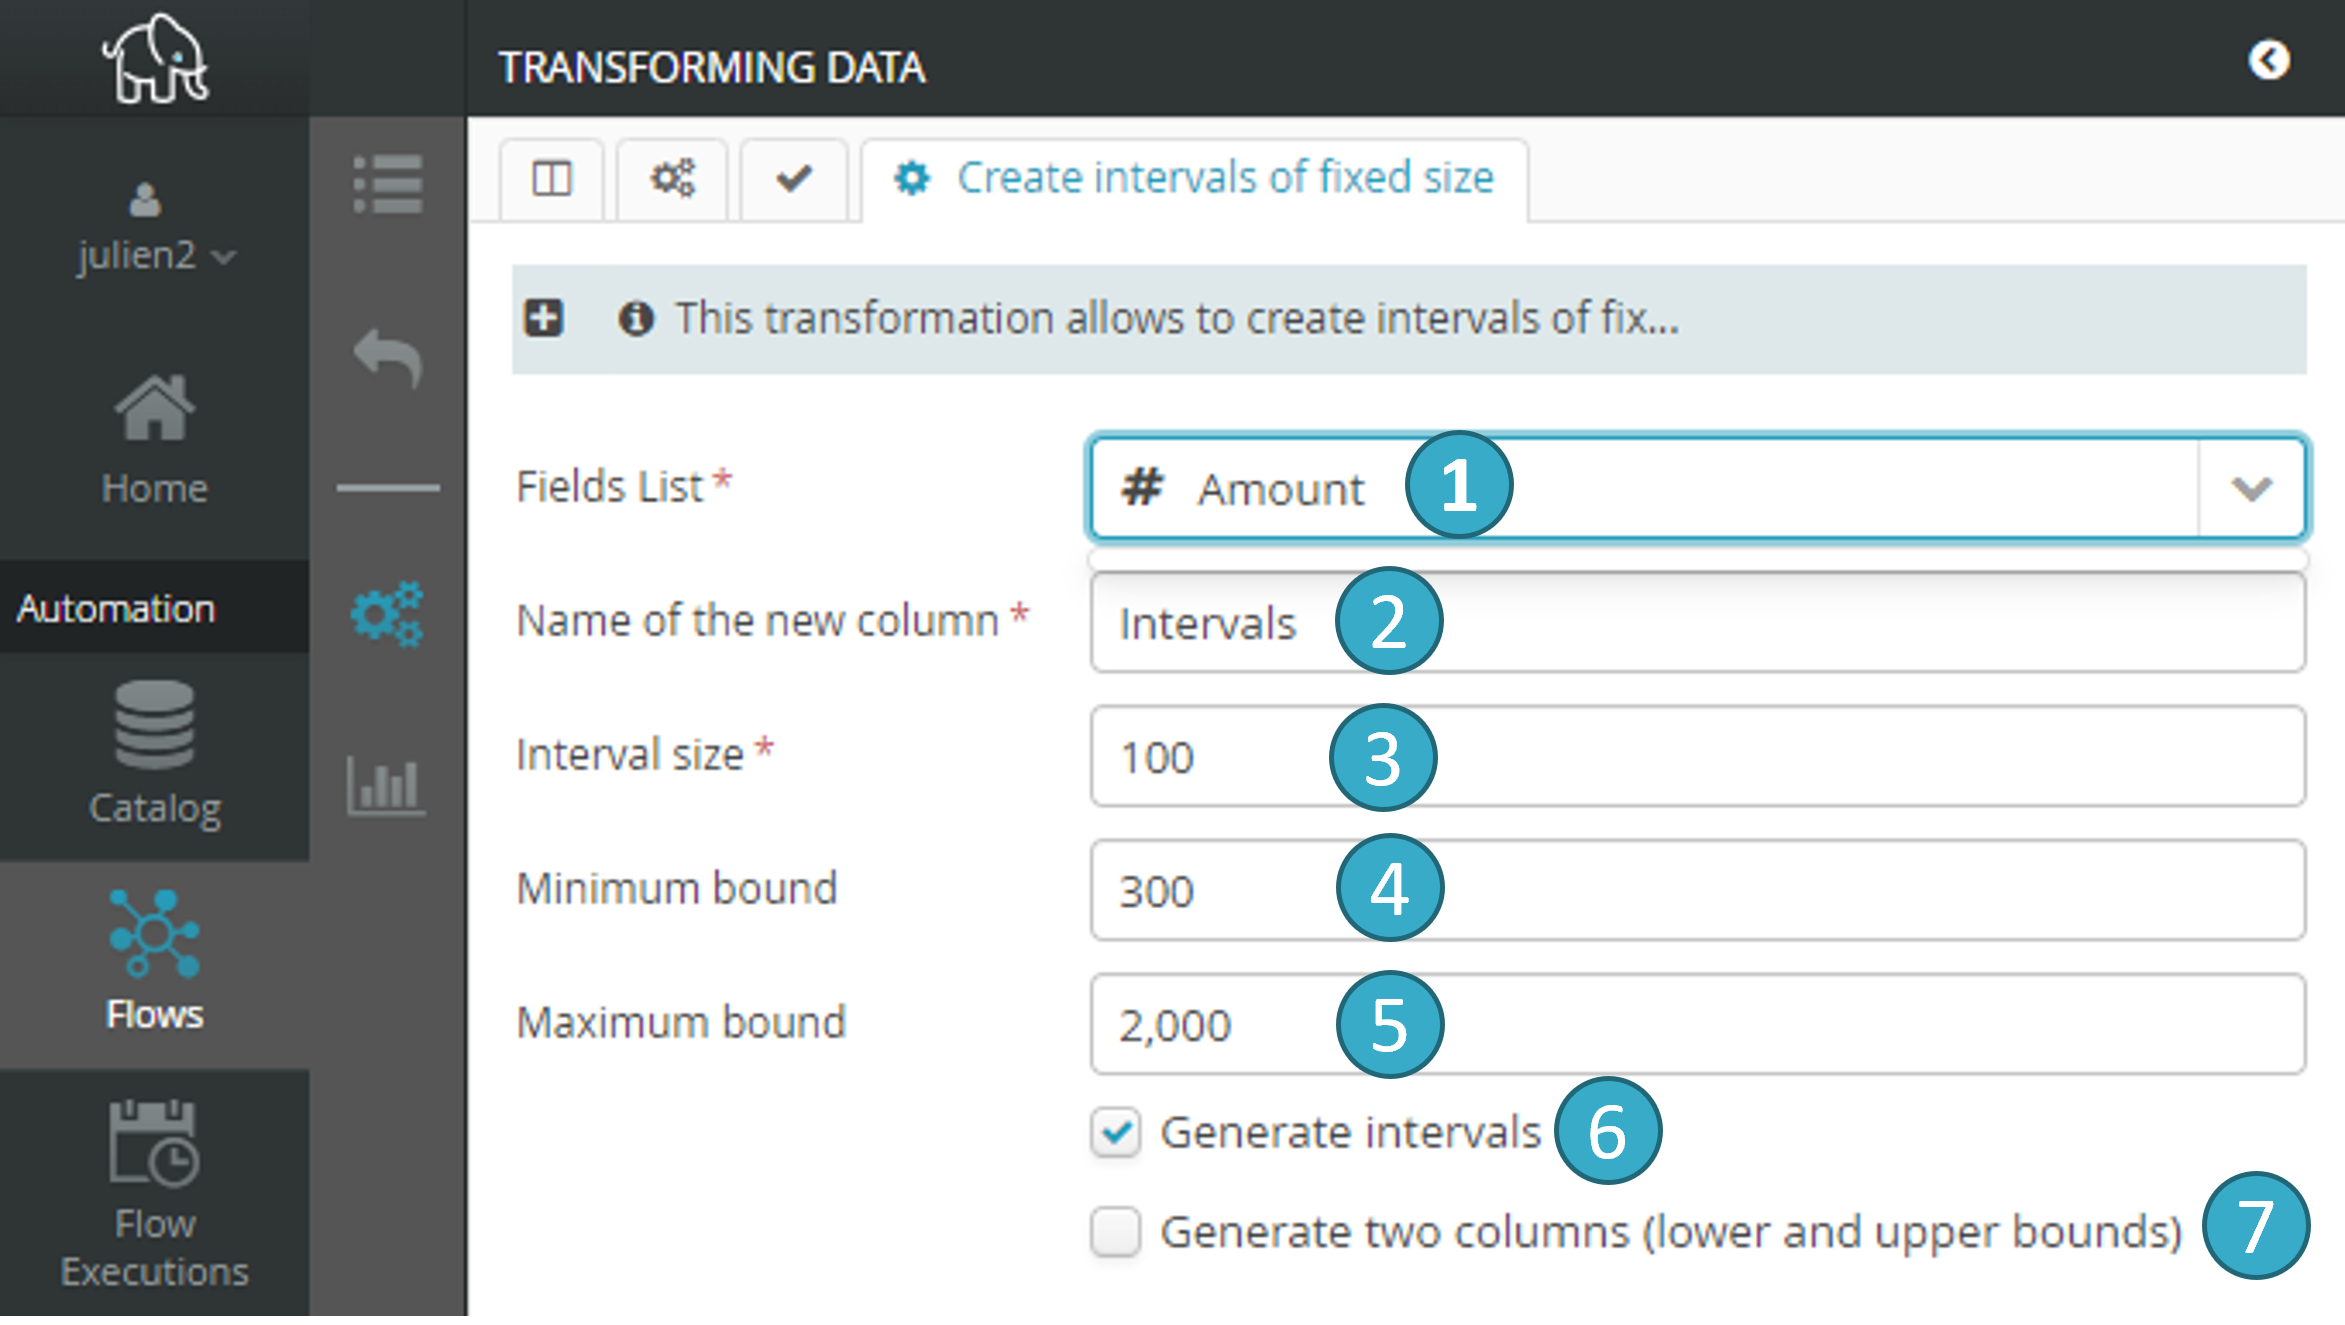
 Choose the name of the numeric column that will be used to create the intervals.
 Choose the name of the new column that will contain the intervals.
 Set the size of the intervals.
 Set a lower limit for the first interval and an upper limit for the last interval (this is optional). If a lower limit B is set, all values below that limit will fall into interval ]-∞, B[. If an upper limit B’**is set |image421|, all values at or above that limit will fall into interval **[B’, +∞[.
 Tick the option to get a text column with [X, Y[ intervals, meaning that the value is >= X and < Y.
 Tick the option to get two numeric columns. The first will contain the lower interval limits (inclusive) and the second will contain the upper interval limits (exclusive).
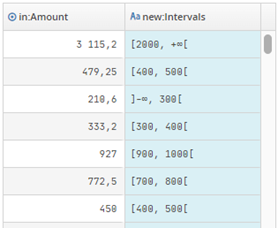
Result preview:
Note
Practical example : Create intervals of fixed-size
Before Transformation:
Age |
|---|
17 |
37 |
45 |
60 |
82 |
Transformation Configuration:
Target Column: Age
New column name
Stride: 20
Minimum Value: 20
Maximum Value: 80
Generate Intervals: True
Generate two columns (Lower and upper bounds: True
After Transformation:
Age |
Intervals |
Intervals_min_inclusive |
Intervals_max_exclusive |
|---|---|---|---|
17 |
]-∞, 20[ |
20 |
|
37 |
[20, 40[ |
20 |
40 |
45 |
[40, 60[ |
40 |
60 |
60 |
[60, 80[ |
60 |
80 |
82 |
[80, +∞[ |
80 |
In this transformed dataset:
The ‘Intervals’ column shows the range in which each age falls.
The ‘Intervals_min_inclusive’ and ‘Intervals_max_exclusive’ columns provide the exact numerical boundaries of these intervals.
This transformation makes it easier to categorize and analyze the age data, especially for statistical or grouping purposes.
7.11.3. Convert measurement units
Convert one unit of measurement into another (e.g. convert kilometers into miles).
The source unit of measurement can also be detected automatically.
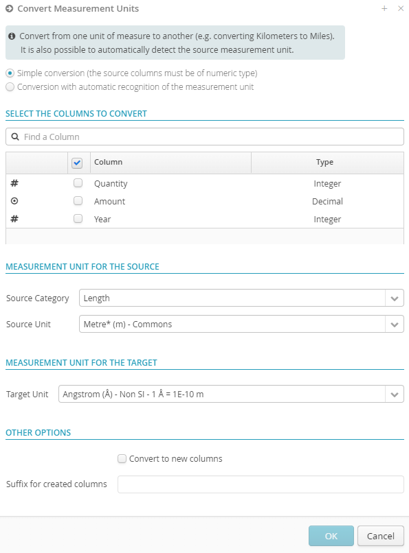
This transformation can be done in 2 ways:
Simple conversion: from one numeric field to another, possibly the same, numeric field.
Conversion with automatic unit recognition: from one text field to a new numeric field.
The transformation will apply to one or more fields.
The transformation will use the active filter(s).
Note
Practical example : Convert measurement units
Before Transformation:
Product ID |
Length (type=inches) |
|---|---|
001 |
24 |
002 |
36 |
Transformation Configuration:
Columns to Convert: “Length”
Source Unit:
inchesTarget Unit:
centimetersConvert to New Columns:
trueSuffix for created columns: “”
After Transformation:
Product ID |
Length (type=inches) |
Length.cm |
|---|---|---|
001 |
24 |
60.96 |
002 |
36 |
91.44 |
In this example, the transformation converts the length from inches to centimeters.
Analysis and Conversion Mode
To enable this mode you must select option Conversion with automatic recognition of the measurement unit.
Columns to Convert: Identify which columns in the dataset contain the values that need to be parsed and converted. These columns must be of text type.
Source Category: Define The unit of measurement category for column values, (e.g. Mass, Pressure, Volume, Length….etc). The selected columns are supposed to contain measurements of the same type. For example, you can’t have 5Kg (kilos) and 8l (liters) in the same column.
Target Unit: Define the unit to which the data should be converted (this unit must be consistent with the Source Category: If you have selected the pressure category for your column, a value of 5 kg will be considered an error, since this is a unit of Mass and not of Pressure).
Decimal Separator: the decimal separator used for the textual expression of a measurement. Possible values are the dot (the default) and the comma. If you have chosen the comma, then 10.5 kg will be read as the decimal 10.5 with, as unit of measurement, the kilogram.
Add a diagnostic column: Optionally, add columns to diagnose and record any errors or issues that occur during the conversion process, such as parsing errors.
Suffix for created columns: Add a suffix to columns created during the parse and conversion process.
Note
Practical example : Mode d’analyse et de conversion
Before Transformation:
Product ID |
Weight |
|---|---|
001 |
5.3 kg |
002 |
10.2 m² |
Transformation Configuration:
Columns to Convert: “Weight”
Source Category:
MassTarget Unit:
GramDecimal Separator:
dotAdd a diagnostic column:
trueSuffix for created columns: “Gram”
After Transformation:
Product ID |
Weight |
Weight.Gram |
Weight.Gram_diagnosis |
|---|---|---|---|
001 |
“5 kg” |
5000.0 |
null |
002 |
“10 m²” |
‘m²’ n’est pas une unité de mesure de Masse |
In this example, on the first row, the transformation successfully converts the weight from kilograms to grams, storing the results in new columns. On the second row, the value indicates a unit of area (in square meters: “10 m²”) and not a unit of mass. The transformation is therefore impossible (the column “Weight.Gram” is therefore empty) and the error message indicates the reason for the failure: 'm²' is not a unit of measurement of Mass.
7.11.4. Extract Numbers
Extract the numbers from a text field and enter them in new fields.
The transformation will apply to just one field.
The transformation will use the active filter(s).
Note
Practical example : Extract Numbers
Before Transformation:
ID |
Description |
|---|---|
1 |
Total: $123,456.78 |
2 |
Amount: 98765.43 units |
3 |
Count: 12,000 items |
Transformation Configuration:
Target Column: ‘Description’
Output Columns Type: ‘Decimal’
Fixed Output Columns Number:
1Thousand Strategy: ‘Comma’
Decimal Strategy: ‘Dot’
After Transformation:
ID |
Description |
Description.number |
|---|---|---|
1 |
Total: $123,456.78 |
123456.78 |
2 |
Amount: 98765.43 units |
98765.43 |
3 |
Count: 12,000 items |
12000.00 |
In this example, the transformation successfully extracts the first numeric value from the ‘Description’ column, interprets the correct thousand and decimal separators based on the specified separators, and populates the new ‘Description.number’ column with the extracted decimal value. This enables clearer and more direct analysis of the numerical data previously embedded within text.
7.12. Date transformations
7.12.1. Add Current Date Time
The goal of the “Add Current Date Time” transformation is to add a new column to a dataset that records the current date and time when the transformation is applied. This can be particularly useful for tracking when data was processed or updated.
How it works:
To configure this transformation, you need to specify the name of the new column where the current time will be recorded. This is done by setting a parameter that determines the target column name. The transformation will automatically add this new column to each row in your dataset, populating it with the exact date and time of the transformation’s execution.
Note
Practical example : Add Current Date Time
Before Transformation:
OrderID |
CustomerName |
Product |
Quantity |
|---|---|---|---|
001 |
John Doe |
Laptop |
1 |
002 |
Jane Smith |
Tablet |
2 |
Transformation Configuration:
You decide to add a column named “ProcessedTime” to track when each record was processed.
After Transformation:
OrderID |
CustomerName |
Product |
Quantity |
ProcessedTime |
|---|---|---|---|---|
001 |
John Doe |
Laptop |
1 |
07/12/2021 10:00 AM |
002 |
Jane Smith |
Tablet |
2 |
07/12/2021 10:00 AM |
In this example, “07/12/2021 10:00 AM” represents the date and time when the transformation was executed, and this timestamp is added to each row in the new “ProcessedTime” column. Important: after application of the transformation, all the rows in the dataset will have the same value in the column ProcessedTime.
7.12.2. Convert an integer to date
This transformation requires having converted a column containing integers into a date type. The input number contains the date encoded in a specific format. For example, it might represent the date literally (e.g. 20190715 = July 15, 2019), or it could represent a number of days or milliseconds since a reference date.
For example, if you specify that your number comes from Microsoft Excel, the value 39448 will be converted to the date January 1, 2008, as exactly 39,448 days have passed between January 1, 1900 and that date.
Note
Conversion of SAB Sopra Banking date format
For an integer following the IBM AS/400 format and requiring a conversion to the date format, you can select the “Century Marker” option as shown below:
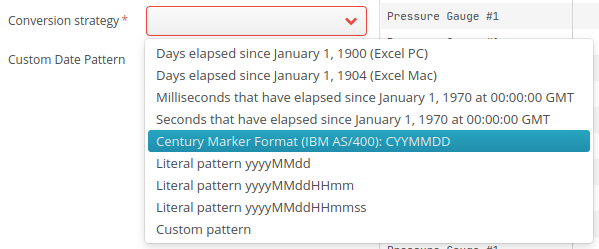
This option is used to read SAB (Sopra Banking) dates in this entry of the Tale of Data cookbook.
The transformation will apply to one or more fields.
The transformation will use the active filter(s).
Note
Practical example : Convert an integer to date
Before Transformation:
Employee ID |
Start Date (Integer type) |
|---|---|
001 |
20210101 |
002 |
20210523 |
Transformation Configuration:
Target Columns: Start Date (Numeric)
Conversion Strategy: yyyyMMdd
Custom Date Pattern: Not used
After Transformation:
Employee ID |
Start Date (Date type) |
|---|---|
001 |
2021-01-01 |
002 |
2021-05-23 |
In this example, the ‘Start Date’ column, which was originally in a numeric format (an integer of type yyyyMMdd), has been converted into a proper date format (yyyy-MM-dd). This makes it possible to standardize the dates and make them usable for operations like sorting, filtering, or time-based calculations.
7.12.3. Extract Date Part
Extract part of a date field and enter it in a new field. The parts to be extracted can be in the format of :
A year
A quarter
A month
A week Number (Excel/US)
A week Number (ISO-8601)
An ISO-8601 Week-based Year
A day
A day of the week: 1-7 (1=monday, 7=sunday)
A day of the week: 1-7 (1=sunday, 7=saturday)
An hour
The transformation will apply to just one field.
The transformation will use the active filter(s).
Note
Practical example : Extract Date Part
Before Transformation:
Employee ID |
Start Date |
|---|---|
1 |
2023-01-15 |
2 |
2024-02-20 |
Transformation Configuration:
Target Column: Start Date
New Column Name: Start Year
Date Part to Extract:
Year
After Transformation:
Employee ID |
Start Date |
Start Year |
|---|---|---|
1 |
2023-01-15 |
2023 |
2 |
2023-02-20 |
2024 |
In this example, the transformation was configured to extract the ‘year’ part from the ‘Start Date’ column. As a result, a new column ‘Start Year’ was added to the dataset, showing the year extracted from each date in the ‘Start Date’ column. This allows for easier analysis of data based on the year.
7.12.4. Format a date using a custom format
Format the date in a date field using a custom format and then enter it in a new field.
The transformation will apply to just one field.
The transformation will use the active filter(s).
Note
Practical example : Format a date using a custom format
Before Transformation:
Record ID |
Original Date (type:Date) |
|---|---|
1 |
2023-01-01 13:45:00 |
2 |
2023-01-02 14:30:00 |
Transformation Configuration:
Source Column: Original Date
Date Format: “dd-MM-yyyy”
After Transformation:
Record ID |
Original Date (type:Text) |
|---|---|
1 |
01-01-2023 |
2 |
02-01-2023 |
7.12.5. Format a date using a predefined pattern
Format the date in a date field using a preset format and then enter it in a new field.
The transformation will apply to just one field.
The transformation will use the active filter(s).
Note
Practical example : Format a date using a predefined pattern
Before Transformation:
Record ID |
Original Date (type:Date) |
|---|---|
1 |
2023-01-01 13:45:00 |
2 |
2024-01-02 14:30:00 |
Transformation Configuration:
Source Column: Original Date
Date Format: “Year and quarter”
After Transformation:
Record ID |
Original Date (type:Text) |
|---|---|
1 |
2023 T1 |
2 |
2024 T1 |
7.12.6. Dates interval
Calculate the date interval between two date fields. A new field will be created with the result of the calculation, expressed in Weeks, Days, Hours, Minutes, Seconds or Milliseconds, as you prefer.
The transformation will apply to one or more fields.
The transformation will use the active filter(s).
Note
Practical example : Dates Interval
Before Transformation:
OrderID |
Start Date |
End Date |
|---|---|---|
1 |
2023-01-01 10:00:00 |
2023-01-02 10:00:00 |
2 |
2023-01-01 15:00:00 |
2023-01-03 11:00:00 |
Transformation Configuration:
Target Columns: Start Date, End Date
Interval Unit: Hours
After Transformation:
OrderID |
Start Date |
End Date |
Interval (Hours) |
|---|---|---|---|
1 |
2023-01-01 10:00:00 |
2023-01-02 10:00:00 |
24 |
2 |
2023-01-01 15:00:00 |
2023-01-03 11:00:00 |
44 |
In this example, the transformation calculates the time interval in hours between the ‘Start Date’ and ‘End Date’ for each order. The result is a new column ‘Interval (Hours)’ added to the dataset, showing the duration of 24 hours for the first order and 44 hours for the second order. This transformation allows for a clear and immediate understanding of the time intervals involved in each record.
7.12.7. Date recognition
At import, the system will attempt to decrypt all not recognized cells within a date field as dates by trying various formats and countries (e.g. 2nd March 2015, 2015.03.02, etc.). The selected formats must be validated by the user.
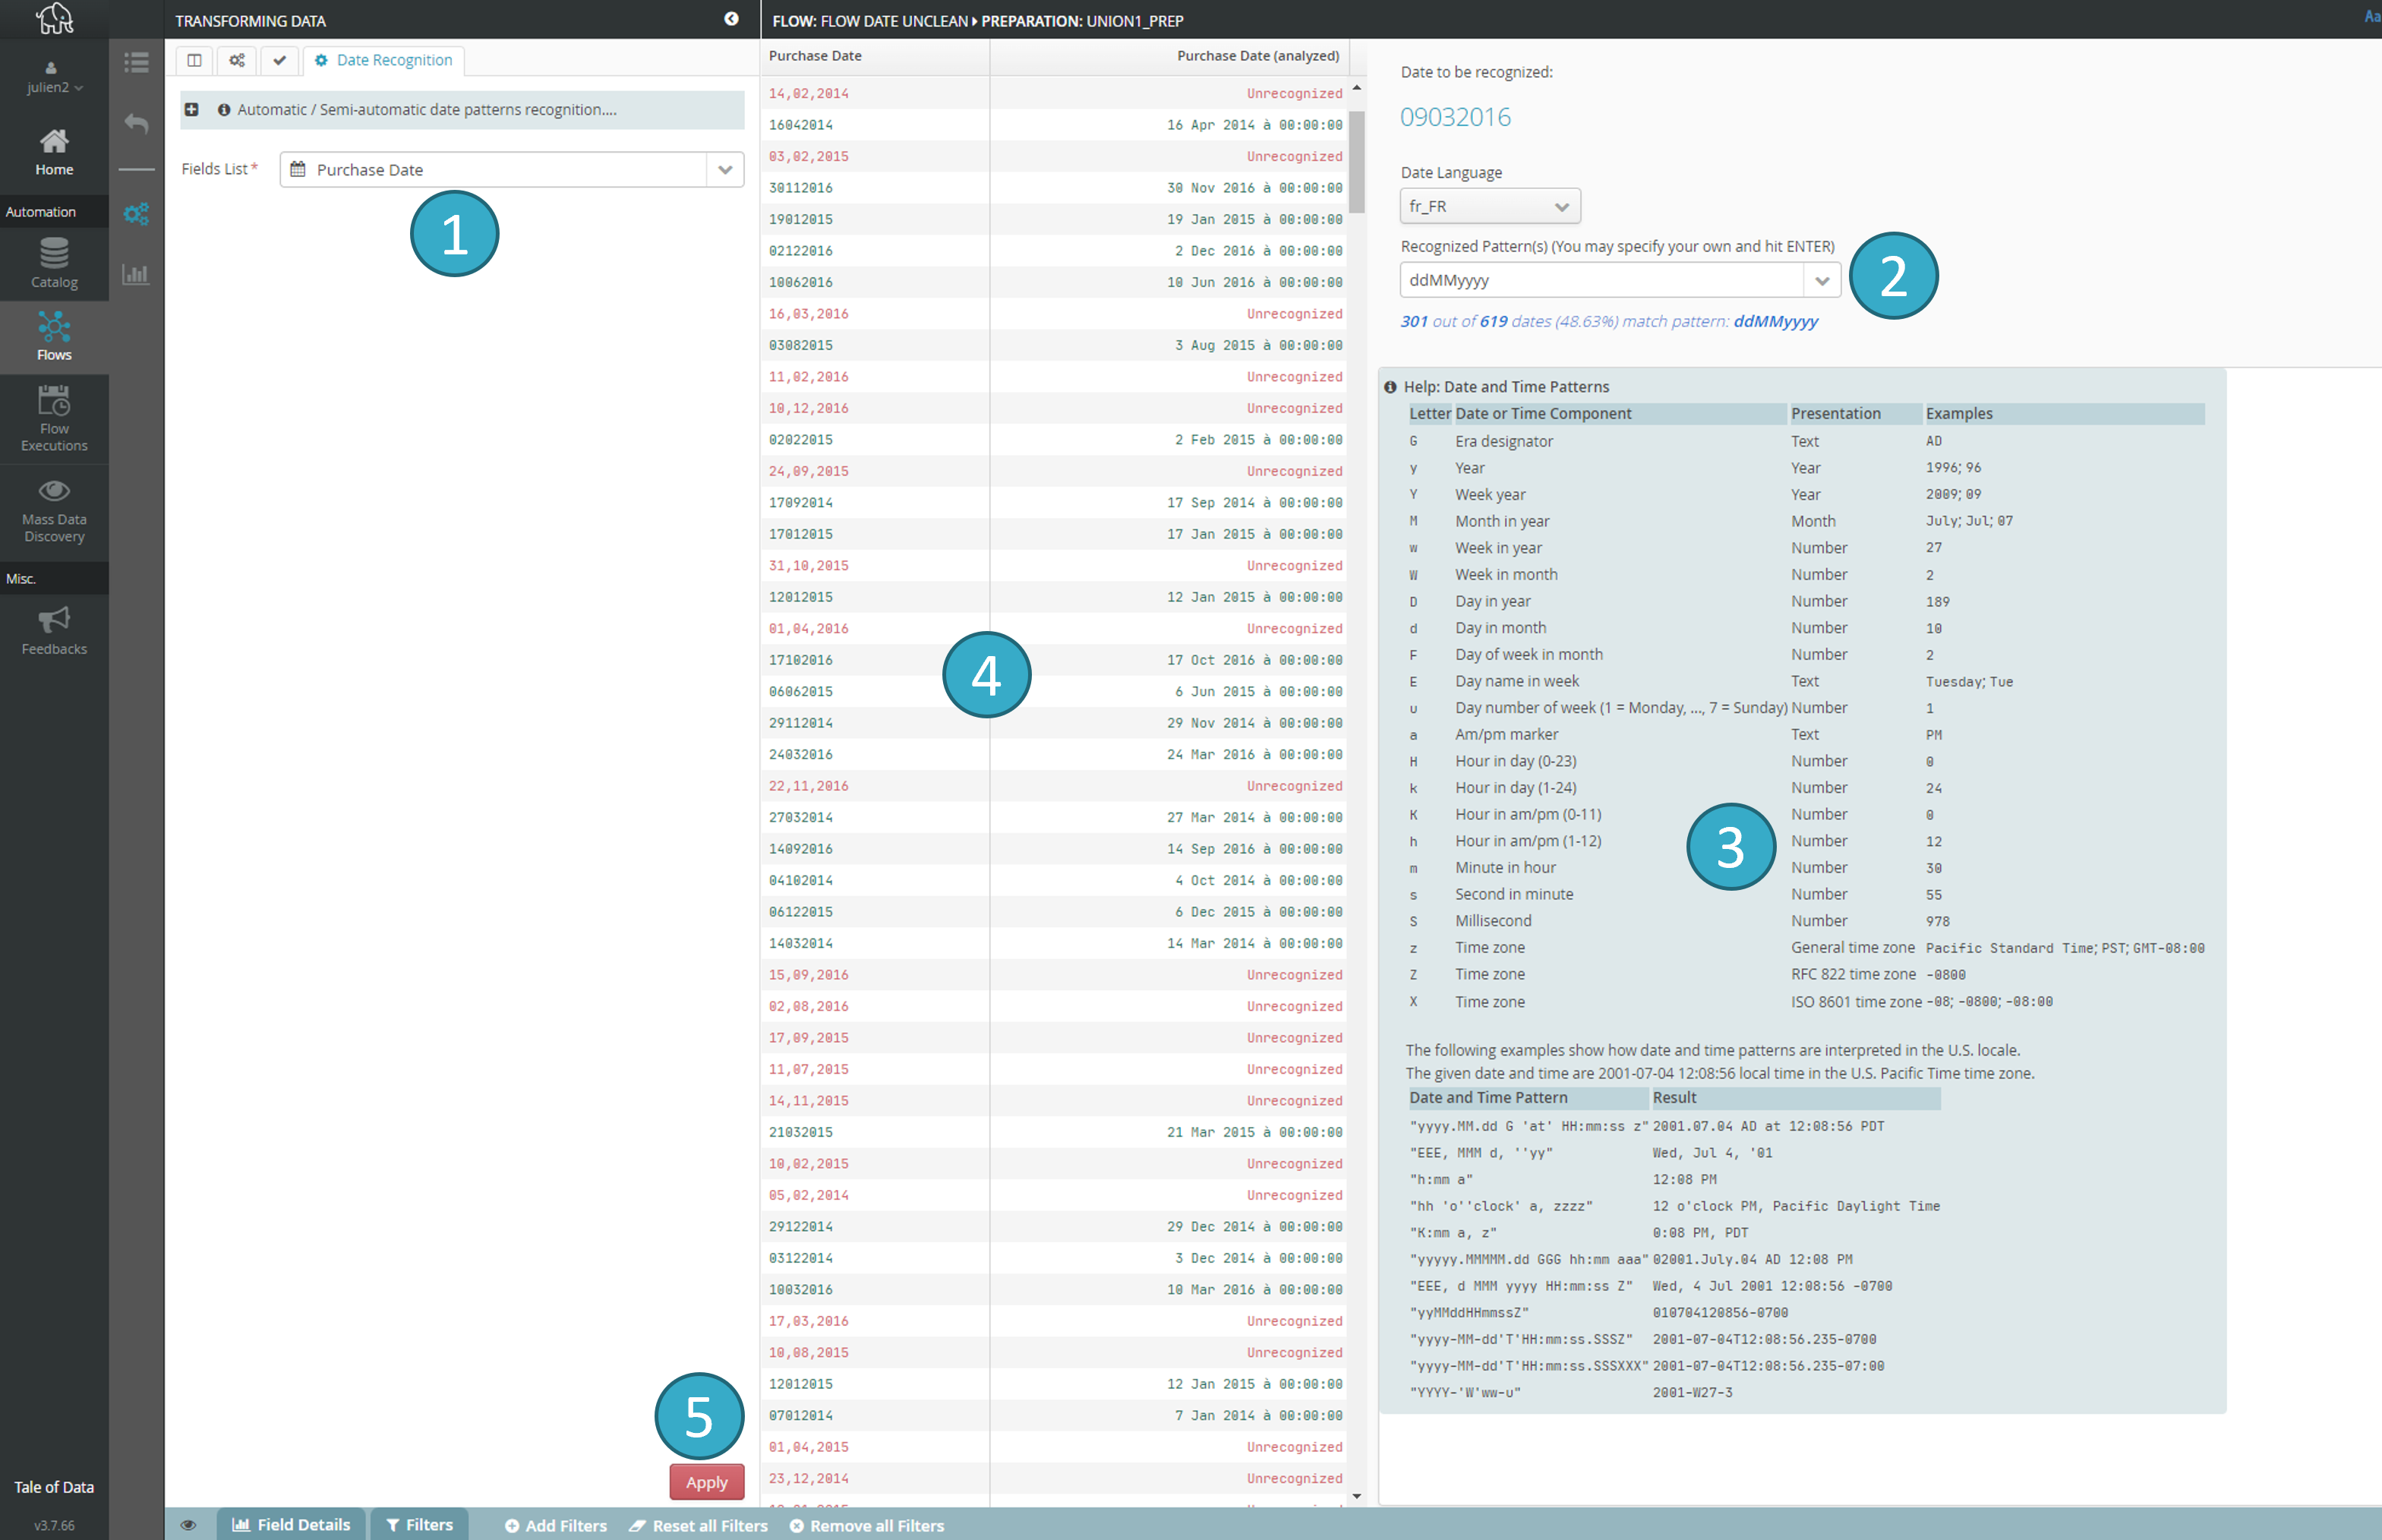
The first date field in the dataset will be automatically selected
The system will try to discover the format (e.g. YYY-MM-dd)
Zone offering help
Results preview
Apply
.
Note
Repeat steps 1-5 until the zone is completely empty (i.e. all the cells have been recognized).
The transformation will apply to just one field.
The transformation will use the active filter(s).
Note
Practical example : Date Recognition
Before Transformation:
ID |
Date entry |
|---|---|
1 |
2023/03/15 |
2 |
March 15, 2023 |
3 |
15-03-2023 14:00 |
4 |
2023/03/16 |
Transformation Configuration:
Target Column: Date Entry Tale of Data will successively suggest the following date patterns:
The pattern
yyyy/MM/ddwill be applied to rows #1 and #4.The pattern
MMMM d, yyyywill be applied to row #2.The pattern
dd-MM-yyyy HH:mmwill be applied to row #3.
After Transformation:
ID |
Date entry |
|---|---|
1 |
2023-03-15 00:00:00 |
2 |
2023-03-15 00:00:00 |
3 |
2023-03-15 00:00:00 |
4 |
2023-03-16 00:00:00 |
In this example, the Date Recognition Transformation successfully parses unrecognized dates enhancing the consistency and usability of the dataset for further analysis and reporting.
Hint
For custom formats, in the vast majority of cases you must use yyyy rather than capitals for four-figure years. This is because * y represents the calendar year (which is widely used in practice), while * Y represents the “Week Year”. Depending on whether the new year starts in a new week, the last few days of the year may fall into the following year.
For more information, see: https://en.wikipedia.org/wiki/ISO_8601#Week_dates
7.13. Clustering transformations
Group words/texts with similar spelling together in a given field. Algorithms will create these clusters but the decision whether to standardize the text in the clustered cells is left up to the user.
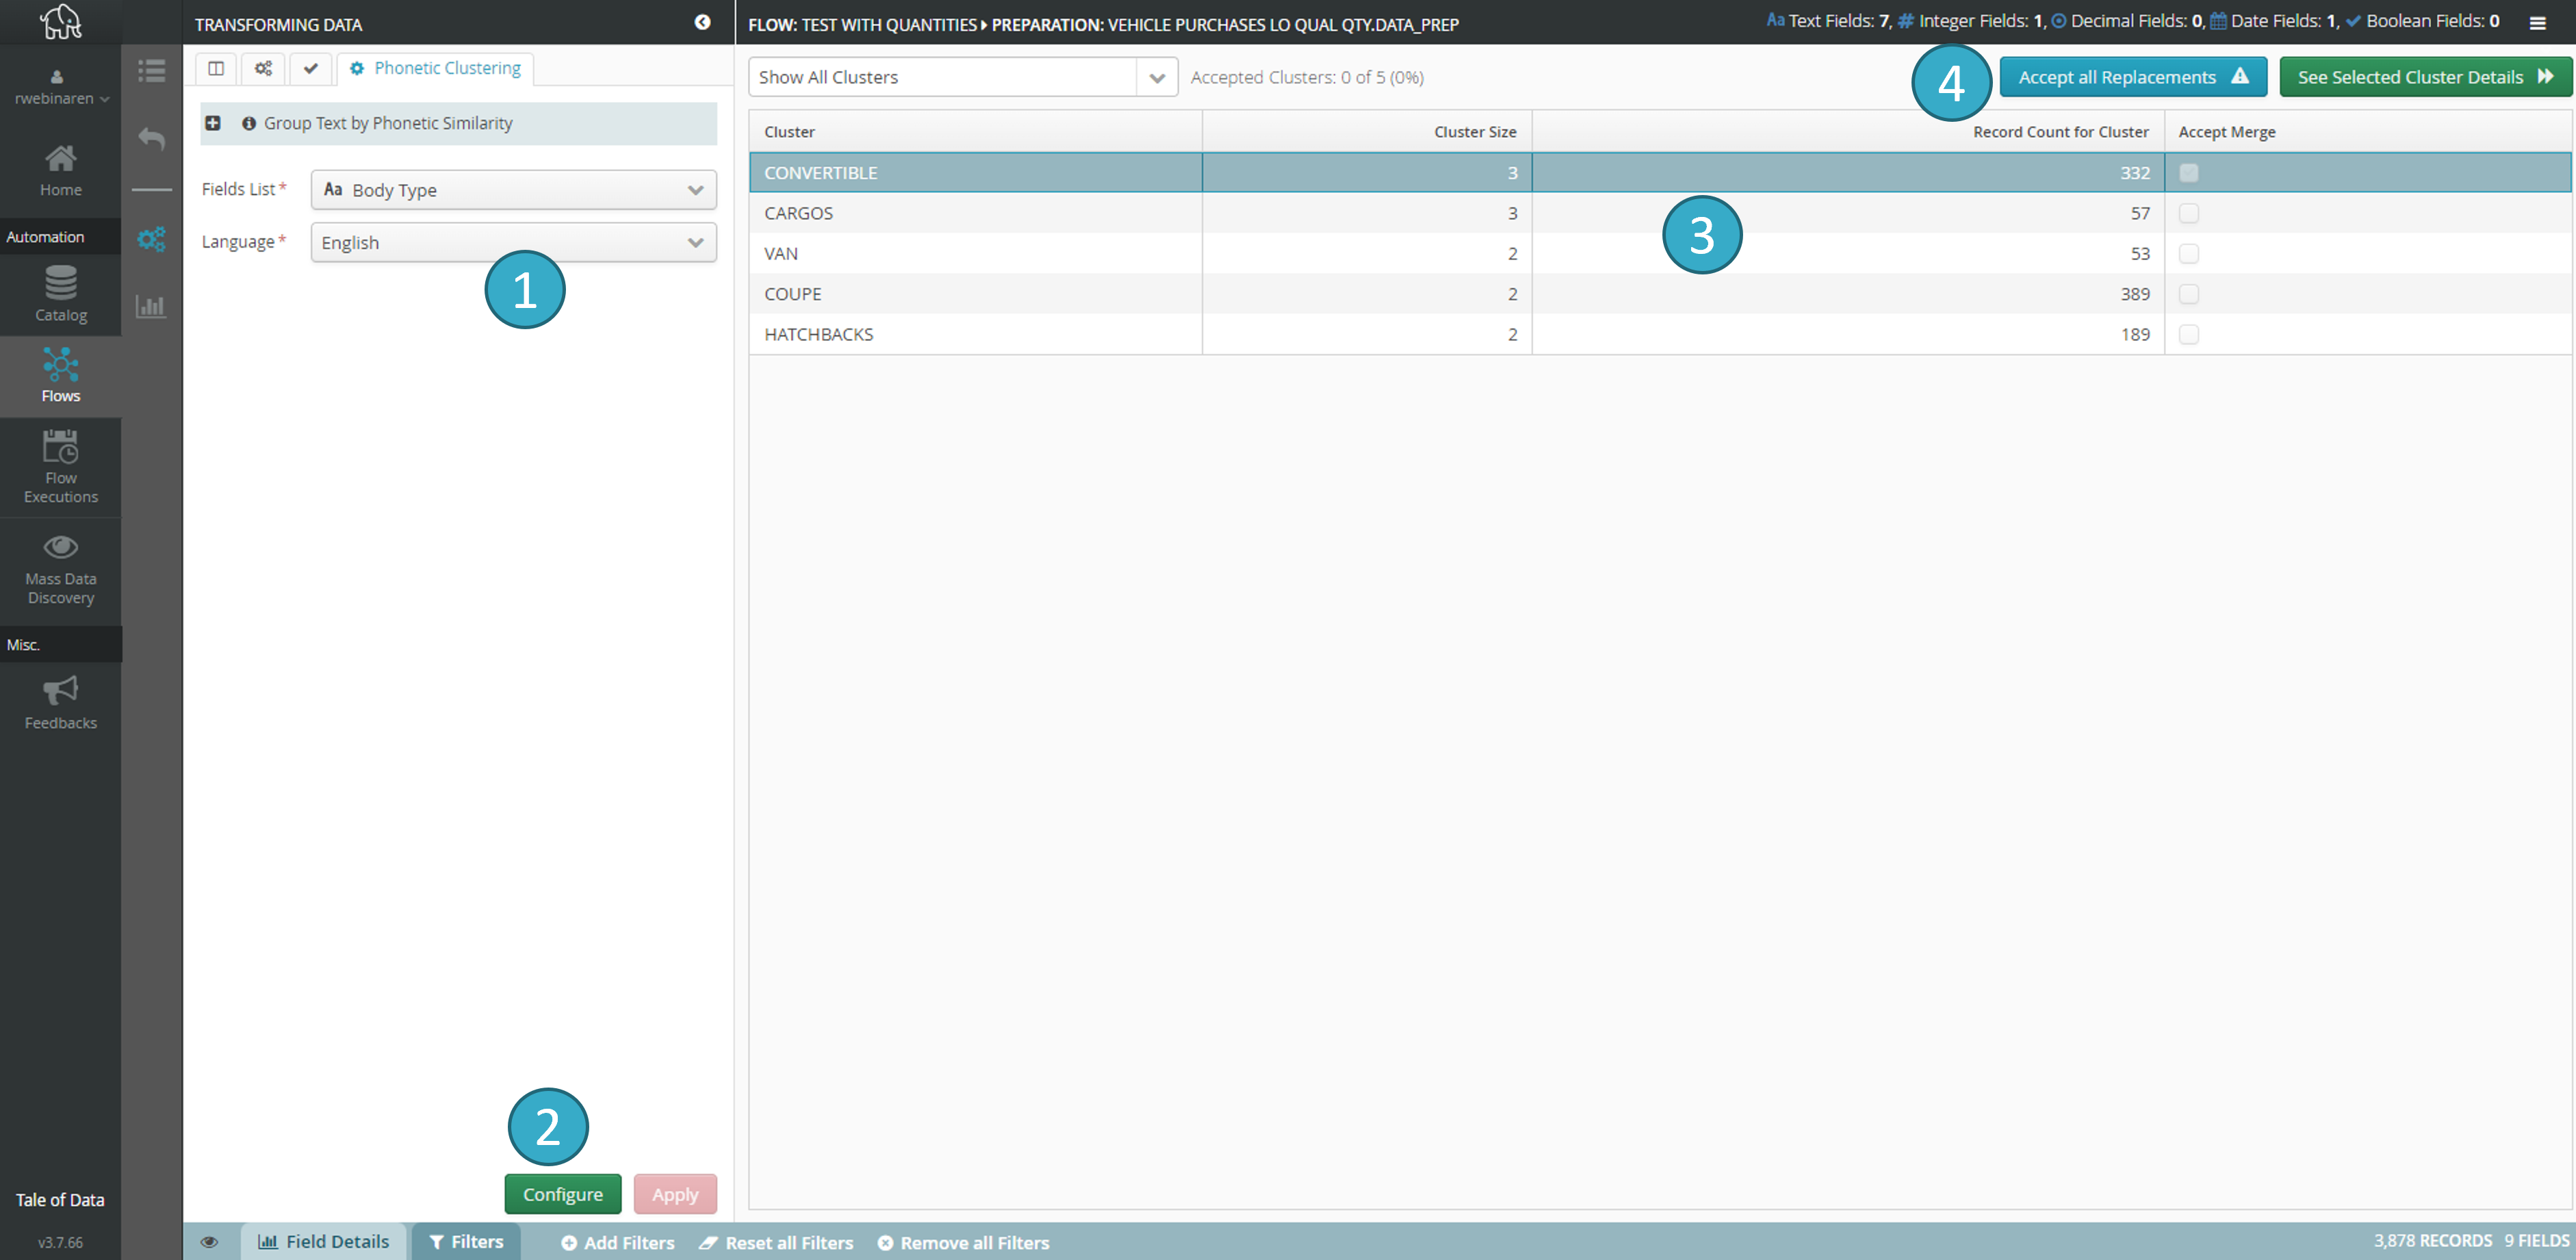
Selection of the field
you want to explore for potential clustering.Open preview
. Clusters will have been calculated to enable you to make a decision.The zone
will display the clusters found: 1 row = 1 cluster (e.g. in the fig. above the system indicates that it has found 3 similar spellings for MONOSPACE and that there are 48 rows in this cluster).Click Display cluster details
(or double-click the zone ) to go to Details and make a decision on each cluster.
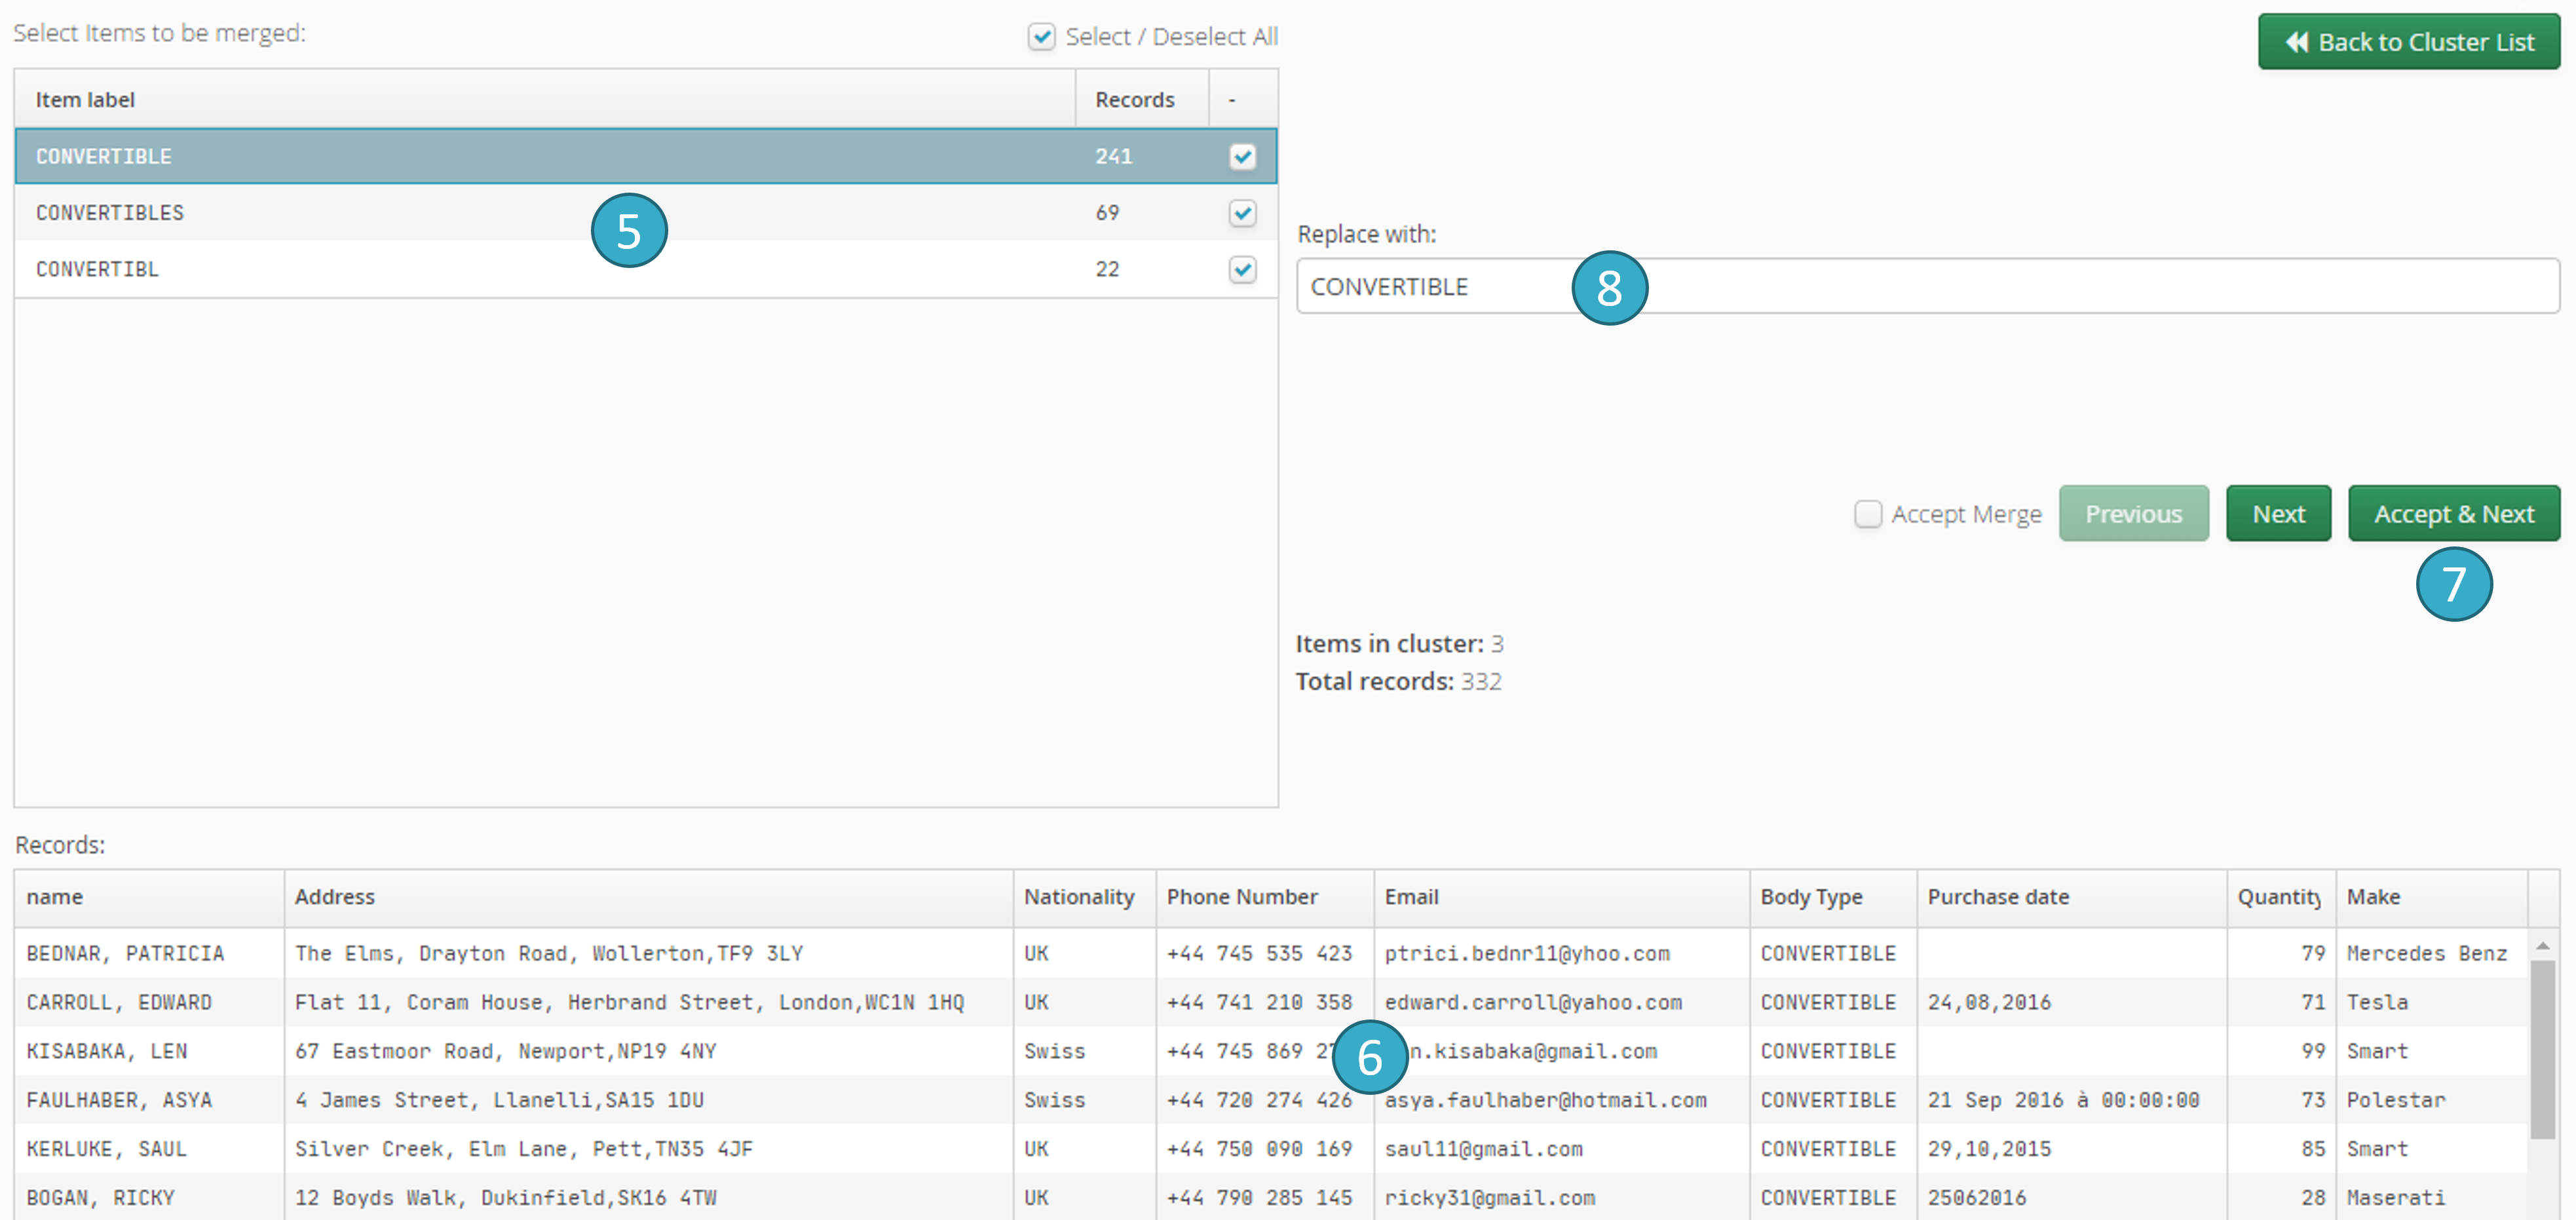
Cluster of similarly spelled words
. Deselect one or more options to exclude them from the final cluster (= false positives).When you select an option in this zone
, the system will display the relevant records in the zone  (making it easier to e.g. identify false positives).
Select a replacement for all similar spellings (or double-click an option in the zone
to select it automatically as the replacement).Use Accept then Next
 to confirm with a single click all the decisions you have made about the current cluster (i.e. selections made in the zone + replacement text in the zone
  ) and move on to the next cluster. Click Next to move on to the next cluster without validating the current cluster (i.e. without making any replacements).
Apply: click to apply a replacement in all clusters validated during the 4 steps described above.
The transformation will apply to just one field.
The transformation will use the active filter(s).
7.13.1. Phonetic clustering
Clusters of cells with similar pronunciations, e.g. telephone and telefones.
The transformation will apply to just one field.
The transformation will use the active filter(s).
7.13.2. Consonant-first fingerprint
Cluster of character-strings, based on the consonant sequence in the text.
The transformation will apply to just one field.
The transformation will use the active filter(s).
7.13.3. Exact match fingerprint
Exact value match clusters
The transformation will apply to just one field.
The transformation will use the active filter(s).
7.13.4. Universal fingerprint
Match similar texts using a combination of strategies:
Removal of non-meaningful words (articles, pronouns, coordinating conjunctions etc.).
Removal of double vowels and double consonants.
Removal of common abbreviations.
The transformation will apply to just one field.
The transformation will use the active filter(s).
7.13.5. Vowels-first fingerprint
Cluster of character-strings, based on the vowel sequence in the text.
The transformation will apply to just one field.
The transformation will use the active filter(s).
7.13.6. N-Gram clustering
Cell clustering based on common letter pairs (or triplets, quadruplets, etc. depending on the value of N).
The transformation will apply to just one field.
The transformation will use the active filter(s).
7.14. Deduplication transformations: multi-algorithm deduplication
Tale of Data allows multi-field (user selects the fields to be used when deciding whether to match two rows) and multi-algorithm (user selects the match algorithm for each field: phonetic, N-Gram, etc.) deduplication:
Select the deduplication fields
Select the algorithm
Click Validate
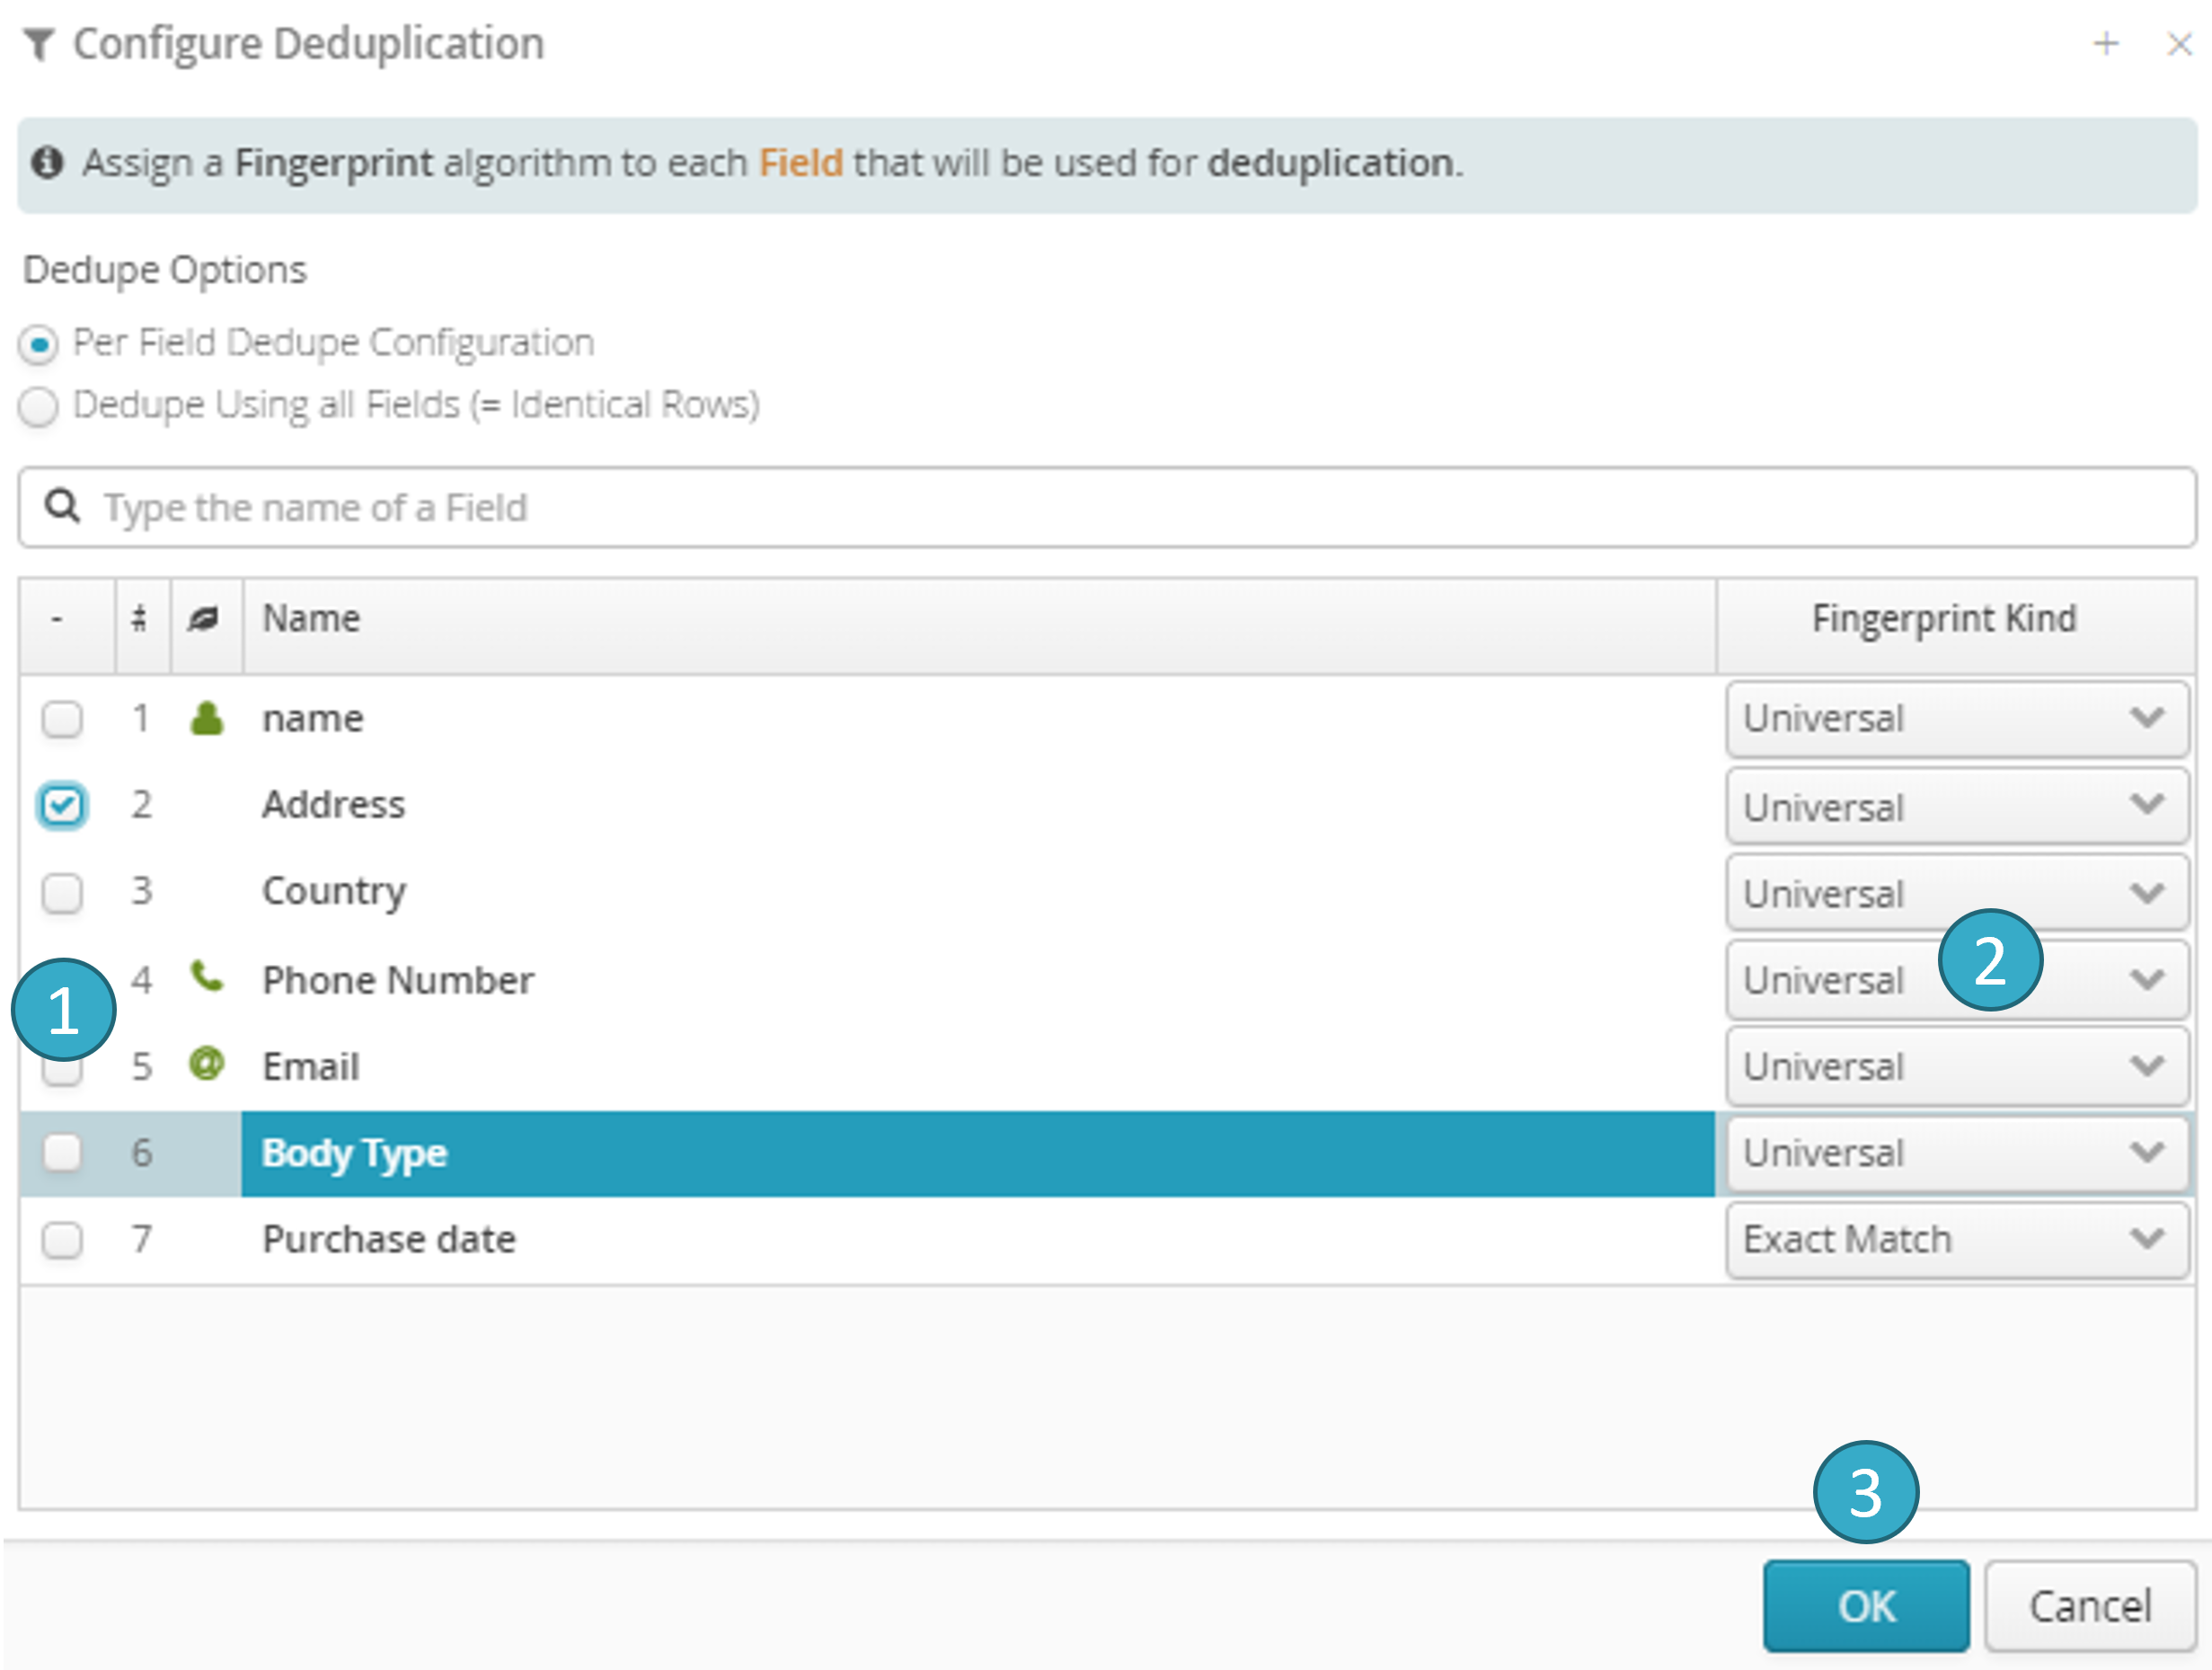
The transformation will apply to one or more fields.
The transformation will use the active filter(s).
Note
Practical example : multi-algorithm deduplication
Before Transformation:
Consider the following dataset:
ID |
Name |
Address |
City |
Country |
|---|---|---|---|---|
1 |
John Doe |
123 Soul Street |
New York |
USA |
2 |
Jane Smith |
456 Oak Avenue |
London |
UK |
3 |
John Doe |
123 Sole Street |
New York |
USA |
4 |
Alice Brown |
789 Pine Road |
Sydney |
Australia |
5 |
Doe, John |
123 Soul Street |
New York |
USA |
Transformation Configuration:
Multi-Algorithm Deduplication Kind: Merge and Remove Duplicate Rows
All Columns Exact Match:
falseColumn Configuration: Match on “Name” and “Address” columns with Exact Match Unordered for “Name” and English Phonetic Match for “Address”.
Filters: None (all rows considered)
After Transformation:
The dataset after applying the transformation:
ID |
Name |
Address |
City |
Country |
|---|---|---|---|---|
1 |
John Doe |
123 Soul Street |
New York |
USA |
2 |
Jane Smith |
456 Oak Avenue |
London |
UK |
4 |
Alice Brown |
789 Pine Road |
Sydney |
Australia |
Explanation:
Row 3 is considered a duplicate of Row 1, firstly because it has an identical “Name”, and secondly because “Soul Street” and “Sole Street” have the same pronunciation in English, and the transformation configuration has specified an English phonetic match for the “Address” column. As a result, these two rows are merged and one is deleted.
Row 5 is also considered a duplicate of Row 1 since “John Doe” and “Doe, John” are also considered identical because the transformation specified for the “Name” column is Exact Match Unordered. Since the addresses are strictly identical, Row 5 is removed as well.
This transformation helps maintain a clean dataset by removing redundant data and ensuring only unique rows remain, based on the specified deduplication rules.
7.15. Nature transformations
7.15.1. Define Column Nature
Change or override the nature of a field (e.g. override ‘telephone number’ as the nature of a numeric column).
The transformation will apply to one or more fields.
The transformation will not use the active filter(s).
Note
Practical example : Define Column Nature
Before Transformation:
ID |
Name |
Statut |
Revenue |
|---|---|---|---|
1 |
Alpha |
Actif |
1500 |
2 |
Beta |
Inactif |
1200 |
3 |
John Smith |
Actif |
1800 |
Transformation Configuration:
Column to which to assign a nature: “Name”
New Nature: Full Name
After Transformation:
ID |
Name |
Statut |
Revenue |
|---|---|---|---|
1 |
Alpha |
Actif |
1500 |
2 |
Beta |
Inactif |
1200 |
3 |
John Smith |
Actif |
1800 |
After applying the transformation, for the “Name” column, only row #3 contains a valid Full Name value (‘John Smith’).
7.15.2. Remove Column Nature
Delete the nature of one or more fields.
The transformation will apply to one or more fields.
The transformation will not use the active filter(s).
Note
Practical example : Remove Column Nature
Before Transformation:
ID |
Name (Nature = Firstname) |
Age |
Salary |
|---|---|---|---|
1 |
John |
30 |
50000 |
2 |
Jane |
27 |
60000 |
3 |
Doe (invalid nature) |
22 |
55000 |
The “Name” column is of a Firstname nature, making Doe an invalid value:
Transformation Configuration:
Target Columns:
Name
After Transformation:
ID |
Name |
Age |
Salary |
|---|---|---|---|
1 |
John |
30 |
50000 |
2 |
Jane |
27 |
60000 |
3 |
Doe |
22 |
55000 |
The name column now has no nature. This means there is no longer any nature invalidity.
7.15.3. Split URL
From a URL, extract the: scheme (http, ftp, etc.), domain name (www.taleofdata.com, www.google.fr, etc.), port, path or query from the URLs of the selected field to one or more new fields.
The transformation will apply to just one field.
The transformation will use the active filter(s).
Note
Practical example : Split URL
Before Transformation:
ID |
Website URL |
|---|---|
1 |
|
2 |
|
3 |
Transformation Configuration:
URL Column: ‘Website URL’
Extracted Parts:
Domain
Path
Query
After Transformation:
ID |
Website URL | Website URL.domain |
Website URL.Path |
Website URL.query |
|
|---|---|---|---|---|
1 |
https://example.com/products?item=book | example.com |
/product |
item=book |
|
2 |
https://blog.example.com/about | blog.example.com |
/about |
||
3 |
http://www.example.net/search?q=hello+world| example.net |
/search |
q=hello+world |
|
In this example, the transformation takes each URL from the ‘Website URL’ column, analyzes it, and extracts the domain, path, and query components. These components are then stored in new columns within the same table, providing a structured breakdown of the original URL data. This makes the dataset more informative and easier to analyze for specific URL components.
7.15.4. Decode URLs
Decode each URL in the selected field into application/x-www-form-urlencoded format. For example:
http%3A%2F%2Fwww.taleofdata.comwill becomehttp://www.taleofdata.com.
The transformation will apply to one or more fields.
The transformation will use the active filter(s).
Note
Practical example : Decode URL
Before Transformation:
ID |
EncodedURL |
|---|---|
1 |
https%3A%2F%2Fexample.com%2Fpath%3Fq%3Dtest |
2 |
https%3A%2F%2Fanother.com%2Fpath%3Fq%3Dabc |
Transformation Configuration:
Target Column: EncodedURL
After Transformation:
ID |
EncodedURL |
|---|---|
1 |
|
2 |
In this example, the transformation takes a table with encoded URLs and converts them into a human-readable format, making the data more accessible and easier to understand for further analysis or reporting.
7.15.5. Encode URLs
Encode each URL in the selected field into application/x-www-form-urlencoded format. For example:
http://www.taleofdata.comwill becomehttp%3A%2F%2Fwww.taleofdata.com.
The transformation will apply to one or more fields.
The transformation will use the active filter(s).
Note
Practical example : Encode URLs
Before Transformation:
ID |
Name |
Website |
|---|---|---|
1 |
John Doe |
|
2 |
Jane Smith |
Transformation Configuration:
Target Columns:
Website
After Transformation:
ID |
Name |
Website |
|---|---|---|
1 |
John Doe |
|
2 |
Jane Smith |
In this example, the Website column data is transformed to ensure that spaces are correctly encoded as %20, making the URLs safe and usable within a web browser.
7.15.6. Shape First Names
Format first names (standardize spaces, capitalization) in the selected field.
The transformation will apply to just one field.
The transformation will use the active filter(s).
Note
Practical example : Shape First Names
Before Transformation:
ID |
First name |
Name |
|---|---|---|
1 |
john |
Doe |
2 |
MARY |
Smith |
3 |
aLiCe |
Johnson |
Transformation Configuration:
Target Column: FirstName
After Transformation:
ID |
First name |
Name |
|---|---|---|
1 |
John |
Doe |
2 |
Mary |
Smith |
3 |
Alice |
Johnson |
7.15.7. Extract Full Names parts
Extract first names, surnames or titles from a field containing full names. This will also deduce titles and genders.
The transformation will apply to just one field.
The transformation will use the active filter(s).
Note
Practical example : Extract Full Names parts
Before Transformation:
ID |
Full Name |
|---|---|
1 |
|
2 |
Ms. Jane Smith |
3 |
Dr. Alice Johnson |
Transformation Configuration:
Source Column: Full Name
Parts to be extracted:
Civility
First name
Country name.
Gender
After Transformation:
ID |
Full Name |
Full Name.civility |
Full Name.firstname |
Full Name.lastname |
Full Name.gender |
|---|---|---|---|---|---|
1 |
John Doe |
John |
Doe |
Male |
|
2 |
Jane Smith |
Ms. |
Jane |
Smith |
Female |
3 |
Alice Johnson |
Ms. |
Alice |
Johnson |
Female |
This transformation allows for a structured and detailed breakdown of names, which can be particularly useful for personalized communications, data sorting, and analysis based on demographic segments.
7.15.8. Shape Proper Nouns
Format proper nouns in the selected field.
The transformation will apply to one or more fields.
The transformation will use the active filter(s).
Note
Practical example : Shape Proper Nouns
Before Transformation:
Employee Name |
Department |
|---|---|
john doe |
Marketing |
JANE DOE |
Human Resources |
Transformation Configuration:
Target Column: Employee Name
After Transformation:
Employee Name |
Department |
|---|---|
John Doe |
Marketing |
Jane Doe |
Human Resources |
7.15.9. Shape Genders
Format genders by localized country/language, using a long/short format.
The transformation will apply to just one field.
The transformation will use the active filter(s).
Note
Practical example : Shape Genders
Before Transformation:
ID |
Name |
Gender |
|---|---|---|
1 |
Alice |
Female |
2 |
Bob |
male |
3 |
Charlie |
M |
4 |
Dana |
FEMALE |
Transformation Configuration:
Target Column: Gender
Region:
English (UK)Format:
Short
After Transformation:
ID |
Name |
Gender |
|---|---|---|
1 |
Alice |
F |
2 |
Bob |
M |
3 |
Charlie |
M |
4 |
Dana |
F |
7.15.10. Shape Civilities
Format titles by localized country/language, using a long/short format.
The transformation will apply to just one field.
The transformation will use the active filter(s).
Note
Practical example : Shape Civilities
Before Transformation:
ID |
Name |
Civility |
|---|---|---|
1 |
Alice |
Ms |
2 |
Bob |
mr |
3 |
Clara |
Mistress |
Transformation Configuration:
Target Column: “Title”
Region:
English (UK)Format:
Long
After Transformation:
ID |
Name |
Civility |
|---|---|---|
1 |
Alice |
Miss |
2 |
Bob |
Mister |
3 |
Clara |
Mrs |
7.15.11. Shape Nationalities
Format nationalities (standardize spaces, capitalization) in the selected field.
The transformation will apply to just one field.
The transformation will use the active filter(s).
Note
Practical example : Shape Nationalities
Before Transformation:
ID |
Nationality |
|---|---|
1 |
american |
2 |
BRITISH |
3 |
CanADian |
Transformation Configuration:
Target Column: Nationality
After Transformation:
ID |
Nationality |
|---|---|
1 |
American |
2 |
British |
3 |
Canadian |
7.15.12. Extract SIREN code
Extract the SIREN (Système d’Identification du Répertoire des ENtreprises) code from a field with SIRET (Système d’Identification du Répertoire des ETablissements) numbers to a new field. Extraction will only work if the SIRET codes are valid.
The transformation will apply to just one field.
The transformation will use the active filter(s).
Note
Practical example : Extract SIREN code
Before Transformation:
ID |
Company Name |
SIRET Number |
|---|---|---|
1 |
Alpha Inc. |
12345678901234 |
2 |
Beta LLC |
98765432109876 |
3 |
Gamma Corp. |
55555555555555 |
Transformation Configuration:
Target Column: “SIRET Number”
After Transformation:
ID |
Company Name |
SIRET Number |
SIRET Number.siren |
|---|---|---|---|
1 |
Alpha Inc. |
12345678901234 |
123456789 |
2 |
Beta LLC |
98765432109876 |
987654321 |
3 |
Gamma Corp. |
55555555555555 |
555555555 |
In this example, the transformation takes the SIRET numbers from the specified column, validates them, and extracts the first 9 digits to store as SIREN numbers in the output dataset. This allows the dataset to be streamlined and focused only on the company’s head office identification numbers.
7.16. Geographic transformations
7.16.1. Parse Address
Analyze one or more fields containing addresses, then extract each part to new fields. If the address is organized across several fields, you must select them in the correct order.
The transformation will apply to one or more fields.
The transformation will use the active filter(s).
Note
Practical example : Parse Address
Before Transformation:
ID |
RawAddress |
|---|---|
1 |
30 bis rue de Lisbonne, 75008 Paris |
2 |
12 rue de Chazelles 75017 Paris |
Transformation Configuration:
Target Columns: ‘RawAddress’
Region: “France”
After Transformation:
RawAddress |
Country |
RawAddress.number |
RawAddress.numberComplement |
RawAddress.streetType |
RawAddress.street |
RawAddress.zipCode |
RawAddress.locality |
RawAddress.namedPlace |
RawAddress.postalService |
RawAddress.apartmentBlock |
RawAddress.building |
RawAddress.floor |
|---|---|---|---|---|---|---|---|---|---|---|---|---|
30 bis rue de Lisbonne, 75008 Paris |
France |
30 |
bis |
rue |
de Lisbonne |
75008 |
Paris |
|||||
12 rue de Chazelles 75017 Paris |
France |
12 |
rue |
de Chazelles |
75017 |
Paris |
In this example, the ‘RawAddress’ column is automatically parsed and broken down into several standardized subfields, such as street number, number complement, type and name of the street, postal code, and city, according to French postal conventions. This facilitates address processing and geographical matching.
7.16.2. Convert country codes
In the selected field, convert country codes from/to ISO 3166-1 [13] in the following formats:
2-letter country code: ISO 3166-1 alpha-2.
3-letter country code: ISO 3166-1 alpha-3.
Country name.
For example:
For codes with 2 letters, such as FR, conversion into ISO 3166-1 alpha-3 format will produce FRA.
For codes with 3 letters, such as USA, conversion into country name format using French as the language, will produce États-Unis.
The transformation will apply to just one field.
The transformation will use the active filter(s).
Note
Practical example : Convert country codes
Before Transformation:
ID |
Name |
CountryCode |
|---|---|---|
1 |
John Doe |
USA |
2 |
Jane Doe |
DE |
Transformation Configuration:
Target Column: CountryCode
Desired Standard: ISO 3166-1 alpha-3
After Transformation:
ID |
Name |
CountryCode |
|---|---|---|
1 |
John Doe |
USA |
2 |
Jane Doe |
DEU |
In this example, the transformation was configured to convert the country codes in the ‘CountryCode’ column to the ISO 3166-1 alpha-3 standard. As a result, ‘DE’ was converted to ‘DEU’, while ‘USA’, already in the correct format, remained unchanged.
7.16.3. Fix deprecated INSEE Commune Codes (France)
Replace obsolete INSEE municipality codes with the new codes. INSEE municipality codes can become obsolete for a number of reasons, including:
Municipality has been associated.
Municipality has been abolished.
Municipality has become delegated.
The transformation will apply to just one field.
The transformation will use the active filter(s).
Note
Practical example : Fix deprecated INSEE Commune Codes (France)
Before Transformation:
ID |
INSEE Code |
Name |
|---|---|---|
1 |
12345 |
CommuneA |
2 |
67890 |
CommuneB |
3 |
13579 |
CommuneC |
Note: Assume that the code ‘67890’ for CommuneB is deprecated.
Transformation Configuration:
Target Column: Commune Code
After Transformation:
ID |
INSEE Code |
Name |
|
|---|---|---|---|
1 |
12345 |
CommuneA |
|
2 |
54321 |
CommuneB |
(Updated code) |
3 |
13579 |
CommuneC |
In this example, the transformation checks the ‘Commune Code’ column for outdated codes. It finds that the code ‘67890’ for CommuneB is deprecated and replaces it with the current valid code ‘54321’. The rest of the dataset remains unchanged as no other deprecated codes are found.
7.16.4. Deduce geographic data from ZipCodes (France)
Enrich the current dataset with geographic data (department name, department code, region name, region code) deduced from the postcode in the selected field.
For example, postcode 75001 produces the following new fields:
Department code: 75.
Department name: Paris.
Region code: 11.
Region name: Île-de-France.
Note
Practical example : Deduce geographic data from ZipCodes (France)
Before Transformation:
ID |
Address |
ZipCode |
|---|---|---|
1 |
123 Rue D’Amiens |
80090 |
2 |
456 Rue De Lyon |
69000 |
3 |
789 Rue De Nice |
Transformation Configuration:
Target Column: ZipCode
Enrich wih: Department Name
After Transformation:
ID |
Address |
ZipCode |
Department |
|---|---|---|---|
1 |
123 Rue D’Amiens |
80090 |
Sum |
2 |
456 Rue De Lyon |
69000 |
Rhône |
3 |
789 Rue De Nice |
In this example, the transformation takes the ‘ZipCode’ column to deduce the ‘Department’ based on the zip code provided. For the first record, the zip code ‘80090’ corresponds to the department ‘Somme’, and for the second record, ‘69000’ corresponds to ‘Rhône’. The third record does not have a zip code, so the department field is left blank.
Tip
The same postcode may apply to several municipalities.
Some post codes can belong to a department that is different from the department of the code.
For better results, we advise using INSEE municipality codes or combining the postcode with the name of the town (delivery address).
The transformation will apply to just one field.
The transformation will use the active filter(s).
7.16.5. Enrich from INSEE Commune Codes (France)
Enrich the current dataset with geographic data from the Official Geographic Code [14] (name of municipality, name of department, code of department, name of region, code of region) based on the INSEE municipality code in the selected field.
For example, INSEE municipality code 75056 produces the following new fields:
Name of municipality: Paris.
Department code: 75.
Department name: Paris.
Region code: 11.
Region name: Île-de-France.
The transformation will apply to just one field.
The transformation will use the active filter(s).
Note
Practical example : Enrich from INSEE Commune Codes (France)
Before Transformation:
ID |
Name |
INSEE Code |
|---|---|---|
1 |
Paris |
75056 |
2 |
Lyon |
69123 |
3 |
Marseille |
Transformation Configuration:
Target Column for INSEE Code: INSEE Code
Enrich with:
City Name,Department,RegionCorrect Deprecated Codes: Yes
After Transformation:
ID |
Name |
INSEE Code |
City Name |
Department |
Region |
|---|---|---|---|---|---|
1 |
Paris |
75056 |
Paris |
Paris |
Île-de-France |
2 |
Lyon |
69123 |
Lyon |
Rhône |
Auvergne-Rhône-Alpes |
3 |
Marseille |
In this example, the dataset initially contains basic information including a unique ID, name, and INSEE code for cities. After applying the transformation with the specified configuration, the dataset is enriched with additional details such as the city name, department, and region based on the INSEE codes provided. For Marseille, where the INSEE code is missing, no additional information is added.
7.16.6. Enrich from ZipCodes (France)
Enrich the current dataset with geographic data (INSEE municipality code, name of municipality, name of department, code of department, name of region, code of region) deduced from the postcode and town name (delivery address) in the selected field.
For example, post code 75001 plus town Paris will produce the following new fields:
INSEE municipality code: 75056.
Name of municipality: Paris.
Department code: 75.
Department name: Paris.
Region code: 11.
Region name: Île-de-France.
The transformation will apply to two fields.
The transformation will use the active filter(s).
Note
Practical example : Enrich from ZipCodes (France)
Before Transformation:
ZipCode |
City Name |
|---|---|
75001 |
Paris |
13001 |
Marseille |
Transformation Configuration:
Zip Code Column Reference: Column 1 (Zip Code)
City Column Reference: Column 2 (City Name)
Enrich with:
INSEE Code,Region NameUpdate Deprecated Commune Codes: Yes
After Transformation:
ZipCode |
City Name |
INSEE Code |
Region Name |
|---|---|---|---|
75001 |
Paris |
75101 |
Île-de-France |
13001 |
Marseille |
13201 |
Provence-Alpes-Côte d’Azur |
In this example, the transformation enriches the original table by adding the INSSEE code and additional geographical information (here the Region Name) for each entry based on the provided zip code and city name.
7.16.7. Enrich with Country Codes
Add country codes or country names to a new field, using the ISO SO 3166-1 [15] country codes or country names in the selected field, in the following formats:
2-letter country code: ISO 3166-1 alpha-2.
3-letter country code: ISO 3166-1 alpha-3.
Country name.
The transformation will apply to just one field.
The transformation will use the active filter(s).
Note
Practical example : Enrich with Country Codes
Before Transformation:
ID |
CountryCode |
|---|---|
1 |
US |
2 |
DE |
3 |
FR |
Transformation Configuration:
Source Column: ‘CountryCode’
Enrich wih: ‘Country Name’
Output language: English.
After Transformation:
ID |
CountryCode |
country_name |
|---|---|---|
1 |
US |
United States |
2 |
DE |
Germany |
3 |
FR |
France |
In this example, the transformation takes the two-letter ISO country codes from the ‘CountryCode’ column and converts them into full country names using the specified settings. The results are stored in a new column ‘country_name’, enriching the original dataset with more descriptive geographical information.
7.16.8. Geocode Address
Geocode one or more fields with addresses. Two fields will be added for latitude and longitude. If the address is divided over several fields, you must select them in the correct order (i.e. number, street, postcode, then town).
To retrieve address fields in the repository (e.g. number, street name, postcode, etc.) in addition to latitude and longitude, select Standardize addresses.
The transformation will apply to one or more fields.
The transformation will use the active filter(s).
Note
Practical example : Geocode Address
Before Transformation:
CustomerID |
AddressLine |
|---|---|
1 |
8 R DU BEL AIR 5 OBSERVATOIRE 92190 MEUDON |
2 |
4 AV DES TUYAS 92600 ASNIERES |
Transformation Configuration:
Target Column: ‘AddressLine’
Country: France
Normalization: True
After Transformation:
CustomerID |
AddressLine |
AddressLine.number |
AddressLine.numberComplement |
AddressLine.street |
AddressLine.zipCode |
AddressLine.locality |
AddressLine.iris_code |
AddressLine.latitude |
AddressLine.longitude |
AddressLine.confidence |
|---|---|---|---|---|---|---|---|---|---|---|
1 |
8 R DU BEL AIR 5 OBSERVATOIRE 92190 MEUDON |
8 |
Rue du Bel Air |
92190 |
MEUDON |
920480212 |
48.814713 |
2.225489 |
0.68 |
|
2 |
4 BIS AV DES TUYAS 92600 ASNIERES |
4 |
Bis |
Avenue des Tuyas |
92600 |
ASNIERES-SUR-SEINE |
920040603 |
48.921102 |
2.279063 |
0.74 |
Tale of Data adds a new column containing the confidence rate (suffix .confidence) at the end of the dataset. This rate is between 0 and 1. 1 means that your address has an exact match in the geographic repository. The more this match is degraded, the more the confidence rate tends towards zero.
7.16.9. Find the country from latitude and longitude
This transformation allows retrieving the country based on latitude and longitude. It is also possible to enrich the dataset with the country’s capital, its geographical area, and the continent to which it belongs.
Warning
For performance reasons, this transformation uses polygons representing slightly simplified outlines of the world’s countries. In some cases, points very close to a border may not be assigned to the correct country. The success rate is 98.9% on the GeoNames ‘All Countries’ dataset, which contains latitude, longitude, and country information for 1,552,935 locations (the allCountries.zip file can be downloaded here: https://download.geonames.org/export/zip/).
The transformation will apply to one or more fields.
The transformation will use the active filter(s).
Note
Practical example : Find the country from latitude and longitude
Before Transformation:
Record ID |
Latitude |
Longitude |
|---|---|---|
1 |
48.858844 |
2.294351 |
2 |
51.507351 |
-0.127758 |
Transformation Configuration:
Latitude Column: Latitude
Longitude Column: Longitude
Language: English
Additional Fields:
ISO 2-letter code
Capital city
After Transformation:
Record ID |
Latitude |
Longitude |
Country |
ISO2 |
Capital city |
|---|---|---|---|---|---|
1 |
48.858844 |
2.294351 |
France |
FR |
Paris |
2 |
51.507351 |
-0.127758 |
United Kingdom |
GB |
London |
In this example, the transformation takes geographic coordinates and appends the country name, ISO 2-letter code, and capital city for each record based on the specified configuration.
7.16.10. Standardize French postal addresses (AFNOR NF Z 10-011)
Standardize French postal addresses in accordance with AFNOR NF Z 10-011 of 19 January 2013 simplifying postal delivery. The regulation organizes French postal addresses into 6 fields:
TITLE or STATUS - FIRST NAME - SURNAME.
APT OR POSTBOX NO. - FLOOR - CORRIDOR - STAIR
HALL - WING - BUILDING - RESIDENCE.
NUMBER - STREET NAME.
PLACE CALLED or POST COLLECTION OFFICE.
POSTCODE and DESTINATION LOCALITY or CEDEX CODE and CEDEX NAME.
The transformation will apply to one or more fields.
The transformation will use the active filter(s).
Note
Practical example : Standardize French postal addresses (AFNOR NF Z 10-011)
Before Transformation:
Civility |
First name |
Name |
Address |
City |
ZipCode |
|---|---|---|---|---|---|
John |
Doe |
30 RUE DE MOSCOU Apt 45 |
Paris |
75008 |
Transformation Configuration:
Civility Column: Civility
Firstname Column: Firstname
Lastname Column: Lastname
Postal Address Columns: Address, City, Postal Code
Uppercase Postal Lines:
true
After Transformation:
Civility |
First name |
Name |
Address |
City |
ZipCode |
postal_address_line1 |
postal_address_line2 |
postal_address_line3 |
postal_address_line4 |
postal_address_line5 |
postal_address_line6 |
|---|---|---|---|---|---|---|---|---|---|---|---|
John |
Doe |
30 RUE DE MOSCOU Apt 45 |
Paris |
75008 |
MR. JOHN DOE |
30 RUE DE MOSCOU |
APT 45 |
75008 PARIS |
7.16.11. Standardize French postal addresses (S42)
Standardize French postal addresses as per regulation S42, which organizes French postal addresses into 10 fields:
Given name.
Surname.
Street No.
Street Name.
Street type.
Floor.
Town.
Region.
Postcode.
Country.
The transformation will apply to multiple fields.
The transformation will use the active filter(s).
Note
Practical example : Standardize French postal addresses (S42)
Before Transformation:
First name |
Name |
Address |
Country |
|---|---|---|---|
Damien |
Desclozeaux |
30 RUE D ALSACE 92110 CLICHY |
France |
Transformation Configuration:
Firstname Column: Firstname
Lastname Column: Lastname
Postal Address Columns: Address
Country Column: Country
After Transformation:
First name |
Name |
Address |
Country |
s42_givenName |
s42_surname |
s42_streetNo |
s42_streetName |
s42_streetType |
s42_floor |
s42_town |
s42_region |
s42_postcode |
s42_country |
|---|---|---|---|---|---|---|---|---|---|---|---|---|---|
Damien |
Desclozeaux |
30 RUE D ALSACE 92110 CLICHY |
France |
Damien |
DESCLOZEAUX |
30 |
d’Alsace |
Rue |
Clichy |
92110 |
France |
7.17. Phone number transformations
7.17.1. Extract Country from International Phone Number
Extract the country from the international telephone numbers in the selected field and enter them in a new field.
Requirements:
A field with an international telephone number nature.
Only valid international telephone numbers can be used.
Outgoing format for countries:
2-letter country code: ISO 3166-1 alpha-2.
3-letter country code: ISO 3166-1 alpha-3.
Country name (localized).
Visual example:
Format |
Language |
Telephone number (incoming) |
Country (outgoing) |
|---|---|---|---|
2-letter country code |
N/A |
+33 1 02 03 04 05 |
FR |
3-letter code |
N/A |
+32 2 333 44 55 |
BEL |
Country name |
English |
+41 22 333 44 55 |
Switzerland |
For further information :
International format (E.123) in Wikipedia.
ISO 3166-1 alpha-2 in Wikipedia.
ISO 3166-1 alpha-3 in Wikipedia.
The transformation will apply to just one field.
The transformation will use the active filter(s).
Note
Practical example : Extract Country from International Phone Number
Before Transformation:
ID |
Phone Number |
|---|---|
1 |
+1 408-555-1234 |
2 |
+44 20 7946 0958 |
3 |
+91 22 2888 8888 |
Transformation Configuration:
Target Column: Phone Number
Country Format: COUNTRY NAME
Output language: English
After Transformation:
ID |
Phone Number |
Country |
|---|---|---|
1 |
+1 408-555-1234 |
United States |
2 |
+44 20 7946 0958 |
United Kingdom |
3 |
+91 22 2888 8888 |
India |
In this example, the transformation takes the international phone numbers from the ‘Phone Number’ column, identifies the country code, and converts these into the full country names based on the specified locale (‘English’). The result is a new column ‘Country’ added to the dataset with the name of the country corresponding to each phone number.
7.17.2. Shape Phone Numbers
Format telephone numbers to a pattern:
International format: +33 9 67 13 07 93.
National format: 0967130793.
E.164 format: +33967130793.
The transformation will apply to one or more fields.
The transformation will use the active filter(s).
Note
Practical example : Shape Phone Numbers
Before Transformation:
ID |
Name |
Phone Number |
|---|---|---|
1 |
John Doe |
+1 650-555-1234 |
2 |
Jane Smith |
00442079460758 |
3 |
Alice Brown |
|
Transformation Configuration:
Target Column: Phone Number
Phone Number Format: INTERNATIONAL
Region: English (US). Since this is just an indication, the british phone number of Jane Smith will be properly formatted.
After Transformation:
ID |
Name |
Phone Number |
|---|---|---|
1 |
John Doe |
+1 650-555-1234 |
2 |
Jane Smith |
+44 20 7946 0758 |
3 |
Alice Brown |
+1 650-555-2345 |
7.17.3. Correct Phone Numbers to International
Within a field containing telephone numbers, adjust those numbers to become international numbers by using a field containing country codes (ISO 3166-1 alpha-2), country codes (ISO 3166-1 alpha-3) or countries. Telephone numbers will be adjusted in a new field.
Requirements:
A field with an international telephone number nature.
A field with country code (ISO 3166-1 alpha-2, alpha-3) or country name nature.
Visual example:
33 (010) 203-0405 with country code FR and international outgoing format will become +33 1 02 03 04 05 when adjusted.
0102030405 with country code FR and international outgoing format will become +33 1 02 03 04 05 when adjusted.
+33 (010) 203-0405 with country code FR and E.164 outgoing format will become +33 1 02 03 04 05 when adjusted
Possible values for the diagnostic column:
VALID: correction OK.
INVALID_FOR_REGION: telephone number not valid for country code.
INVALID_COUNTRY_CODE: invalid country code.
INVALID_INPUT: not a telephone number.
For further information :
International format (E.123) in Wikipedia.
E.164 format in Wikipedia.
ISO 3166-1 alpha-2 in Wikipedia.
ISO 3166-1 alpha-3 in Wikipedia.
The transformation will apply to two fields.
The transformation will use the active filter(s).
Note
Practical example : Correct Phone Numbers to International
Before Transformation:
Phone Number |
CountryCode |
|---|---|
+33 1 40 90 38 00 |
FR |
+41134235000 |
CH |
Transformation Configuration:
Target Column for Phone Numbers: ‘Phone Number’
Country Column: ‘Country Code’
Default Country: ‘Switzerland’
Include Diagnostic Column: Yes
After Transformation:
Phone Number |
CountryCode |
Phone Number.fixed_international |
Phone Number.fixed_international_diagnostic |
|---|---|---|---|
+33 1 40 90 38 00 |
FR |
+33 1 40 90 38 00 |
VALID |
+41134235000 |
CH |
INVALID_FOR_REGION |
The example above shows, on the first line, that the French number was valid but incorrectly formatted. It has been reformatted and the new status is ‘VALID’. On the second line, the number provided is not a valid telephone number for Switzerland. No correction is therefore possible (the column Phone Number.fixed_international stays empty, and the diagnosis is ‘INVALID_FOR_REGION’).
7.18. Email address transformations
7.18.1. Split Email address
Extract from an e-mail address: the domain part (contact@taleofdata.com, contact@gmail.com, etc.), the local part (contact@taleofdata.com, contact@gmail.com, etc.) or the domain and local parts from e-mails in the selected field and enter them in one or more new fields.
The transformation will apply to just one field.
The transformation will use the active filter(s).
Note
Practical example : Split Email address
Before Transformation:
ID |
|
|---|---|
1 |
|
2 |
Transformation Configuration:
Email Column: ‘Email’
Parts to extract:
local and domain partsDomain Part Column: ‘Domain’
Extract only from valid e-mails:
true
After Transformation:
ID |
Email.local |
Email.domain |
|
|---|---|---|---|
1 |
john.doe |
example.com |
|
2 |
jane.smith |
abc.com |
This transformation allows users to effectively split email addresses into their basic components, facilitating easier data management and analysis based on individual parts of the email addresses.
7.18.2. Shape Emails
Format the e-mails (standardize spaces, delete accents, make characters lower case) in the selected field.
The transformation will apply to just one field.
The transformation will use the active filter(s).
Note
Practical example : Shape Emails
Before Transformation:
ID |
|
|---|---|
1 |
|
2 |
|
3 |
Transformation Configuration:
Target Column: Email
After Transformation:
ID |
|
|---|---|
1 |
|
2 |
|
3 |
7.18.3. Check E-mail consistency
Check for faults in e-mail addresses against fields containing the first names and surnames.
Requirements:
A field containing the e-mail addresses to be checked.
A field containing the relevant first names.
A field containing the relevant surnames.
Visual example:
surname |
first name |
email_consistency |
|
|---|---|---|---|
first name.surname@domain.com |
Name |
First name |
OK |
fist namefist name.surname@domain.com |
Name |
First name |
FIRST_NAME_MISSPELLED |
first name-surnam@domain.com |
Surname |
First name |
LAST_NAME_MISSPELLED |
The transformation will apply to three fields.
The transformation will use the active filter(s).
Note
Practical example : Check E-mail consistency
Before Transformation:
First name |
Country name. |
|
|---|---|---|
John |
Doe |
|
Jane |
Smith |
Transformation Configuration:
Target Email Column: Email
First Name Column: First Name
Last Name Column: Last Name
Email Consistency Column: Email Status
Email Pattern Column: Email Pattern
Email Corrected Column: Corrected Email
After Transformation:
First name |
Country name. |
Email.email_consistency |
Email.email_pattern |
Email.email_corrected |
|
|---|---|---|---|---|---|
John |
Doe |
OK |
FIRSTNAME__SEPARATOR |
||
Jane |
Smith |
FIRST_NAME_MISSPELLED |
FIRSTNAME__SEPARATOR |
In this example, the transformation checks each email for consistency with the associated first and last names. The first email is found to be valid and matches a standard pattern. The second email is flagged as invalid (FIRST_NAME_MISSPELLED) because the spelling of the first name in the email does not match the spelling of the first name in the First Name column.