5.4. Line-by-line AI: The “Generative AI” node for Flows
Line-by-line AI means applying the power of generative AI to each line of a dataset. Here is an example video of this functionnality:
Line-by-line AI: The “Generative AI” node for Flows
The “Generative AI” node allows querying a generative AI for each line of a dataset and adds one or more cells to each line — that is, one or more new columns — containing the responses produced by the AI.
5.4.1. General overview
5.4.1.1. What’s new with this node
In a nutshell:
Generative AI in the preparation node is used only during the design phase of a flow, to produce a script. Upon execution, it is this script that is invoked and not the generative AI.
This is token-efficient and fast, but this feature is only usable if the transformation to be performed can be implemented by a script of a few lines. The Generative AI node, on the other hand, allows implementing transformations that require an invocation of the generative AI for each line.
5.4.1.2. How generative AI in the preparation node works (reminder)
In a preparation node, generative AI is invoked only once to generate a script; this script is then applied to all lines.
Example: from the instruction “check that the REF column contains only numbers and letters”, the AI generates a script testing a regular expression on the column.
When executing the flow, generative AI is never called: only the generated script is executed.
5.4.1.3. How the new “Generative AI” node works
It is a processor that allows calling a generative AI for each line of the dataset, when the flow is executed.
Example: “Determine whether the message in the MSG column is URGENT, IMPORTANT BUT NOT URGENT, or NEUTRAL”.
The node is multi-provider (Anthropic, OpenAI, Mistral, local AI…) and multi-model (Opus, Sonnet, Qwen, Gemma, Llama…).
Note
Thanks to this capability, Tale of Data can help process unstructured and semi-structured data.
5.4.2. Line-by-line AI use cases
The “Generative AI” node covers a wide variety of needs. The most frequent use cases are presented below.
5.4.2.1. Extraction of structured data from unstructured text
From a free-text field, the AI extracts structured information into new columns. Example: from a real estate ad written in natural language (Description column), the AI fills in the number of rooms, the total area, and an associated confidence score.
5.4.2.2. Classification
The AI classifies each row into a category from a list of allowed values. Example: classify each message (Message column) according to an alert level: URGENT, IMPORTANT BUT NOT URGENT, or NEUTRAL.
5.4.2.3. Other examples
Detection of inconsistencies on the row (without knowing a priori what is being searched for).
Classification into an ontology provided by the user.
Generation of unstructured text from the structured data of a row (e.g., generating a sensor description from its characteristics).
Translation into another language, spelling corrections.
And many others depending on your needs.
5.4.3. Add and configure the node in a flow
5.4.3.1. Picking the node from the toolbar
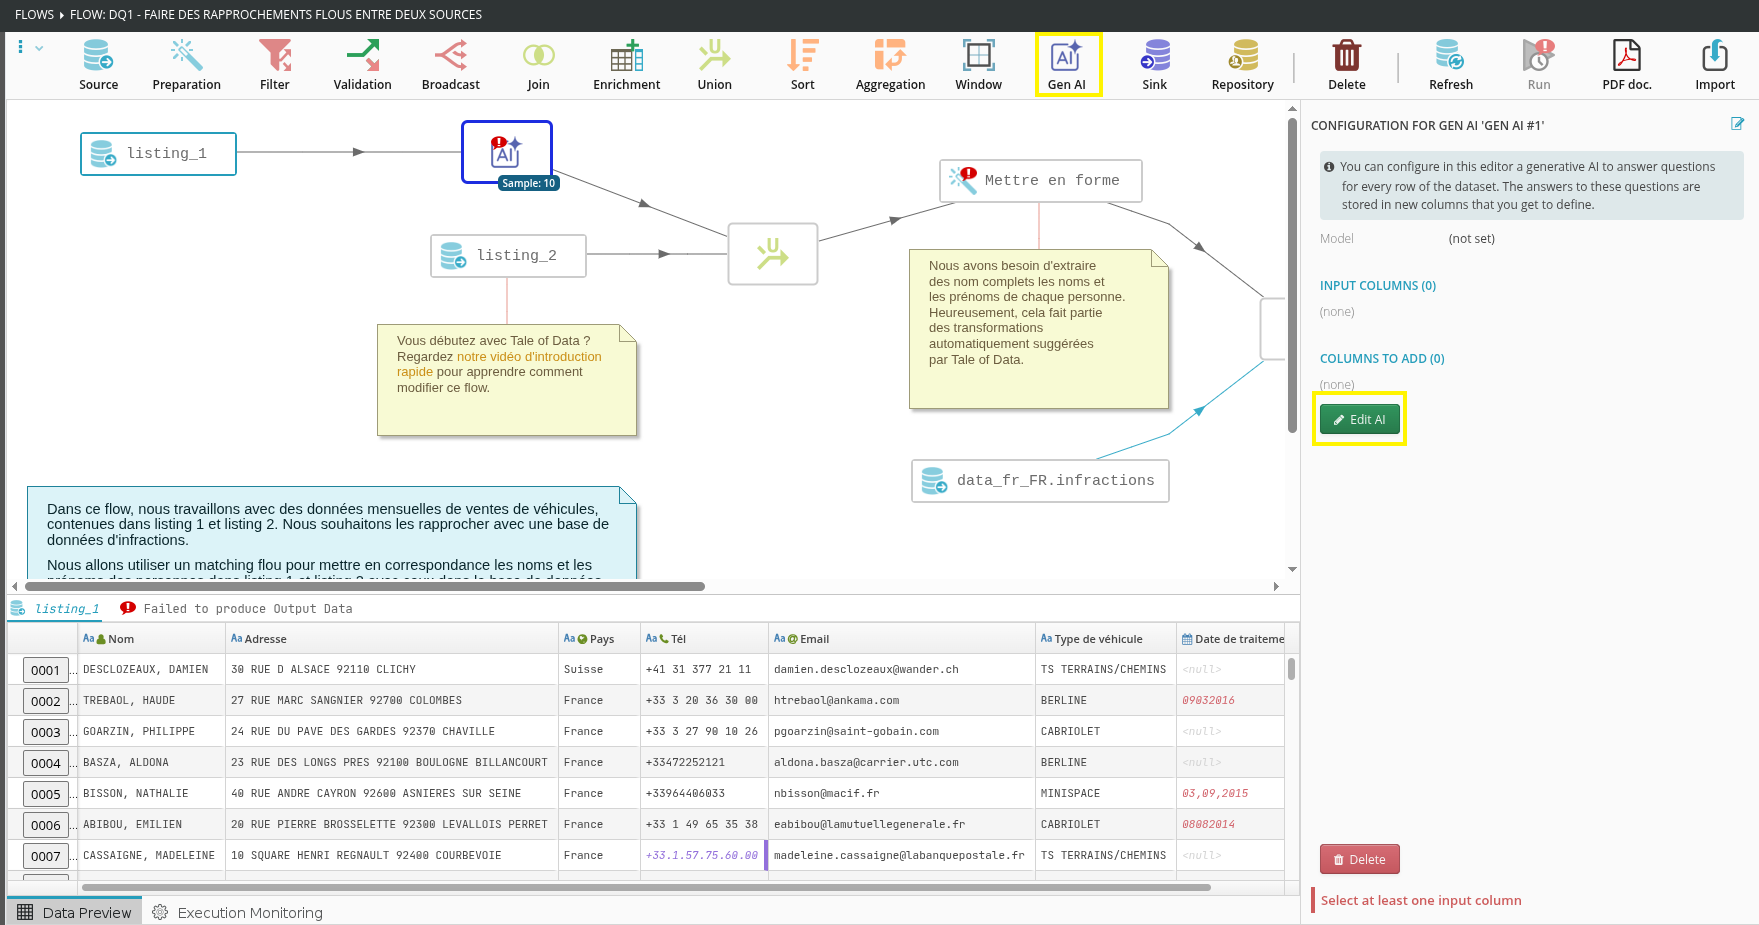
The “Generative AI” node (labeled Gen AI) is available in the flow designer toolbar, alongside other node types (Source, Preparation, Filter, Validation, etc.). Simply add it to the flow and connect it to the data source to be enriched.
5.4.3.2. Open the configuration editor
Once a “Generative AI” node is selected in the flow, the “Edit AI” button appears in the right pane of the flow designer. Clicking this button opens the node’s configuration editor.
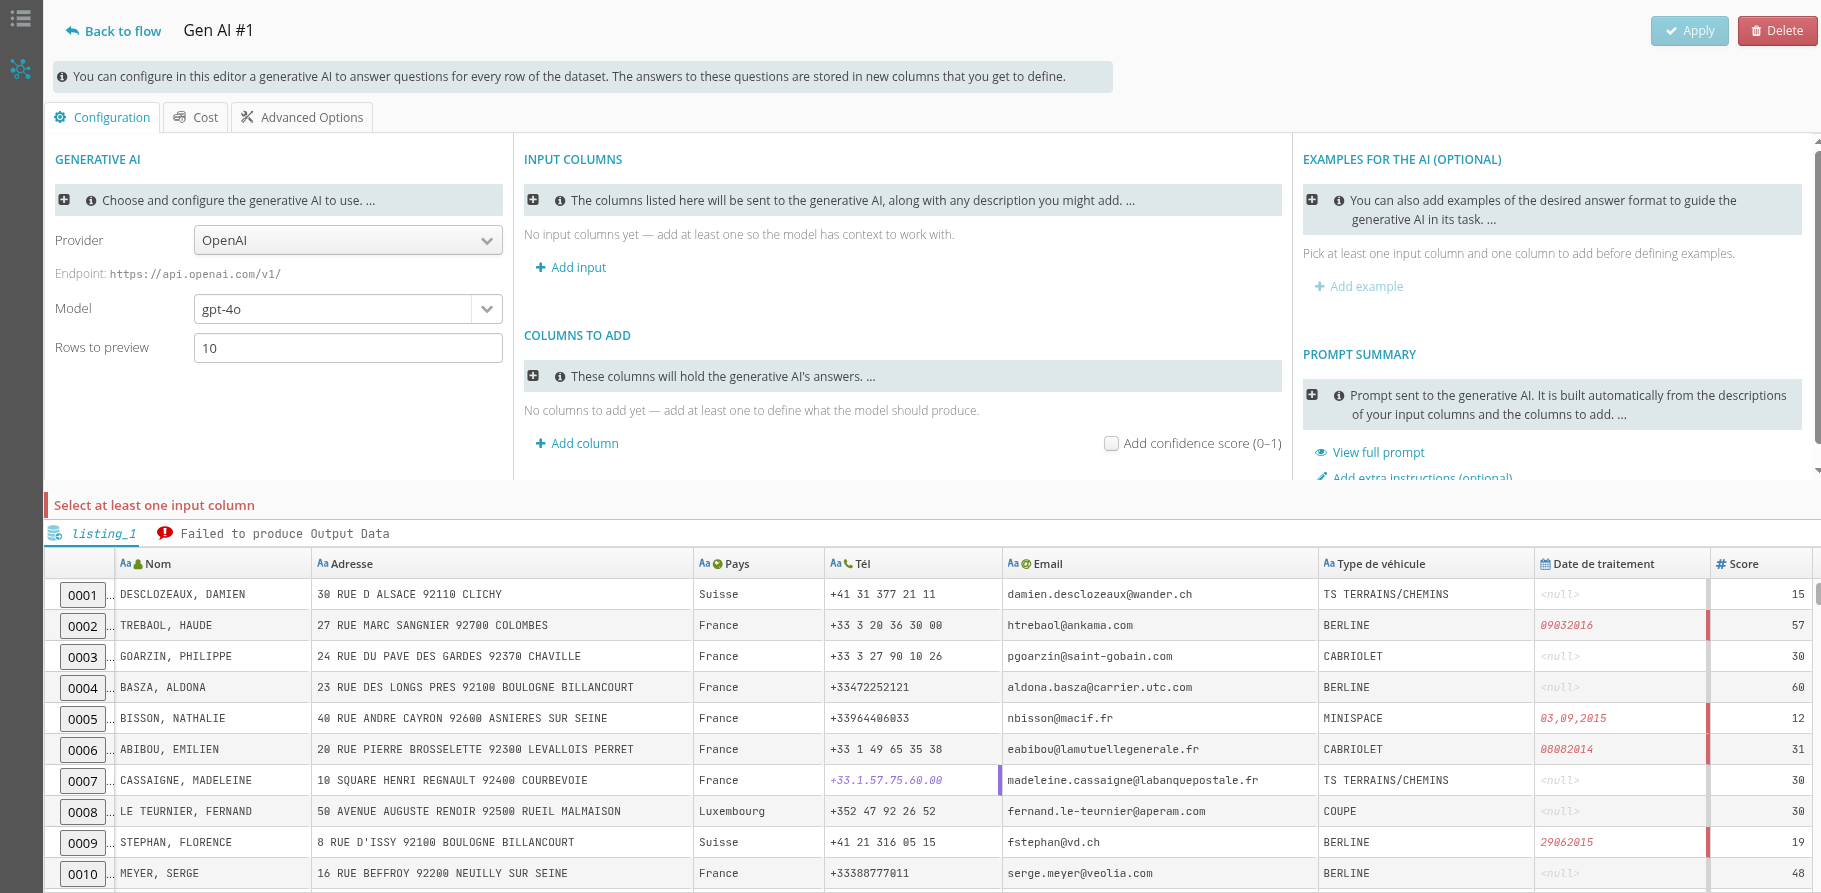
The editor consists of three tabs: Configuration, Cost, and Advanced Options. The “Apply” and “Delete” buttons (top right) allow saving the node configuration or deleting it, respectively, and the “Back to flow” link brings you back to the general flow view.
5.4.4. “Configuration” tab
The Configuration tab is the main screen of the node. It allows configuring the AI to use, the columns to send to the AI, the columns to produce, as well as optional examples to guide the AI. The screen is organized into several areas described below.
5.4.4.1. “Generative AI” area
This area allows selecting and configuring the generative AI used. A usage tip is recalled here: adjust the number of previewed rows according to your needs and avoid previewing too many, in order to maintain good responsiveness and minimal token consumption.
Field |
Description |
|---|---|
Provider |
Generative AI provider to use (e.g., OpenRouter, Anthropic, OpenAI, Mistral, or a local AI). |
Endpoint |
Endpoint URL of the selected provider’s API. It is automatically filled in based on the provider. |
Model |
Language model used to respond (e.g., google/gemma-4-31b-it). The choice depends on the selected provider. |
Rows to preview |
Number of rows computed in the editor preview (default value: 10). A reduced preview preserves responsiveness and limits token consumption during configuration. |
5.4.4.2. “Input columns” area
The columns listed here are sent to the generative AI, accompanied by the description you can associate with them. Other columns in the dataset are ignored. At least one input column must be added so that the model has a context to use.
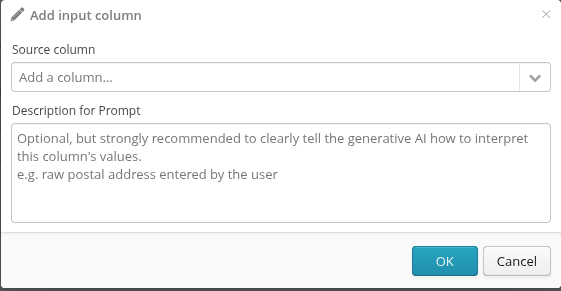
The “Add input” button opens a dialog window allowing you to select the source column and associate a description with it.
5.4.4.2.1. Fields of the “Add an input column” window
Field |
Description |
|---|---|
Source column |
Dropdown list allowing you to select, from the dataset columns, the one to send to the AI. |
Description for the prompt |
Optional but highly recommended field: it clearly indicates to the AI how to interpret the values of this column (e.g., “postal address entered by the user”). |
The “Confirm” and “Cancel” buttons confirm or discard the addition of the input column.
5.4.4.3. “Columns to add” area
These columns will contain the responses from the generative AI. For each of them, the AI responds line by line based on the column name, its description, its type, as well as the optional constraints provided. At least one column to add must be defined to specify what the model should produce.
Warning
The description may be left blank, provided that the column name is explicit enough for the AI to understand how to respond.
The “Add a column” button opens the “New column to add” window. A checkbox “Add confidence score (0–1)” also allows having the AI produce a confidence score associated with its responses (value between 0 and 1).
5.4.4.3.1. Common fields of the “New column to add” window
Field |
Description |
|---|---|
Name (required) |
Name of the new column. This field is required; in its absence, the message “The name of a column to add is required” is displayed and validation is blocked. |
Description for the prompt |
Optional but highly recommended field: it clearly indicates to the AI the expected response format (e.g., “2-letter country code”). |
Type |
Dropdown list determining the type of the output column. The choice of type conditions the constraints offered below (see §4.3.2). |
Constraints |
Set of fields that varies depending on the selected type (see §4.3.2). Constraints refine and secure the AI response. |
5.4.4.3.2. Available types and associated constraints
Type |
Available constraints |
Description |
|---|---|---|
Text |
Min length / Max length / Regular expression |
Frames a text response: minimum and maximum length, and optionally a regular expression that the response must match. |
Integer |
(N/A) |
Response in the form of an integer. |
Decimal |
(N/A) |
Response in the form of a decimal number. |
Boolean |
(N/A) |
Two-value response (true / false). |
Enumeration |
Allowed values (one per line) |
Response restricted to a finite list of possible values, entered one per line (e.g., Positive, Neutral, Negative). |
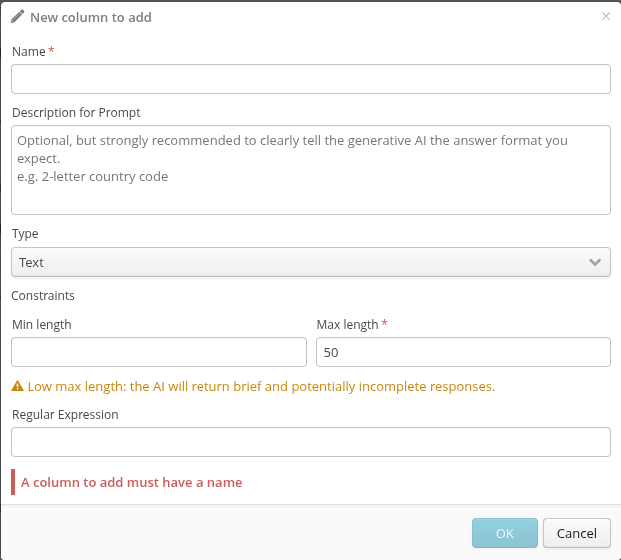
5.4.4.3.3. “Text” type
When the “Text” type is selected, the following constraints are offered:
Field |
Description |
|---|---|
Min length |
Minimum number of characters expected for the response (optional). |
Max length (required) |
Maximum number of characters for the response. A value that is too low triggers the warning “Short max length: the AI will return brief and potentially incomplete responses”. |
Regular expression |
Optional regular expression that the produced response must match. |
5.4.4.3.4. “Integer” type
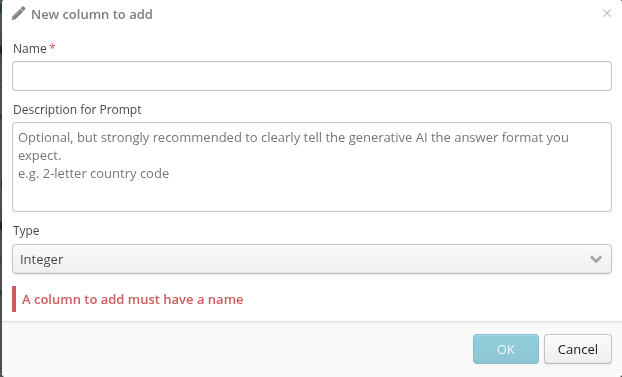
When the “Integer” type is selected, the following constraints are offered:
Warning
We are removing today the constraints that do not make sense for integers and decimals, so the table below is now obsolete (a new screenshot will therefore need to be taken to replace capture_2_3.png).
Field |
Description |
|---|---|
Min |
Minimum integer value allowed for the response (optional). |
Max |
Maximum integer value allowed for the response (optional). |
5.4.4.3.5. “Enumeration” type
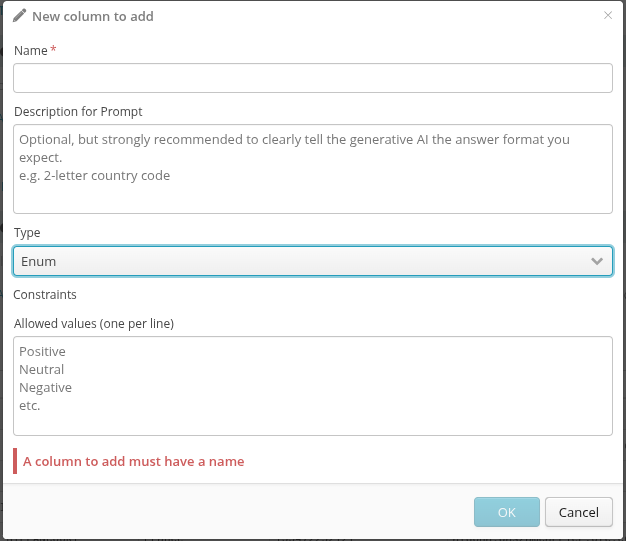
The Enumeration type allows specifying a finite list of possible values that the AI must follow. It is particularly suitable for classification use cases.
Field |
Description |
|---|---|
Allowed values (one per line) |
List of possible values, entered one per line (e.g., Positive, Neutral, Negative). The AI’s response will mandatorily be one of these values. |
5.4.4.4. “Examples for the AI” area (optional)
You can provide examples of the desired response format to guide the AI in its task. For example, if the goal is to extract a country name in a specific format from a postal address, you can give “United Kingdom (UK)” as an example: the AI will then replicate this format in its responses. 2 to 3 examples are usually sufficient.
The “Add an example” button allows you to define an example. You must first have selected at least one input column and one column to add before you can define examples.
5.4.4.5. “Prompt summary” area
This area displays the prompt sent to the generative AI. This prompt is automatically constructed from the descriptions of the input columns and the columns to add.
The “View full prompt” link displays the full generated prompt.
The “Add instructions (optional)” link allows adding additional instructions to refine the tone, constraints, or framing of the task.
5.4.5. “Cost” tab
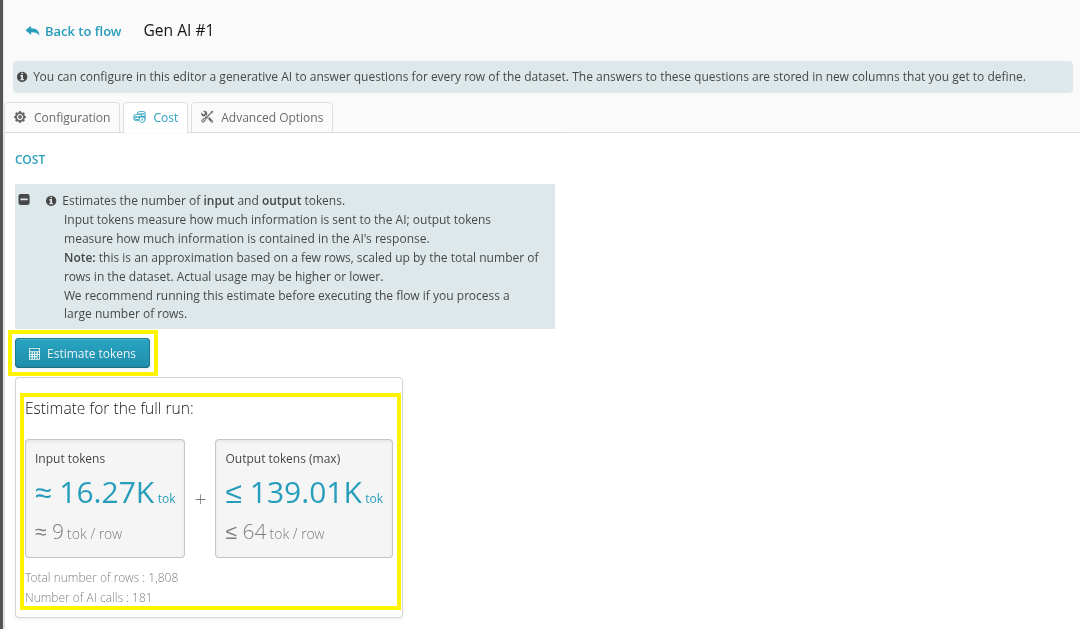
The Cost tab allows estimating the number of input and output tokens for a full flow execution, before actually launching the processing.
Note
Input tokens measure the amount of information sent to the AI; output tokens measure the amount of information contained in the response.
Warning
This is an approximation based on a few rows, multiplied by the total number of rows in the dataset. Actual consumption may be higher or lower. It is advisable to run this estimate before executing the flow if you are processing a large number of rows.
Clicking the “Estimate tokens” button triggers the calculation and displays the “Estimate for full execution” block, which shows:
estimated input tokens (total and per row);
estimated output tokens (max) (total and per row);
the total number of rows in the dataset and the number of AI calls.
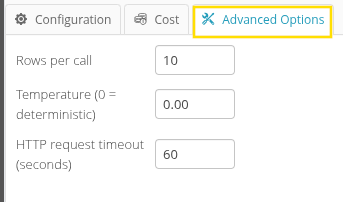
5.4.6. “Advanced options” tab
Option |
Default value |
Description |
|---|---|---|
Rows per call |
10 |
Number of rows from the dataset sent to the generative AI in a single HTTP call. Warning: the more rows sent in a single call, the higher the risk of reaching the LLM’s context window size limit. |
Temperature |
0.00 |
Classic LLM temperature parameter: 0 corresponds to a repetitive and deterministic response, 1 to maximum response variability for the same question. |
HTTP timeout (seconds) |
60 |
Maximum waiting time (time-out) when sending an HTTP request to the LLM. If Tale of Data waits for the response longer than this value, an error is raised and the flow fails. |
5.4.7. Typical sequence of use
To configure and use a “Generative AI” node, the recommended sequence is as follows:
Add the “Generative AI” node (Gen AI) into the flow and connect it to the data source to be enriched.
Select the node, then click on “Edit AI” to open the editor.
In the Configuration tab, choose the provider and the model.
Add the input columns to send to the AI, along with a description for the prompt.
Add the columns to produce (name, description, type, and constraints), and optionally enable the confidence score.
Optional: add 2 to 3 examples and/or additional instructions to guide the AI.
Optional: in the Cost tab, estimate token consumption before execution.
Optional: in the Advanced options tab, adjust rows per call, temperature, and HTTP timeout.
Click on “Apply” to save the node configuration, then continue designing the flow.